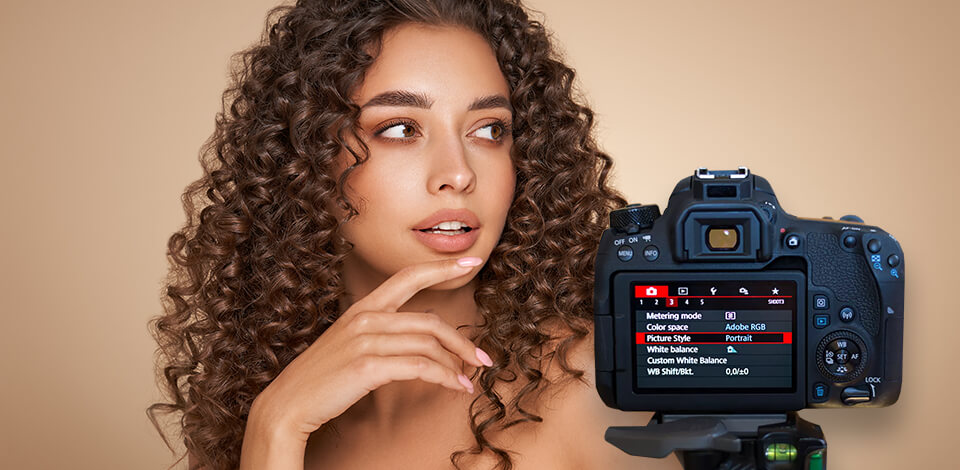
Want to switch from Auto to Manual Mode when shooting portraits, but unsure what camera settings for portraits to use? Even complete beginners can take beautiful portraits if he knows the right settings. In this guide, you will explain to you how to set up a camera to take great pictures in different weather and shooting conditions.


Use this cheat sheet to remind yourself the key principles of good exposure for portrait photography and how they influence on the final picture you get. These are universal camera settings that can be used on various camera for portraits, so you should make little changes according to your light, number of models, and destination.

Outdoor portrait photography may cause certain problems with lighting and shadows. You won’t find better conditions for shooting backlit portraits outside than the bright sun. These are recommended camera settings for outdoor portraits in sunny weather:
ISO: The maximum picture quality is a must for portraits. Typically, in natural light, the lowest ISO is preferable, which is ISO 100 on the majority of Nikon and Canon cameras for portraits. Choosing between ISO 100 and 400 is a golden middle.
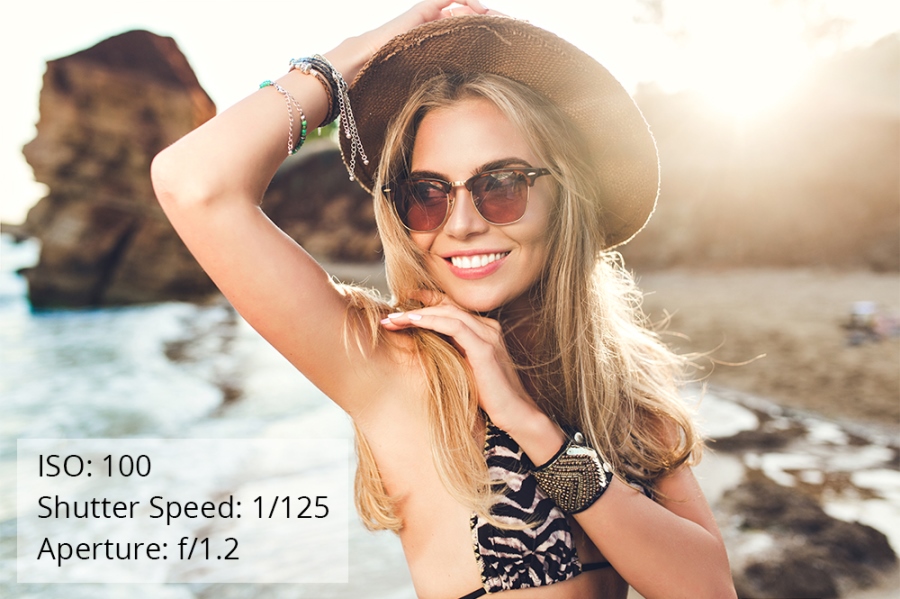
Taken by Canon EOS 5D Mark IV + Canon EF 50mm f/1.2 L
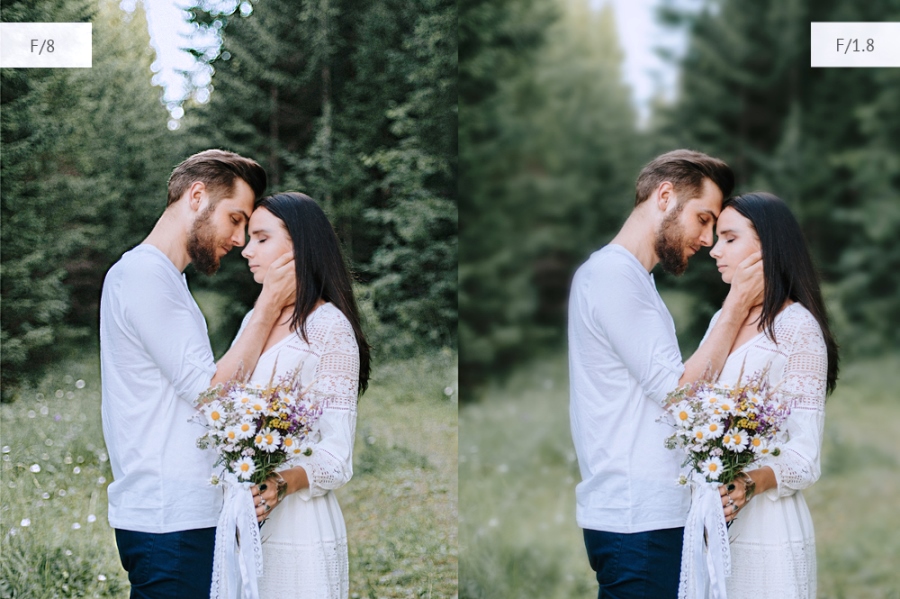
Aperture: The lower the f-stop is, the shallower the depth of field is. Consequently, the higher the f-stop, the deeper the depth of field, and the smaller the aperture will be. Aperture portraits should be set to wide, for instance, f/1.2-f/4 for a blurred background.
In case you need to achieve a more focused background or a sharper shot, set the aperture 2-3 stops higher than the lowest aperture. It will be the sharpest point of the lens. For instance, at around f/5.6 to f/8, an f/2.8 lens will be at its sharpest point.
Read more about recommended camera settings for portraits taken in different lights and conditions in Portraits: Making the Shot book by Gina Milicia. Check out diverse portrait samples with various camera settings to understand the difference.
Shutter Speed: Now it is time to take advantage of the camera’s meter and regulate the shutter speed. Your goal is to achieve a center reading. After that, you have to take a test picture and examine the histogram and LCD screen.
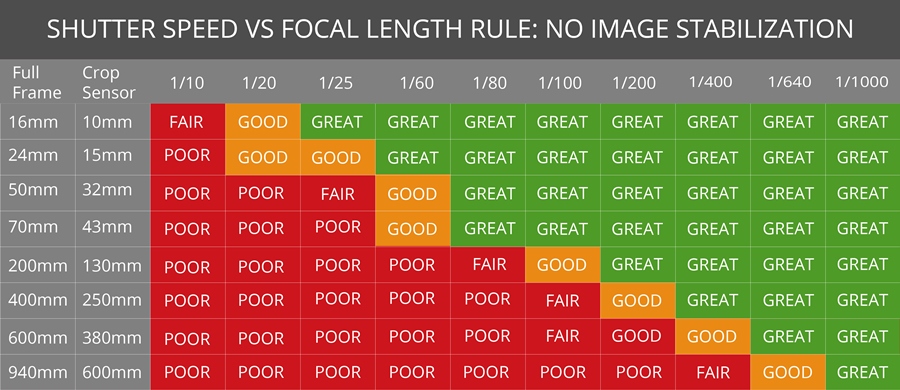
Shutter speed is set approximately two times the lens’ focal length. If you shoot with a 24mm prime lens, you set the lowest shutter speed of 1/60th to prevent camera shaking and picture blurring. However, it isn’t the best shutter speed for portraits in all situations.
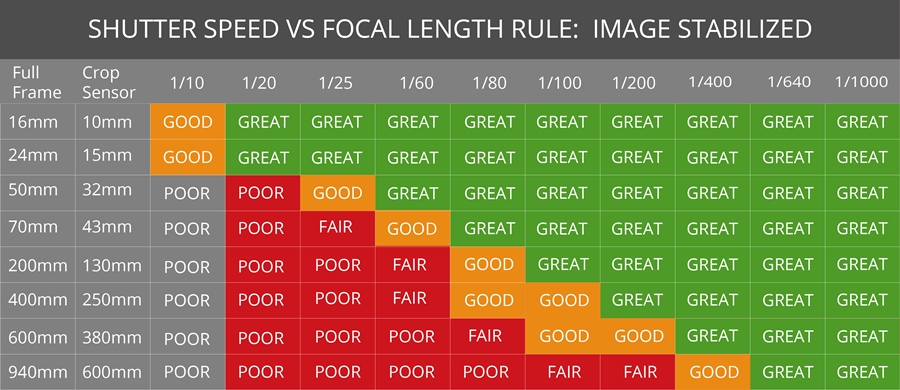
In case your mirrorless camera or a lens features built-in stabilization or you shoot with a tripod produced by a popular tripod brand, setting lower shutter speeds is advisable. By choosing the aperture priority mode, your aperture will be set automatically.
White balance is suggested to be set to 5200-6000 Kelvin or “Sunny”. Remember, that poses are no less important aspect for portrait photographers. If you aspire to get flawless portraiture, make sure to research portrait photography poses.

Gloomy weather is more challenging for portrait photography ideas, but with these tips you’ll easily get amazing result.
ISO should be set from 100 and higher. Since it isn’t bright outside, the sensitivity of the camera must be increased. Keep in mind not to overdo, as some cameras set to ISO 800 may produce unnecessary noise. Still, the amount of grain depends on the camera model you have. At ISO 800, some cameras generate clear shots, other – rather grainy ones.
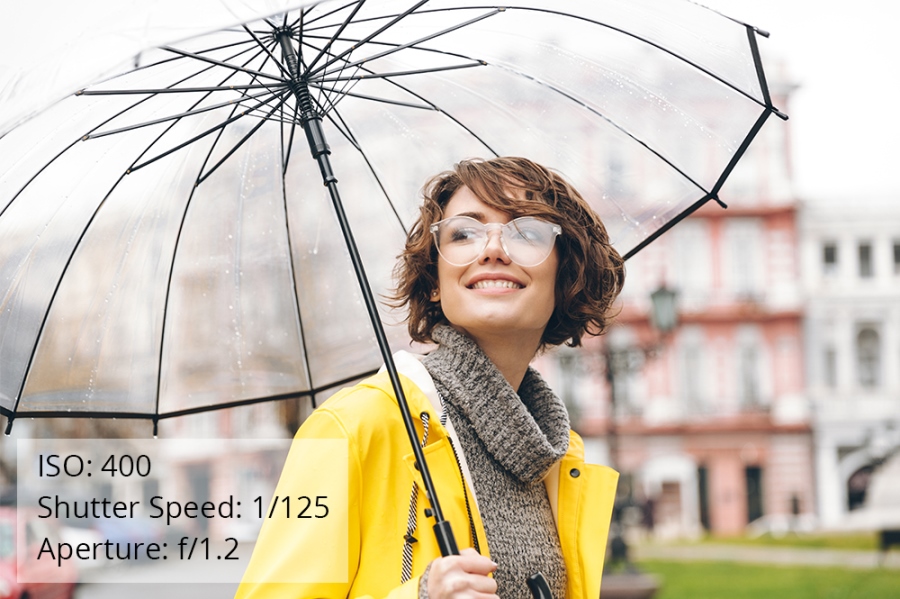
If you’re going to take portraits in gloomy, snowy, or even rainy weather, I recommend you use a waterproof camera to avoid lags or buying a camera bag that will keep your camera body and lens safe.
The Aperture (f) has to be set wide open. Of course, it doesn’t mean setting it to the highest point. The same as in photographing outside in sunny weather, you need to be aware of your composition. Therefore, stick to the widest aperture for shallow depth of field and the smallest one for the background to be in focus.
Shutter speed shouldn’t exceed the 1/200 or 1/400 values, because you may see insufficient light. In case you select aperture priority mode, this parameter is adjusted automatically. Bear in mind that values slower than 1/60s, such as 1/15 or 1/30 might ruin your bridal portraits. If you don’t use a tripod, the shots will turn out blurry.
The white balance is set from 6000 Kelvin, “Shade” or “Cloudy”. You can use white balance card to make it easier for you to figure out the right white balance value.
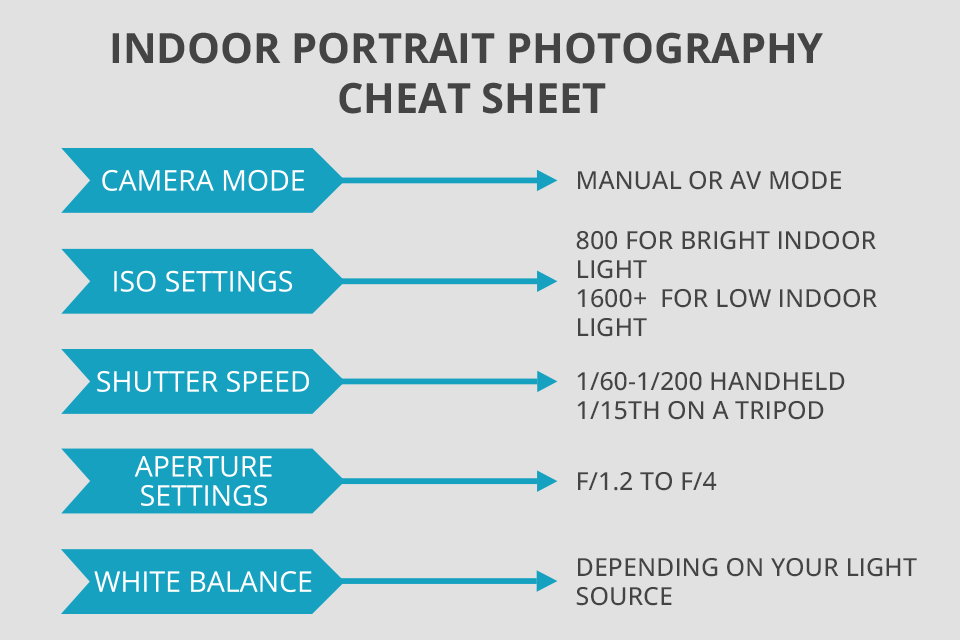
In case you are wondering how to take studio portraits or fine art portrait photography, the settings resemble the ones for outside shooting in cloudy weather. Still, indoor photography has its nuances when it comes to camera adjustments.
Taken by Sony A7R III + Rokinon RK50M-E 50mm F1.2
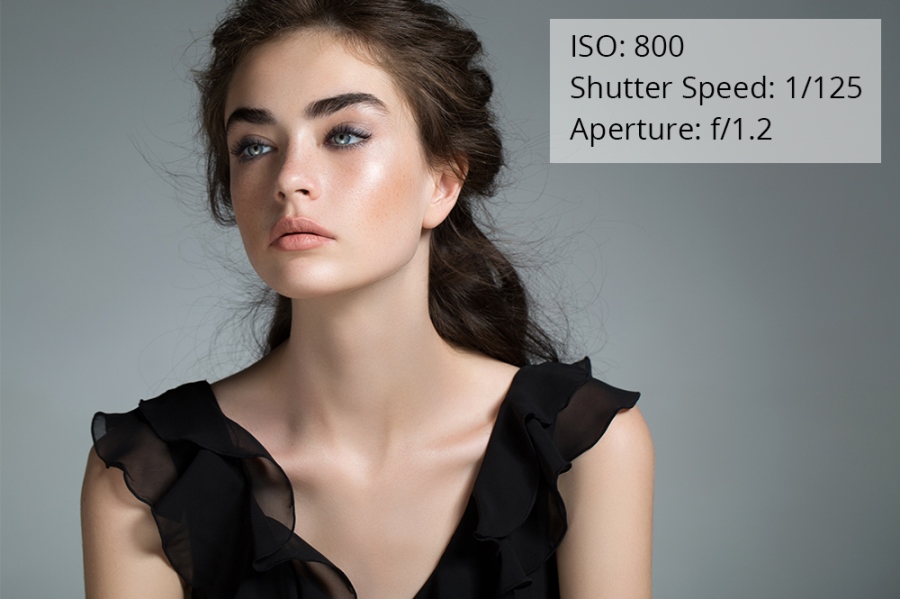
Aperture should be 1.2 or the widest available for the lens. Don’t forget that the wider the aperture, the more light can pass through the lens. Pay attention to this parameter, as indoor lighting isn’t limited.
ISO: Photographing at f/1.2 will probably result in a shutter speed being slightly too slow for shooting with hands and prevent a camera from shaking. Cope with this by regulating shutter speed and pre-setting a raised sensitivity of approximately ISO 800. For low light, the best ISO for portraits is 1600+ and 800 for bright studio light without a flash. View more at the Lighting Portraits on Location course by Scott Kelby.
Shutter Speed: Select 1/15th for tripod shooting and 1/60-1/200 for stable pictures taken with hands. To capture fast-moving subjects (e.g. a person who is running, jumping, or dancing), use a shutter speed around 1/1000th of a second or beyond.
White balance settings: “Fluorescent” mode is used to achieve warm and bright images when you can compensate for fluorescent lighting and cool tones. “Tungsten” mode is used for tungsten bulb lighting. This setting contributes to the accent on cool colors in the shots.
“Flash” mode is used when the lighting is unsatisfactory. With this mode, the camera selects the correct white balance in low light environment. Auto mode will assist in auto-regulation of the white balance automatically in accordance with the type of lighting sources and their number.

When you face the task of shooting a great number of people at the same time, remember that it is full of challenges. You should watch everyone in front of the camera carefully, have creative group photo ideas in your mind, make sure that they are motionless and in focus. Being aware of the camera settings for large group photos definitely gives you an advantage during the shooting process.

Taken by Canon EOS REBEL T7i + Canon EF 35mm f/2
ISO: Such low values as 100-400 are highly recommended. If your camera sensor is quite large, you can increase your ISO without the risk of getting noise. But it's better to be attentive. For faster shutter speed, the value should be raised.
Aperture plays a key role in wedding portraits. The best aperture for group portraits, so that every person is in focus and an image is sharp is f/5.6 or f/8. Taking into account the positioning of people, they shouldn’t be located very far from each other.
Ask the models to gather as close as possible and photograph at f/5.6 to get sharp and well-focused shots. Besides, don’t go overboard with closing the diaphragm and raising values higher than f/11. If the set aperture is quite small, in combination with most lenses, it will cause the loss of quality and accuracy of group portraits.

Use this helpful table to figure out what aperture to set, depending on how many people you have in the frame.
Shutter speed. When photographing children or groups of people, use a fast shutter speed. Start at 1/125th or faster, and then tweak this setting along the way. If you notice that your images become blurry, you should increase shutter speed. In this case, it is also necessary to adjust an aperture or choose a higher ISO.
White Balance: For outdoors photo sessions, set the white balance to "Shadow", "Daylight" or "overcast" conforming to the weather. As for camera settings for group photos indoors, take advantage of the white balance settings for fluorescent or incandescent photography light bulbs, in accordance with the chosen lighting source.
Bringing your portraiture to the next level is a pretty troublesome process, but, thankfully, I have prepared effective portrait photo tips and techniques you may use to make your photos pop and achieve amazing results with Photoshop portrait tutorials.
Even though modern digital cameras boast of RAW file format compatibility, plenty of rookie photographers keep on shooting in JPEG. Actually, the RAW format is more beneficial for photoshopping portraits. It ensures top-grade picture quality along with dynamic range expansion in dark and light image parts.
With the RAW file, you can fix any errors in camera settings for portraits, particularly, white balance and exposure. But if you took pictures in JPEG, you wouldn't have an opportunity to edit anything and would end up deleting these files.

Aperture Priority is probably the most widespread portraiture mode. It enables a shooter to choose the aperture (f-number value), while the photography camera regulates the shutter speed.
With this mode, you fully manage the depth of field along with background blur to emphasize the subject. As an alternative, you may choose manual camera settings, which provide complete shutter speed and aperture regulation. I suggest mastering Aperture Priority mode at first. Then you can try to photograph in Manual mode adjusting portrait DSLR settings on your own.

One of the most essential tips for good portrait photos is not to allow the camera to pick where to focus itself. It will apparently fail. Instead, set the focus by yourself on a single point, for instance, the model's eyes. In case the eyes aren't located on the same distance to the camera, focus on the eye closest to the device. When it comes to focus adjustments, prefer Single one (AF-S) to Continuous Shot (Servo or AF-C).
Don’t mix up the tracking focus for moving objects with the autofocus for static objects, you need the latter one. Once you are dealing with models, who constantly move, like children, set Continuous AF mode and select numerous focus points. By combining numerous focus points and Continuous AF mode, you are more likely to get a sharp shot.

Successful portrait photos require spot metering. It enables you to check whether the particular area is exposed correctly. Spot metering processes the light in the center spot of a shot and estimates the exposure. Unless you shoot with a camera flash, the model's face will be at that point.
In the case of flash usage, exposing for the background is a must. As a result, the person’s face would be illuminated by the flash. Check twice that you don't have Aperture Priority mode switched on. You will have to perform manual adjustments of shutter speed and exposure values, as you have already resorted to spot metering and new exposure values were indicated.

It often happens that you need to increase the brightness of a person's face because of insufficient lighting or skin turning out darker than necessary in an image. Another variant is when the snow appears not as white and bright in the frame as you intended. Exposure Compensation will assist you in fixing this.
Firstly, examine the camera manual to find and press the Exposure Compensation button. The next step is to raise it to +1 stop of positive Exposure Compensation to brighten the model’s face or lower -1 stop to make it darker. As for my Exposure Compensation camera settings for portraits, I typically begin with 1/4 EV and then raise or lower it by 1/4 increments till I am satisfied with the result.

If you want to improve your portraits like a pro without spending much time on editing, try these pre-made tools. With these presets, you can correct colors in your images and make other adjustments to realize all your self-portrait ideas. This versatile pack contains effects for both indoor and outdoor portraits.


