By Tata Rossi 14 days ago, Professional photography
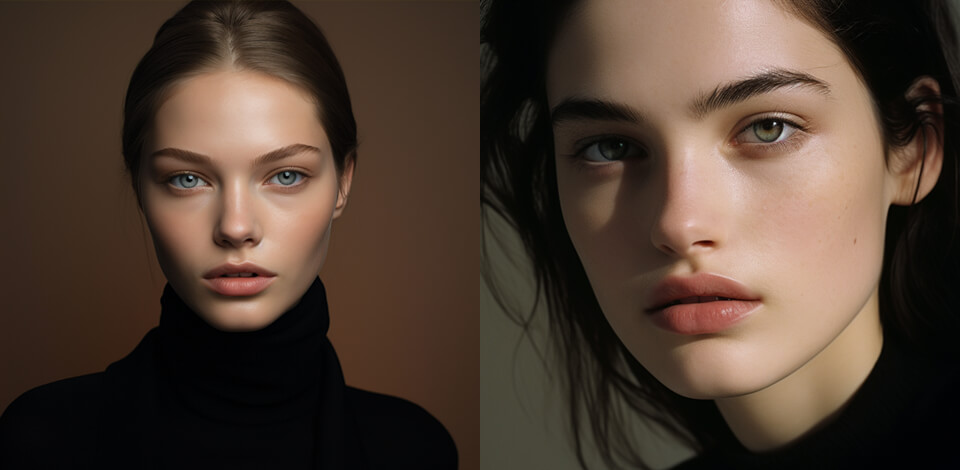
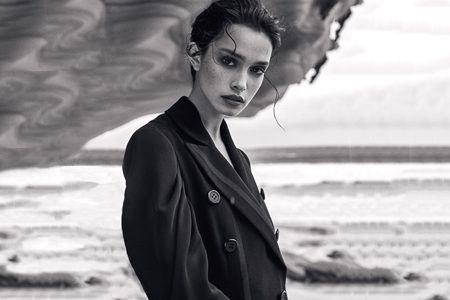
Clamshell lighting is a fantastic option if you want to highlight particular details and hide others. It works best for defining cheekbones, chin lines, and eyes. Besides, by using such lighting, you can make shadows soft and delicate.
Though clamshell lighting requires proper managing similar to Rembrandt lighting, mastering it can be rewarding. The best thing is that you need to use one light source and one reflector to create such a lighting pattern. Currently, the cost of lighting source is rather moderate about $70/piece.
Unlike rim lighting, clamshell lighting requires placing a key light source above the subject, while the second one can be positioned below it. The key light will be the primary source of illumination and the second light source will perform the function of fill light, minimizing shadows, and making the light softer.
When taking clamshell photos, you don’t have to purchase lots of expensive equipment. Besides camera and lens, you only need to buy:
STEP 1. Choose lights and modifiers. Clamshell lighting setup may consist of 2 separate light sources. You can use strobe lights for photography for this purpose. There are continuous, modified, and nonmodified options.

I like adding modifiers to the system because they can make the light softer and more flattering. Besides, I recommend bringing a couple of identical softboxes. In fact, a DIY softbox will suffice. Take your time to practice taking clamshell photos when softboxes serve as modifiers. Once you nail it down, you can start using other modifiers, e.g., beauty dishes and strip boxes.
STEP 2. Arrange the key light. Take your key light that works as the main light source and put it in front of the model and slightly above. Now you need to angle it down a little so that the light beam is directed at the person’s nose.
If you are after a softer effect, you need to locate the light source closer to the subject. For the opposite result, namely a harder effect and broader coverage, you need to bring the light backward.
STEP 3. Add fill light to the setup. You need to place the fill light directly below the key light and point it upward toward the model at 45º. Make sure to tweak the brightness. It should be 2 stops below the key light.

If the effect is too intense and the shadows are almost lost, you should reduce the light power. In the opposite case, increase the power.
STEP 4. Take a photo. Once everything is OK with your studio lighting kit, you can proceed with taking images. It is important to keep the subject’s eyes in focus as it is believed that eyes display genuine people’s feelings. However, you should also pay attention to the mouth.

It is better to stand behind the lights and photograph through the gap.
If there is not much of a gap, you need to bring light higher or lower depending on the situation till you get enough space for convenient shooting. It is a good idea to take another meter reading.
A clamshell lighting setup is an ideal option for beauty photo sessions when using reflectors or on-axis fill lights isn’t possible. For instance, it is troublesome to operate a reflector when using a beauty dish with a grid, so photographers opt for clamshell light.
If you also want to get the most out of this lighting pattern, you should have a look at the tips below.

Similar to cob lighting, it is paramount to place setup pieces properly to achieve the desired result. You need to keep the fill light a bit tilted up in front of the model.
By doing so, you will get gently scattered light with beautiful soft shadows. Besides, your photos will stand out with depth and dimension.

To get well-balanced clamshell photos, you need to make the fill light about 2 stops underexposed in comparison with the key light. Thus, the fill light will illuminate the model’s face properly and the photo will still have peculiar subtle shadows. This is indispensable if you aim at getting eye-pleasing images.

Once you are done with basic customization, you can start experimenting with different settings. For instance, if you enable a manual camera mode and choose different brightness values of the secondary light, you can get very interesting outcomes.
Keep in mind that there are no universal light and camera settings, so you should find perfect options to highlight the beauty of every face.

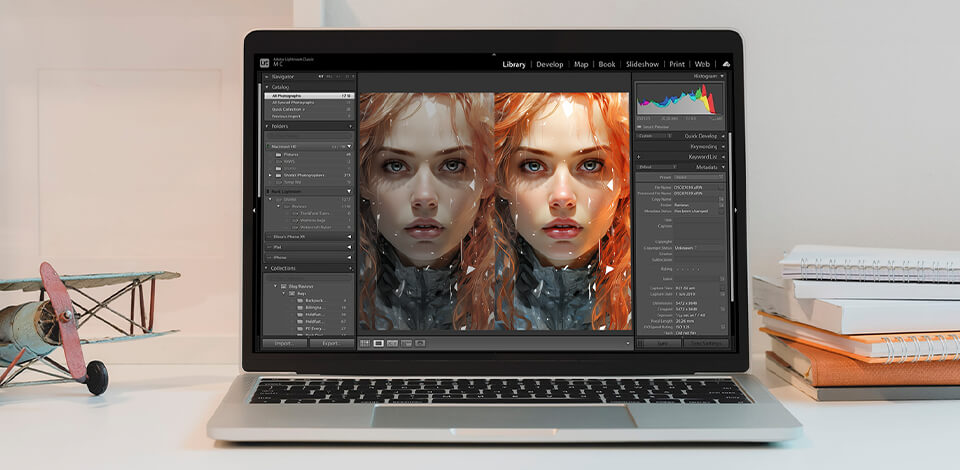
By editing clamshell lighting photos, you can create real masterpieces. To speed up image processing, it is advisable to use professional tools. We have compiled a bundle of efficient instruments compatible with Photoshop CS 4-6, Photoshop CC that you can apply to different types of images.
This lighting pattern is mainly used during portrait photo sessions. A photographer needs to place one light source in front and slightly above the subject and locate the second one in front and below the model.
This is a powerful method to highlight some facial features while keeping the rest concealed. It works perfectly for defining cheekbones, chin lines, and other curves. Photographers specializing in beauty, portrait, headshot, and fashion genres frequently use clamshell lighting.
It consists of 2 separate lights or a single light & a reflector + + reflector board. You don’t need to combine 2 lights with a reflector.
Yes, it is. In fact, it accurately fills the shadows cast by the key light, so portraits turn up looking beautiful. But it is necessary to reduce the power of the lower light in comparison with the upper light to prevent photo washing out.
You need to put an upper light source at a higher angle and reduce power in the lower light source. It is also helpful to use black flags or barn doors to prevent light from reaching unwanted areas.