Chromatic aberration is also called color fringing. It is manifested as a color distortion when there is an outline of unwanted color along the edges of a photo. This phenomenon is common along metallic surfaces or in areas with a sharp contrast between light and dark elements, e.g., a black column against a cloudless blue sky.
Chromatic aberration occurs when a camera lens can't focus all colors of light at the same point. This happens because different colors travel through the lens at different speeds, causing them to end up in slightly different places. As a result, you might see colored fringes or halos around objects in your photos. The most frequent cases are blue-yellow, red-green, and magenta-purple fringing.
Chromatic aberration in photography can be of 2 major types – axial (longitudinal) and transverse (lateral).

Longitudinal Chromatic Aberration is also referred to as “LoCA” or “bokeh fringing”. Such color distortion appears because different wavelengths of color converge at different points after going through a lens.
When you are using a lens with this type of chromatic aberration, you are likely to see fringing around objects across a whole photo. The central part isn’t an exception. The fringing can have different hues like Red, Green, Blue, or even their mixes. The easiest way to reduce LoCA is to narrow the lens aperture. Longitudinal Chromatic Aberration usually affects fast aperture prime lenses. Slower lenses are less subject to this distortion.
Lateral Chromatic Aberration or "transverse chromatic aberration," happens when light wavelengths hit the lens at an angle and focus at slightly different points on the same plane.
Such chromatic aberration never appears in the center of a photo. Usually, it is visible in the edges, which are often high-contrast areas of a shot. Fisheye, wide-angle, and low-quality lenses are prone to this color distortion, which acquires the form of blue and purple fringing.
There is no 100% efficient method to handle Lateral Chromatic Aberration. Stopping down the lens won’t do any good unlike the case with LoCA. The only way to remove or at least minimize the fringing is to use professional tools. For instance, when editing photos in Lightroom, you can fix the defect.

Optimize the focal plane. When using wide-angle lenses with shorter focal lengths, you are more likely to end up with chromatic aberration in your photos. For instance, when taking photos at 18mm, which equals the extremities of the lens, you are sure to see color distortion. Using a medium focal length is a good solution. 30mm when employing an 18- to 55-millimeter lens can yield the needed result.
Use a narrower aperture. It is better to take photos at a higher f-stop, which means your aperture will be smaller. Such adjustments allow minimizing color distortion. This recommendation is extremely helpful if you use budget-friendly lenses. When shooting at a wide-open aperture, e.g., as f/1.8, the likelihood of seeing chromatic aberration is even higher.
However, if you use a smaller aperture, like f/5.6, this defect can be significantly reduced. To compensate for the reduced light when using a narrower aperture, you can increase the ISO, use a flash, or slow down the shutter speed.

Shoot in RAW. When you have source image files in this format, you initially receive more data to manipulate. Therefore, you can experiment with different settings in Adobe Lightroom, Adobe Camera Raw, or any other program you use for photo processing. Take your time to master the tools and you will never struggle with what is chromatic aberration and how to save images spoilt by it.
Avoid high-contrast scenes. Whenever possible, steer clear of high contrasts in the frame. By taking some precautions, you won’t need to spend much time fixing chromatic aberration during photo editing.
Subject position. To avoid chromatic aberration, it's best to position your subject in the center of the frame. This is because transverse chromatic aberration (TCA) typically occurs around the edges of the image, leaving the middle unaffected. By placing the subject centrally, the risk of distortion is minimized.
If you still want to position your subject in the top or bottom thirds of the frame, or near the edges, don’t get upset. A good way out is to initially place it in the center during shooting. You can then crop the image later to achieve the desired composition, minimizing the risk of chromatic aberration.
Sometimes it is next to impossible to prevent chromatic aberration during a photo session. Fortunately, there are reliable methods to correct chromatic aberration in Lightroom.


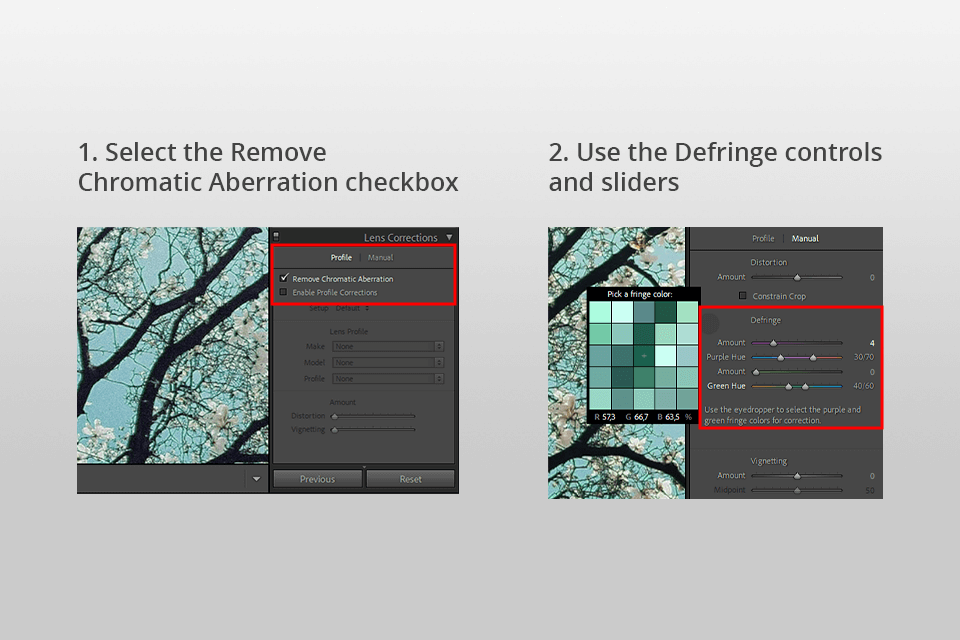
Head to the Lens Corrections panel. Tick the Remove Chromatic Aberration checkbox under the Color section.
Drag the Defringe controls and sliders to find and remove any color distortion. Next, Remove Chromatic Aberration left behind along high-contrast edges.
Select the Defringe icon within the Optics panel. Use the Fringe Selector to identify the green or purple distortion. Then, drag the slider to remove the fringe. Or you can eliminate these color fringes by using the Defringe slider in the Brush, Linear Gradient, or Radial Gradient panels for localized corrections.
When I need to remove color fringes in specific areas of a photo, I opt for local brush or gradient adjustments.

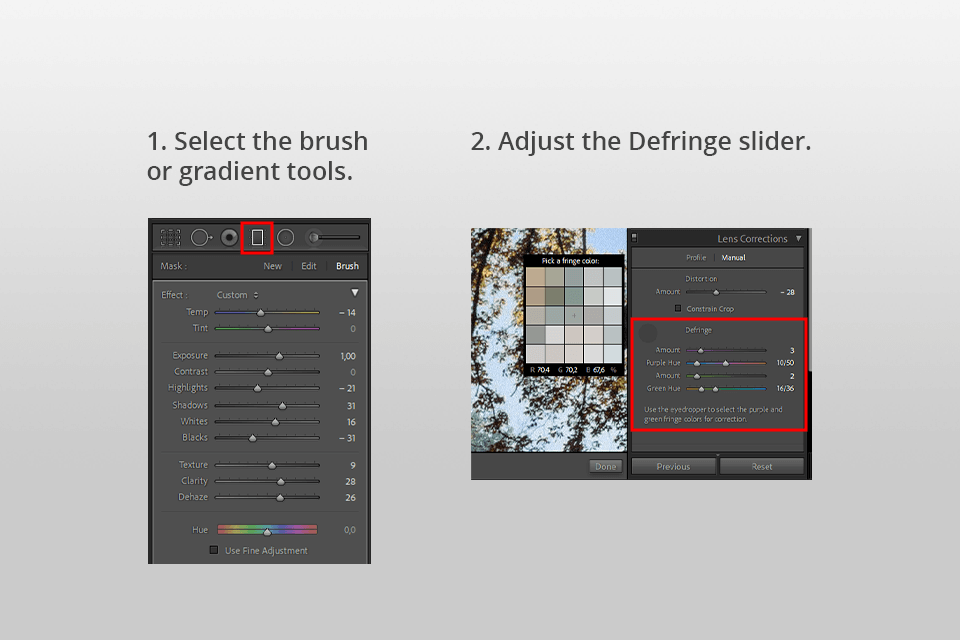
Select the brush or gradient tools and drag in the image.
Move the Defringe slider. When dragging it to the “+”, the color fringe becomes less pronounced. When moving toward “-”, the effect is the opposite but specific areas are protected from global defringing effect. Minus 100 protects the area from any defringing.
For example, a strong global adjustment to remove purple fringing may inadvertently desaturate or alter the edges of purple objects. By applying a Defringe value of -100 to those areas, you can preserve their original color and look.
If you lack time to handle chromatic aberration on your own, address reliable online photo editing services. Experts will fix the defects and send you pro-quality photos.
I believe there are instances when chromatic aberration can transform a photograph into a piece of creative content. Experimenting with chromatic aberration in Adobe Photoshop, Premiere Pro, or After Effects, I achieved some impressive results. By manipulating color fringing or separating the Red, Green, and Blue channels (RGB splitting), I have transformed an average image into an artistic project.

Dreamlike portraits. When there is a chromatic aberration in portraits, they acquire a surreal and ethereal look. Soft and dreamy halos around subjects look very interesting.
Retro aesthetic. By intentionally applying chromatic aberration to pictures during editing, you can imitate the look of old film cameras and VHS recordings. Many people adore that vintage, nostalgic flair.
Abstract art. Abstract photos, jazzed up with chromatic aberration, look otherworldly and mysterious.

Dynamic motion. When adding the fringing to action shots or fast-paced scenes, you can exaggerate movement greatly. In the end, you will get an energetic and chaotic blur effect.
Alien landscapes. Landscape videos or photos can also benefit from color distortion if you want them to look alien.
Urban night photography. City lights and neon signs combined with aberration in pictures are perfect for depicting a futuristic, cyberpunk atmosphere.

Digital double exposure. Blending chromatic aberration and double exposure in Photoshop is a sure way to receive a surreal, psychedelic outcome.
Music video glitches. Another interesting idea is to add aberration to music videos during key moments. The resulting artistic glitch effect nicely complements the mood of a song.
Leaving chromatic aberration or keeping it intact in photos depends on the result you are after. Usually, photographers choose to remove it because they want flawless images without any fringing. Fortunately, controlling color distortion is possible both during and after photo session.