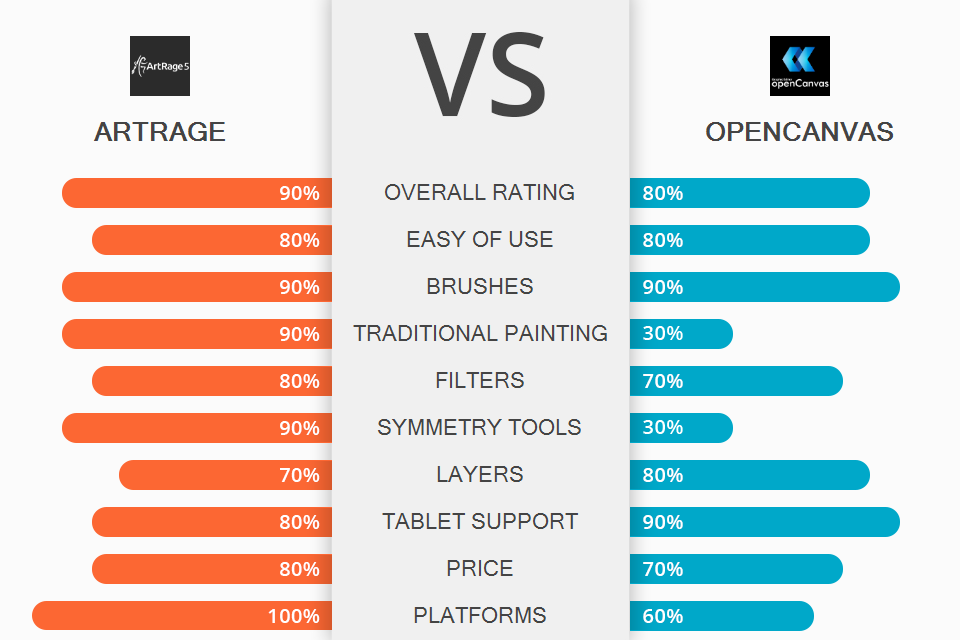
Comparing ArtRage vs OpenCanvas, I figured out that these programs have several things in common. Namely, they both contain basic drawing tools and have a UI that is easy to master. However, OpenCanvas is suitable for all styles, being reminiscent of Clip Studio Paint but with more advanced tools on board. ArtRage is better suited for mimicking traditional mediums like oil paint.
ArtRage is a cross-platform program with instruments for realistic digital painting. It does wonders when it comes to using natural media and creating lifelike paintings, being malleable enough so that users can create a convenient working environment. If you have previously used Photoshop, you will easily switch to this software. Here you can customize brushes, record unique actions, adjust the appearance of a canvas, and more.
OpenCanvas is one of the best programs to use if you want to gradually move from traditional painting to digital design. You can experiment with various tones, patterns, and paper textures, as well as use over 100 brushes to create arresting, one-of-a-kind projects.
Several layouts for convenient work. There is the “classic” mode, which is set by default. It offers standard toggle buttons for panels, the signature tool palette, and the color palette corners. If you have already used the docking panel, you can switch to the Docking mode available in the software. Thus, you’ll be able to adjust stacks of panels on both sides of the canvas. Moreover, if you’re going to pull an all-nighter, you may want to turn the “Light Out” mode on, to make all elements of the UI dark.
Amazing collection of realistic painting tools. Creating digital paintings and illustrations in the program is super-easy thanks to a variety of corresponding instruments. Here you’ll find an Oil Brush, Watercolor, Airbrush, Palette Knife (for blenders and smudges), Paint Tube, and Paint Roller. I have provided more details about the toolset in the ArtRage vs Corel Painter comparison.
ArtRage was developed with realism in mind, so paints are blended on the canvas, which results in natural color variations and transitions. Depending on the amount of paint on the brush and on the surface, you can get either delicate gradations or more saturated mixes. Moreover, you can make the needed adjustments so that paint on the brush will run out over time for more lifelike fading.
Simple customization of the Brush tool. The possibility to create custom brushes will surely appeal to inventive artists, who want to have more control over the painting process. You can impact such parameters as shape, stroke properties, colors, and depth of the paint. Moreover, the software allows adding volume to the Custom Brush strokes, alters the shape of strokes with smoothing, jitter, and other properties. Besides, you can customer your original brush so that it functions as an Eraser.
Experts especially like that it’s possible to define how the color is picked and blended by the brush head. Once you are done making adjustments, you can save the result as Preset and even create your unique collection of such paint brushes.
All the needed tools for convenient work. Looking through the pack of tools, you will find everything required for trouble-free digital painting. You can use layers, reference images, tracing instruments, and more. The Layers tab contains the standard operations and features, including layer groups, blending modes, and even Layer Effects, which resemble Ps Styles. You can take advantage of such effects as Glow, Stroke, Drop Shadow, Cutout, Inner Glow, and Emboss.
There is also a collection of stencils and rulers that can serve as masks. If you want, you can make and upload your own masks but the range provided by ArtRage is rather extensive. What’s more, users can import images to pin to the Canvas as References and have a precise guide for choosing paints and sample colors.
A handy tool for creating symmetrical objects. While comparing ArtRage vs OpenCanvas, I was really impressed with the variety of features offered by the former. To my mind, the most interesting option is the Paint Symmetry. It is indispensable if you want to create mesmerizing ornaments. By combining the smoothing parameters of a brush and the capabilities of the Paint Symmetry, you can become a real expert in creating mandalas. Besides, painting bilateral subjects such as faces or butterflies becomes easier.
Using this instrument, you can automatically create multiple strokes around the center of symmetry, adjust the number of symmetrical segments, affect the position of the center, rotate segments, clip paint strokes to the segment they stem from, and paint blends and smears like normal if you cross over segments.
Access to special filters. ArtRage has the Warp Filter, which allows smearing and warping pictures with non-destructive brush strokes. Besides, it is possible to adjust the size, hardness, and pressure of the brush head and create smears, pinches, and swirls under the brush.
Users are sure to appreciate the set of Adjustment Filters that includes Blur Filter, Add Noise Filter, Color Adjustment Filter, and Remove Color Matte Filter. Those comparing ArtRage vs Photoshop with the aim to find a perfect program for day-to-day work, will be pleased to know that the former supports some Ps standard filters.
Some tools and parameters don’t comply with industry standards. If you have experience using other programs for digital painting and are now pondering on switching to ArtRage, you’ll have to “translate” some of the tool names in head. For example, there is the Palette Knife tool which is needed for blenders and smudges. But you will master all the options rather quickly.
Enhanced brush engine. The collection of brushes includes a pencil, pen, watercolor, airbrush, and other options that allow creating original objects and expressions. In total, there are more than 150 types of default brush presets that you can use for your creative experiments. Keep in mind that you can change the brush settings and get a perfect tool for your current project.
Straightforward canvas navigator panel. There is a special instrument called Hand Control. You can find it in the lower right corner. With its help, you can easily move, rotate, scale, and flip the canvas vertically. Since display control tools are arranged in one area, managing your projects is simpler than ever.
Besides, OpenCanvas comes with Shortcut Control, which makes the entire workflow more efficient. This tool is translucent and you can adjust its size.
Convenient display of the drawing procedure. The Event function available in this manga drawing software deserves many flattering words. Using it, you can record/replay the drawing procedure and keep tabs on your progress. Besides, you can share such recordings on the PNG community website to get feedback on your work.
This function may be decisive for experts reading this ArtRage vs OpenCanvas comparison. Using it, they can demonstrate different drawing techniques, brush settings, and filter usage. By clicking on the Event file, you can add and edit your project from the moment you stopped, and even create a GIF animation.
40 types of filters. It is always nice to have some effect to jazz up your standard drawings. Here you can find a separate tab with filters suitable for altering colors, applying textures, and more. The range of filters includes Hue/Saturation, Lighting, Color Halftone, Noise, and Mosaic, to name a few.
Unlimited possibility with Layer Mode. If most of your painting work involves using layers, this software is definitely a more suitable option in the ArtRage vs OpenCanvas battle. It provides access to 22 types of Layer Modes, allowing you to adjust brightness, contrast, color tones, and more. The Layer Mode, except for several options, is compatible with Photoshop.
More intuitive control with TabletPC support. TabletPC offers pen pressure and multi-touch gesture support. Thus, using digital drawing tools, you will feel like dealing with real paper and can control canvas intuitively. To take advantage of this feature, you need a tablet that supports pen pressure and multi-touch.
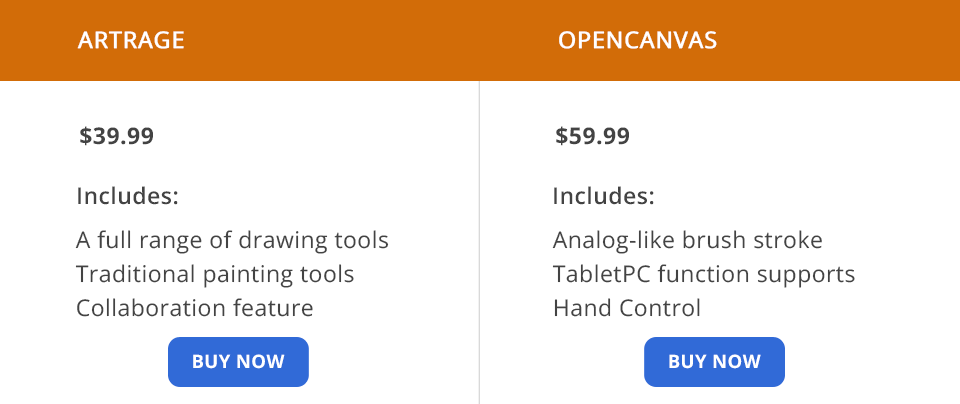
To understand whether ArtRage can satisfy your needs, you can get the free demo version and test it. It comes with no time restrictions, so you can learn the features at a convenient tempo. However, you can’t save files in the demo version. To do it, you have to download a paid version for $40.
It is also possible to test the capabilities of OpenCanvas for free within 120 days. After this period expires, you have to spend $59 to continue using the software.
If you are mainly engaged in producing aesthetic stuff, you should opt for ArtRage. It contains all the needed tools and features for watercolor painting and other art forms. Using the program, you can create high-quality graphic designs, digital artworks, book illustrations, comics, sketches, visual effects, concept art pieces, and product designs.
If you are a professional artist, video game developer, or a person fond of illustrating, you should have a closer look at OpenCanvas. It comes with an intuitive canvas navigator panel and other handy tools for convenient work. There is also a dark mode, which is great for those working at night. However, this program is designed only for Windows OS and has some laggy brushes, so I can’t name it the winner of this competition.


