Adobe Workfront
To be honest, I was pretty skeptical about Adobe Workfront at first. I doubted it lived up to its reputation and was worth the money. Besides, as a freelance photographer and videographer, I wanted something intuitive to manage my weddings, corporate shoots, editing jobs, and creative collaborations.
But it happened that I missed a deadline because I couldn’t find a client’s email. At that moment, I figured out I needed a tool to organize all my messages. So, I decided to try the Workfront project management tool.
It is great that this software integrates with Adobe CC. I already use Lightroom, Photoshop, and Premiere Pro, so handling and sharing data would be easy. This is particularly important if you have lots of responsibilities and need to work promptly.
Adobe Workfront is a project management software with a rich toolset. Initially, it was aimed at creative and marketing teams. Now, it is a go-to tool for companies from different niches that want to streamline processes, connect teams, and optimize productivity.
The software belongs to the Adobe Experience Cloud and works smoothly with other Adobe products. Therefore, if you are a loyal Adobe user, you’ll definitely appreciate this addition to your toolkit.
Just like other free Adobe software, Workfront has received several new powerful features. All enhancements are meant to facilitate regular workflows. AI-powered features deserve special praise:
There are also some significant workflow improvements:
The developers also introduced handy document management features:
“The new live updates are amazing. You don’t need to refresh to see what’s happening. Besides, the updated visual calendar is very helpful for task monitoring. Now, you won’t forget about deadlines.”

Workfront is a modern solution for organizing projects, tasks, and people working on them. It has a clear design, so you can focus on your work without distractions, monitor project status, and ensure your team members are on the same page. Workfront software integrates with the Adobe Experience Cloud. This is particularly beneficial for businesses that actively use other Adobe products.
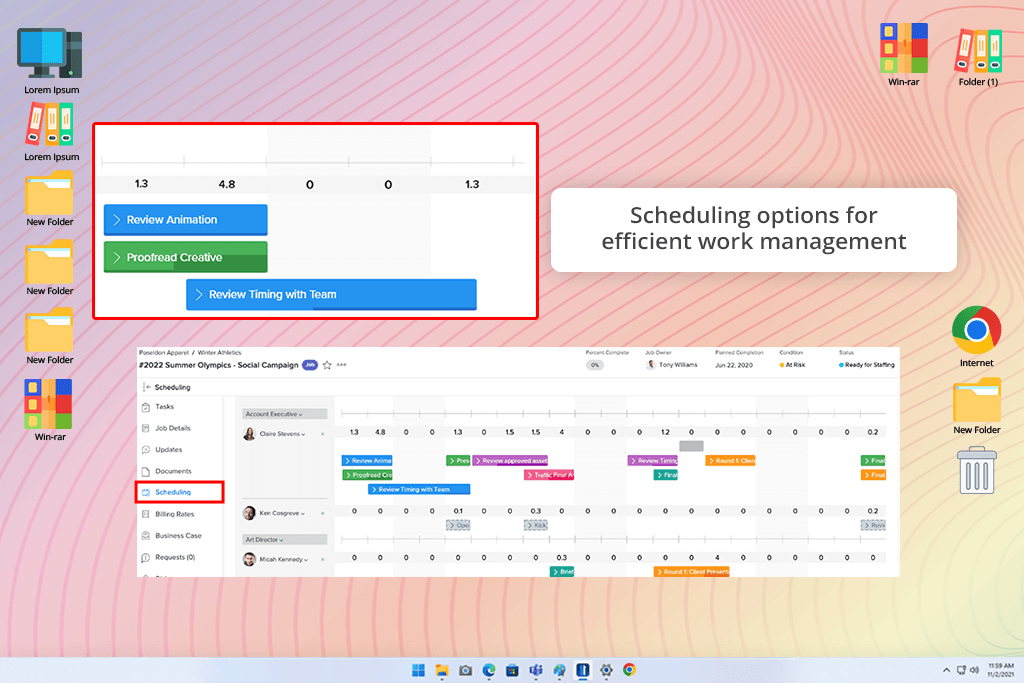
Workfront provides the standard project management tools. It shows you deadlines on a calendar and how busy each team member is. If someone is snowed under tasks or suddenly needs time off, Workfront has tools to redistribute the work. You can also track your time with the included timesheets. However, unlike some other tools, it doesn't offer a timer to automatically track time spent on specific tasks.
“The calendar is very helpful. You can keep tabs on deadlines and won’t miss them. I also like the team workload view and auto-rebalancing for workloads. Unfortunately, there is no built-in timer. Still, you can use timesheets to track the progress.”

I was genuinely impressed with Workfront Goals. Using this feature, you can establish clear objectives, match them with the company's strategy, and keep an eye on key performance indicators (KPIs). When there is a clear connection between strategy and practical execution, it is easier to achieve the desired results. Moreover, you can be sure that each employee contributes to the mutual success.
“With this feature, I could see whether we were moving in the proper direction. I set goals, tracked KPIs, and grasped whether overall effort aligned with the company’s strategy. I had peace of mind about the team’s performance.”

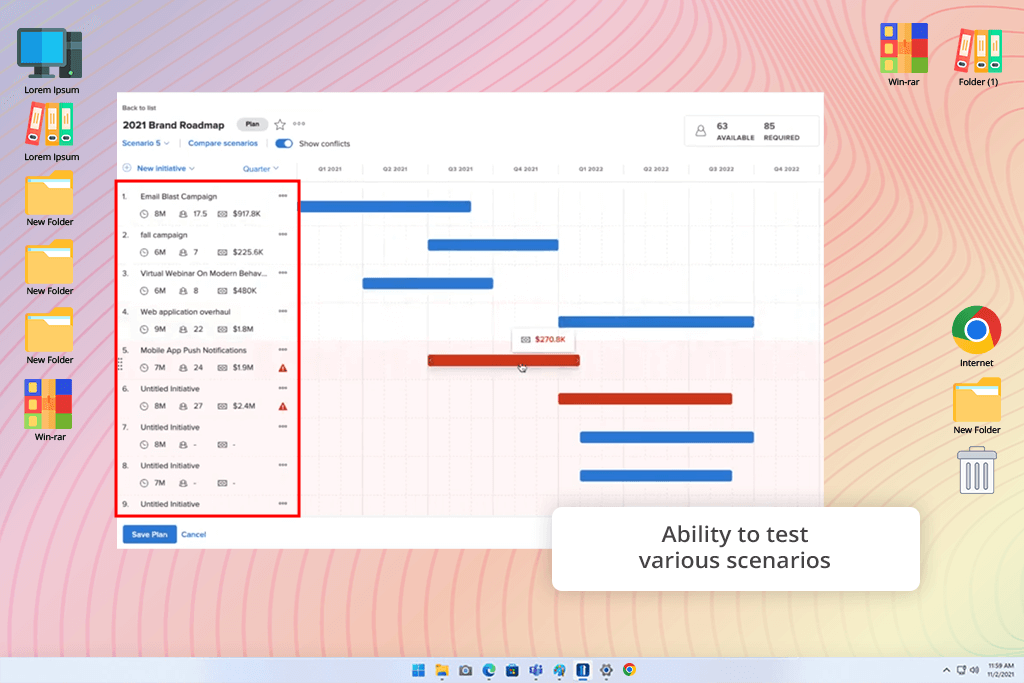
Workfront Adobe also offers the Scenario Planner tool. Using it, I can look at different strategies side by side, test out ideas, see what resources each would need, and choose the most beneficial plan. I no longer need to guess, but can make informed decisions.
I particularly appreciate that Workfront can be used in conjunction with other tools. Thanks to its integration with Adobe Creative Cloud, I can link creative assets directly to project tasks. When I connected it with Microsoft Teams and Google Workspace, team communication and file sharing became easier and centralized. I no longer need to switch between different online collaboration software.
There are also dedicated apps for Android and iOS. Therefore, you can stay in touch with your colleagues regardless of your whereabouts. A mobile app lets you monitor work progress, request submissions, and give approvals.
The software has an open API, meaning you can connect other tools that you regularly use for work. With the latest updates, teams can take advantage of Microsoft Office 365, Slack, and other business tools.
“It is so cool to have Adobe Creative Cloud and Workfront under one roof. I don’t have to hop from one app to another. Besides, syncing with Google Workspace is so helpful. A mobile app is a terrific option to stay productive on the go.”

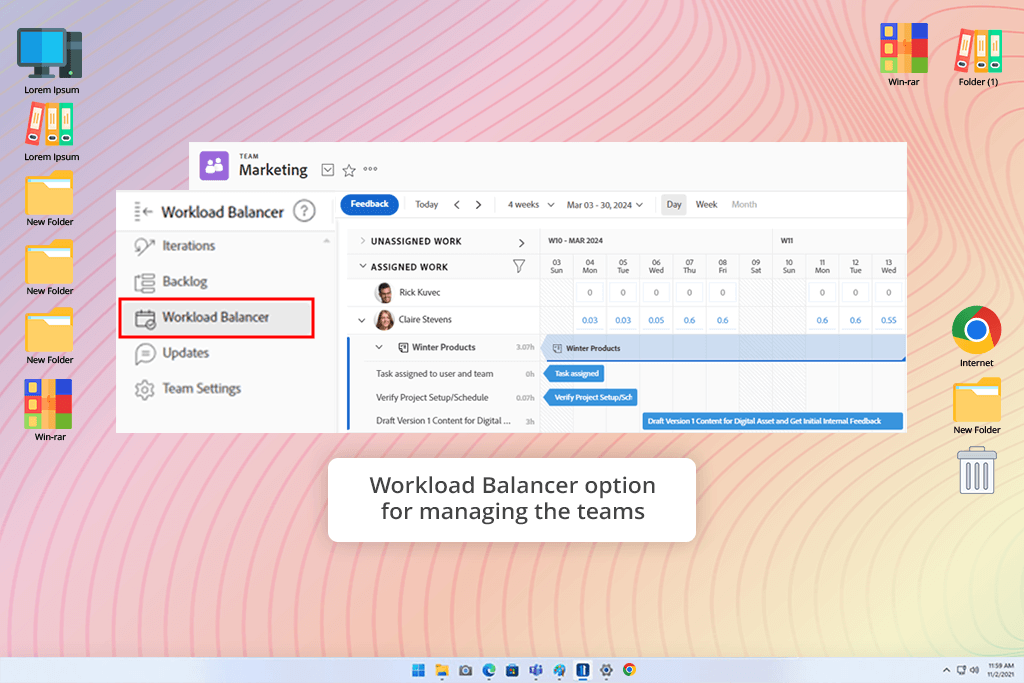
What is Workfront used for? In addition to the listed tasks, the software is suitable for managing resources. It has purpose-made tools – Resource Planner and Workload Balancer. Using them, it is possible to analyze your team capacity and distribute tasks among employees according to their skills and availability. There is also the Utilization Report that lets you see how resources are used. With this data at hand, you can implement enhancements timely.
“With these tools, I can immediately see what employees were busy or not. Besides, I used the report option to optimize our workflow.”

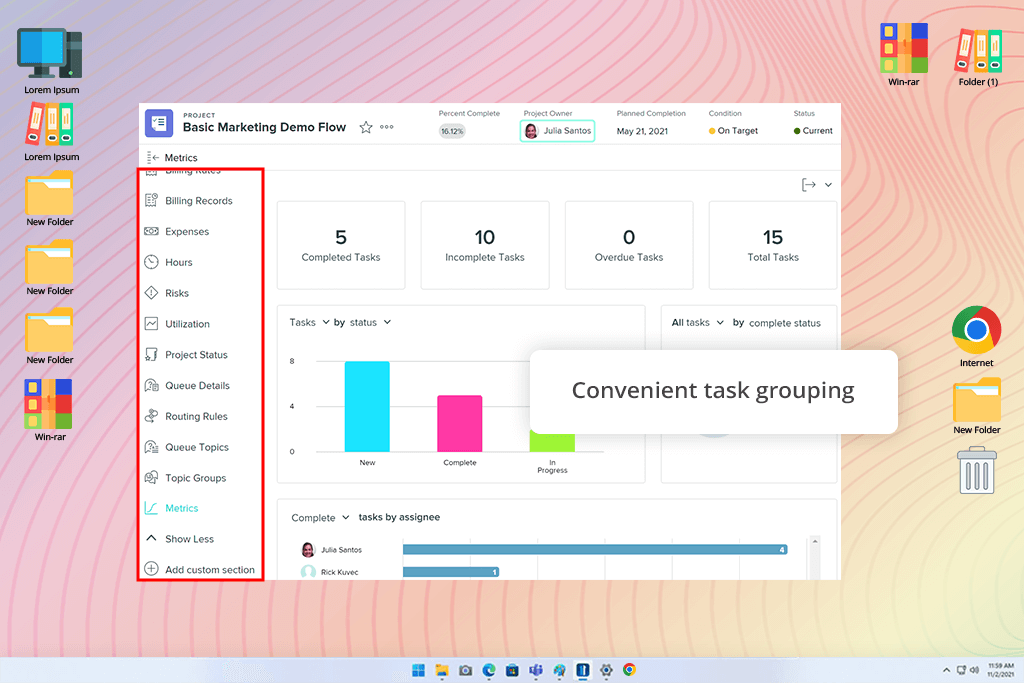
Workfront is a user-friendly program with rich customization. You can adjust views and reports, as well as manage tasks in bulk and group frequently used items into favorite lists. Such simple tweaks have a significant influence on overall productivity.
Adobe Workfront is a wonderful solution for large businesses that want clear, organized workflows. It offers a perfect mix of project and work management tools, along with advanced features for resource planning. Custom permission levels make it easy to tailor access and responsibilities, so everyone stays on track and in sync.
If you have a smaller company and prioritize clear communication and a flexible setup, you'd better choose Asana or similar user-friendly tools.
“Workfront is a perfect option for large companies that need a robust permissions system and advanced security tools. Resource management instruments here are also aimed at serious challenges.”

Workfront offers efficient reporting and analytics features. They surprised me in the best way. I can track progress and use real-time data for decisions, without switching to external data analytics platforms.
There are also personalized dashboards with all major data stored in one place. For instance, you can see project status, team performance, and key metrics.
The Report Builder deserves special mention in this Workfront review. It lets me create detailed reports much quicker and customize all the elements I want. I didn’t have to worry about staying on top of updates, as there is an automatic scheduling feature. Moreover, users can take advantage of heatmaps and trends to detect workflow bottlenecks and make improvements right away.
Generally, I believe these tools are indispensable for proper project handling. They let you have a clear idea about your processes and apply corrections timely.
Workfront offers more functionalities in addition to file uploading. For example, you can use version control and check-in/check-out features, file sharing services, tools to keep tabs on every document change, and more. Therefore, you can be confident all team members work on the latest document version.
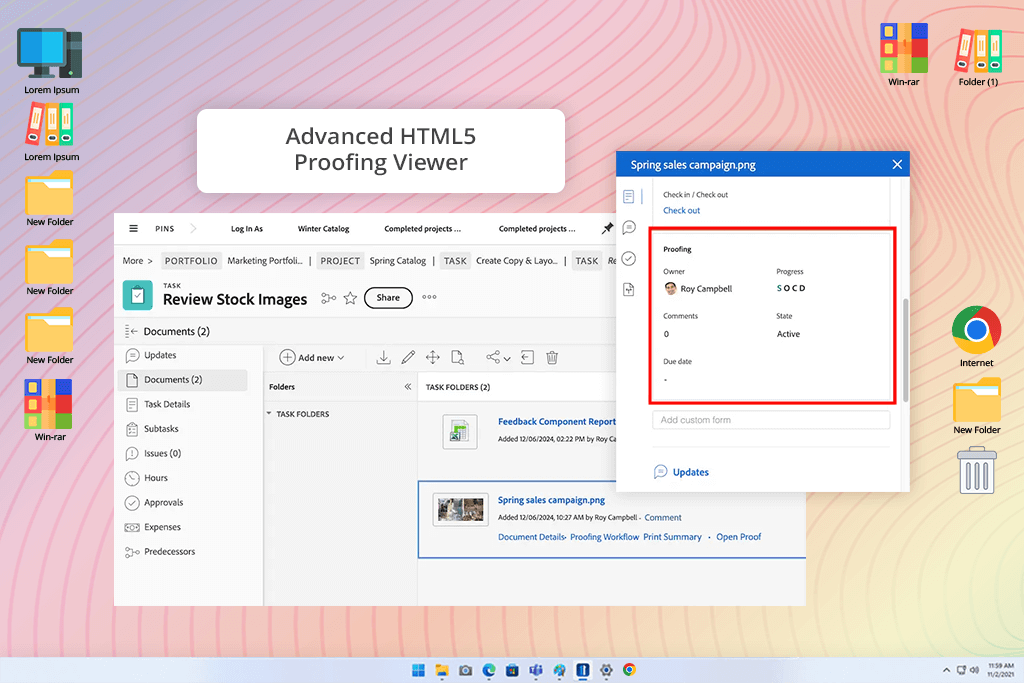
The real highlight of Workfront project management software is the HTML5 Proofing Viewer. It lets you open and review files directly within Workfront, without relying on additional tools. You can easily search through text, mark things up, and share feedback in just a few clicks. This is perfect for teams who want a smooth and speedy review process.
Smart task prioritization. Using AI, Workfront looks at deadlines, how much work your team can handle, and how important each project is. Therefore, you don’t have to figure out what to do first. The software will suggest the most pressing tasks. This helps teams concentrate on their key objectives.
Predictive resource management. It can foresee when team members may become available and identify potential workload issues before they arise. This is paramount for distributing work more evenly and preventing team burnout.
AI-based time tracking and estimations. By analyzing past performance, the system predicts the duration of tasks. This is particularly beneficial for time-critical projects, helping teams stay on track to meet deadlines.
Automated workflow suggestions. The software examines previous projects and recommends optimal workflows for new work. I often use this feature for recurring or comparable projects. Thus, I can reduce setup times and ensure that all team members work in the most efficient way.
In-depth analytics and insights. The system can interpret complex data for you, so that you can understand all bits and bobs and take reasonable actions. The AI can identify trends and highlight potential roadblocks. Besides, there are AI dashboards, where you can find all the key data without collecting it from different sources.
Improved collaboration through predictive suggestions. I like that the program suggests what people, resources, and previous tasks can be beneficial for your present work. This streamlines multiple processes and lets you communicate in the most productive way with your colleagues.
AI-driven proofing and feedback. The software identifies potential issues in documents and files very accurately. This is crucial for quick reviewing and corrections. The feedback is easy to understand and address.
I teamed up with a few colleagues from the FixThePhoto team. Together, we took a closer look at Adobe Workfront, tested all Workfront features, and eventually created a well-rounded and useful review.
First of all, we concentrated on simple project management tasks. We assigned jobs, set due dates, and kept an eye on progress through intuitive dashboards. We also tested the calendar mode and workload balancing features. They appeared to be very helpful, especially as we managed multiple photo editing projects and content creation within a short timeframe.
Eva said it was impressively easy to sync Workfront with Adobe Creative Cloud. It meant we didn’t have to keep toggling between different apps anymore. Instead, we could review designs, upload finished photos, and perform other tasks quicker thanks to streamlined synchronization. At the same time, Nataly explored the Scenario Planner, analyzing different “what-if” scenarios for how we could manage resources. It was great to see how we could plan for various situations without interrupting the projects already in progress.
While testing the HTML5 Proofing Viewer, we were amazed by its capabilities. Tata claims this is a terrific tool for markup and feedback while working on joint editing projects. Any team member can add annotations, suggest corrections, monitor revisions, and more in a single workspace. We also recommend using proofing tools, especially if you seek clear and neat results.
The analytic tools in Workfront Adobe project management software are top-notch. There is the Report Builder, using which you can make custom reports, track performance, and define weak points in your working process. Our team tried heatmaps to envisage possible delays and take proactive actions.
After analyzing the ins and outs of the program, we can conclude that it is powerful and feature-rich. Still, it can confuse total novices, requiring sufficient time to master all the tools. However, if you want to expedite in-company processes and get the most out of every project, you should definitely try Workfront.


