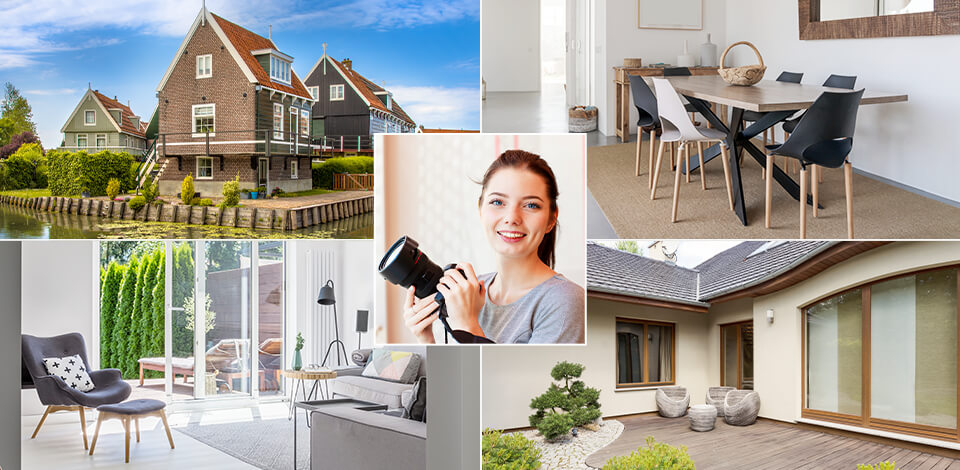
Today, the average annual salary of a real estate photographer ranges from $40,000 to $62,000. Real estate photography involves both interior shooting and taking images of the surrounding infrastructure. With detailed, high-quality real estate photos, you can show the advantages of a particular property to potential clients.
The real estate market depends much on the visual representation of houses and apartments. Every realtor strives to show the property as effectively as possible in order to interest buyers. Taking such images can cause much headache when you only get into real estate photography.
But following the recommendations listed below, you can grasp the ropes of the genre and below a well-paid photographer.
.jpg)
Choosing the right time is very important for real estate photographers. If it is possible, schedule a photoshoot in the daytime. This way, you will get a lot of natural light and bright, saturated colors in your pictures.
If the weather is cloudy, you should choose another time for shooting. Some people like to photograph real estate during the sunset. Undoubtedly, you can get very beautiful shots in this period of the day.
Do not rush. First, you have to learn every nuance of a house. Remember that they may be very different, so you must pay attention to every detail. Before the photo session, walk around the house and yard, and take several shots.
Take 2-3 pictures of each room, 1-3 photos of the backyard and 1-2 photos of the facade of the house.
Then you should examine these shots very attentively to identify features vital for commercial real estate photography. This approach helps photographers see those details that seem imperceptible at first glance but have great importance.
In addition, this way, you can ensure that the property is ready for shooting. Probably, you may need some time to correct some imperfections.
In addition to the staging, you need to “build” the frame in such a way that viewers can guess what the season is. This is a simple yet efficient way of creating a particular mood and evoking specific emotions. However, don’t get too carried away as your main object is a house not the nature around it.
Spring. Put seasonal, local flowers in a vase or near the front door. Besides, you can photograph a garden if there is any.
Summer. Take advantage of gentle sunlight. You may also capture a pitcher of lemonade or a bowl of seasonal fruit.
Autumn. Make sure to photograph colorful leaves outside, or add small decorations embellished with autumn foliage.
Winter. Capture snow near the house or fire in the fireplace.
Practicing real estate photography, you must remember that natural light is the best option. No artificial light sources can replace the sun.
Using natural light, you can get very beautiful, saturated shadows. Enhance the effect produced by natural light with LED panels and reflectors. They will help you highlight important details, such as metal, wooden or textile elements of furniture.
Besides, natural light will make your photos as realistic as possible, and clients will see how the house actually looks.
Image editing is an integral part of interior photography. Some photos have screwed exposure, others suffer from harsh shadows, lack of light, etc. If you take images without a tripod and just learning how to build a composition, you may need to perform cropping. In addition, if the property is empty, it can be virtually staged by adding furniture and decor effectively to enhance the overall appeal of the space.
It is a common practice to make colors brighter in property images. Actually, you need to fix all defects and adjust photo parameters in order to get a professional result.
It is highly advisable to use the top real estate photography software. Primarily, pay attention to Adobe products. Both Photoshop and Lightroom have many tools and features for advanced photo processing. You can correct colors, accentuate details, and do all possible to give your images a catchy look. Sometimes, it is necessary to alter saturation and hue settings for a more natural result.
If you want to get professional images but lack time to perform the edits yourself, get in touch with our company. We`ve been helping photographers with their photo processing routine for over 17 years now, so we know how good real estate photos should look.

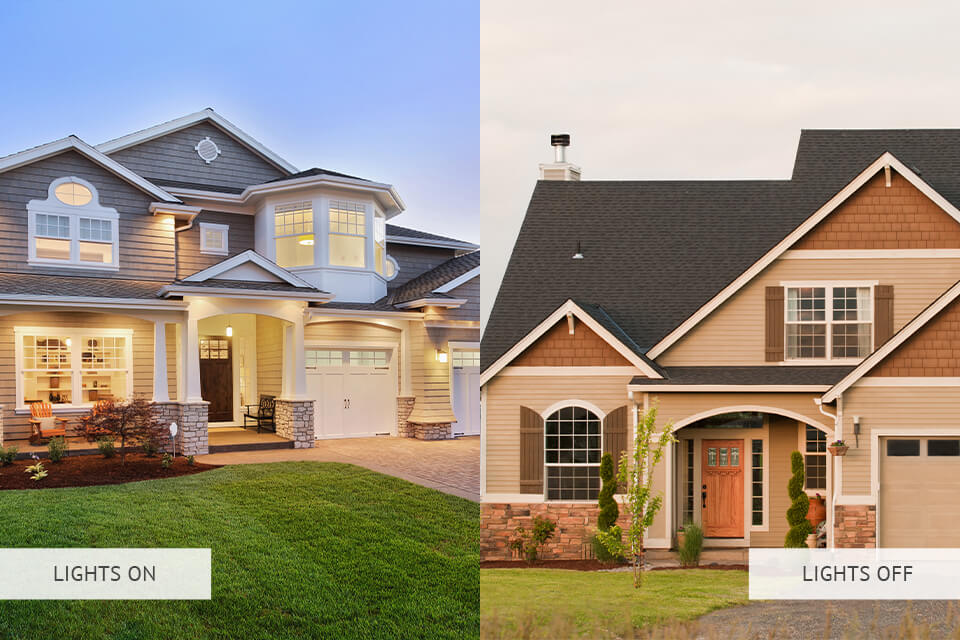
This is one of the basic but at the same time very useful real estate photography tips. Turning the lights on and off, you can achieve different effects. It all depends on your goals. For example, artificial light will add warmth and coziness to your pictures.
Nevertheless, you should remember that such photos require light temperature correction during photo editing.
Working with the lights off will bring you a balanced temperature, but such pictures will look quite cold.
According to the United States Department of Labor report, real estate photography job is the most well-paid on the market.
The starting real estate photography salary is around $40,000 per year; the top real estate specialists earn between $40,000 and $93,000. If you want to receive more, you should provide educational lectures and materials like online or printed books on real estate photography.
Study to shoot a real estate video and make a 3D tour. The 3D tour service can bring you about $5000 per month.
Choosing the best camera for real estate photography is key to your success. I advise you to pay attention to full frame cameras. They are perfect for this type of shooting.
The fact is that a cropped sensor camera can’t get a lot of light while full-frame cameras cope with this task perfectly. I recommend considering Canon EOS 6D Mark II, as it has fast and accurate autofocus and demonstrates remarkable capabilities when shooting with ISO 3200.
To take pro-level real estate photos, you must use good lenses that can be detached. Very often, they play an even bigger role than a camera itself.
The main task of a photographer is to move around the object quickly and cover the maximum space. Choose right lenses for real estate photography. Wide-angle lenses will help you visually enlarge a room and create a more comfortable and inviting look. My recommendation is to use Canon 17-40mm f/4L or buy the best Canon wide-angle lenses you can afford.
Add external flashes to your residential real estate photography equipment toolkit. As a rule, the standard flashes are too weak. Using them, you can’t take professional images with even lighting. I advise you to use an external flash.
You can attach it to your camera or place it anywhere to improve lighting and highlight important details. Pay attention to Canon Speedlite 430EX III-RT that is powerful, yet compact enough to take anywhere.
Camera shake can totally distort your photo, so using a tripod for real estate photography is a smart way out. If you take images of interiors, remember about horizon and perspective. They also matter a lot in this case.
The Amazon Basics tripod is manufactured from a special aluminum alloy. It is lightweight and ideal for interior photography. The tripod can be extended to 158cm, so using it in the rooms with 3m ceilings won’t cause a problem.

Make sure you get a filter that has the right size for your particular lens and make sure it's a circular polarizing filter. If you are just learning the peculiarities of real estate photography, I recommend taking a filter off or the filter blocks off around 50% to 75% of your light.
I recommend using Amazon Basics Circular Polarizer to intensify the color of blue skies and reduce/eliminate glare.
Have the sand bags in your arsenal. They guarantee your light stands or umbrellas will not fall down and spoil the clients’ furniture or floor.
Be careful with your drone for real estate photography while flying it near the house. The FAA reports the top two uses of commercial drones, which are aerial photos (34 %) and real estate photos (26 %).
There are many drone zones in the USA. Install the FAA’s safety application, which uses your GPS location to provide you with real-time data about airspace restrictions and flying rules. If you don’t know what drone to use, have a look at DJI Inspire 2. It brags about intelligent flight modes, obstacle sensing range, and smart return to home.
Have a step ladder that should be very small and assembled with only one hand. A normal weight is 4.2 kg and such a ladder occupies little place. For instance, it can be placed in a small golf car. By placing elbows on a ladder, you will avoid camera shake.
I also always have two spare 64GB memory cards in case I run out of space.
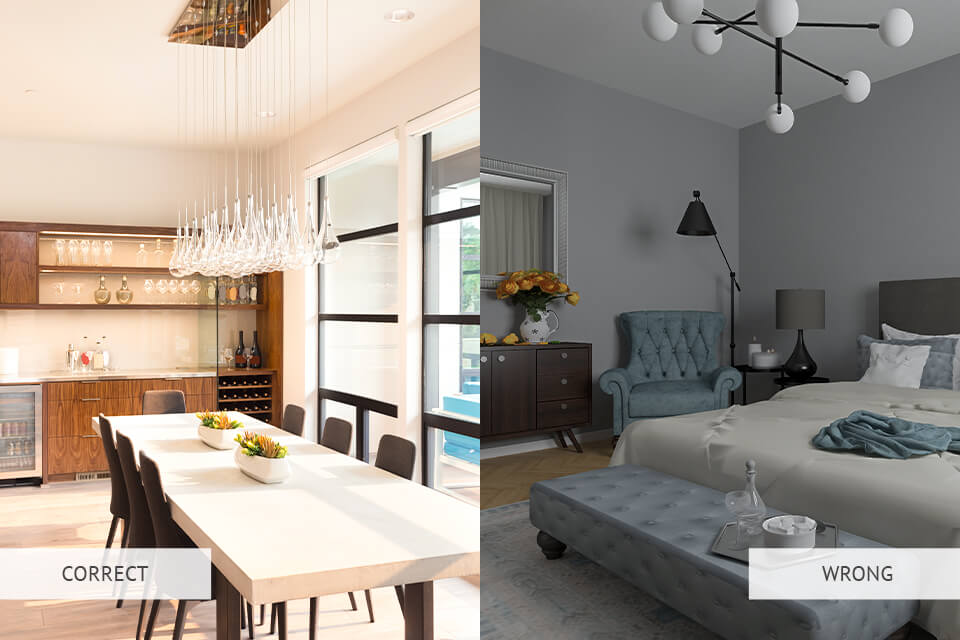
Do not photograph the interior of a room from the corner. Such photos look very trivially. Try to find more interesting, unusual angles. This is a very important thing in the real estate photography business.
For example, you can shoot a room from a doorway. Thus, you may capture the maximum amount of space and show the whole room. Also, pay attention to details. If you notice any distracting elements, such as a picture or some pieces of furniture, remove them from the frame to get a laconic and clear image.
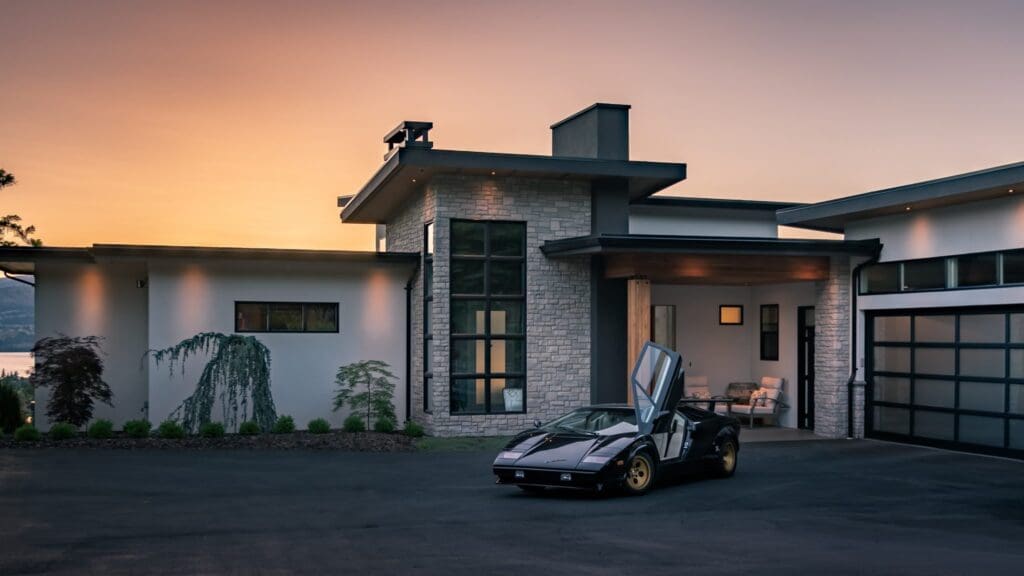
A house acquires a bit different look at night or twilight, and such photos are very popular among potential buyers. You can take an image from different angles with lights on and off. It is also a wonderful idea to incorporate distant city lights in the frame for a truly amazing look.
When shooting at eye level, you present the property in a way that mimics how people naturally experience the space. This creates a sense of familiarity and helps viewers imagine themselves moving through the rooms, assessing the layout, and envisioning their own lives within the property.
Furthermore, shooting at eye level helps maintain proper proportions and perspectives. It minimizes distortions that can occur when shooting from extreme angles or heights, ensuring that the rooms and objects within them appear accurate and true to life. This allows viewers to accurately gauge the size, scale, and layout of the property.
Additionally, it provides a more inviting and engaging visual experience. It creates a connection between the viewer and the space, eliciting an emotional response and generating a greater sense of interest and desire.
That’s why, you need to keep a camera at an eye level without strange tilting angles. Of course, there are no universal measurements for every house as much depends on the distance between the floor and the ceiling. In general, it takes some time to choose the right perspective.
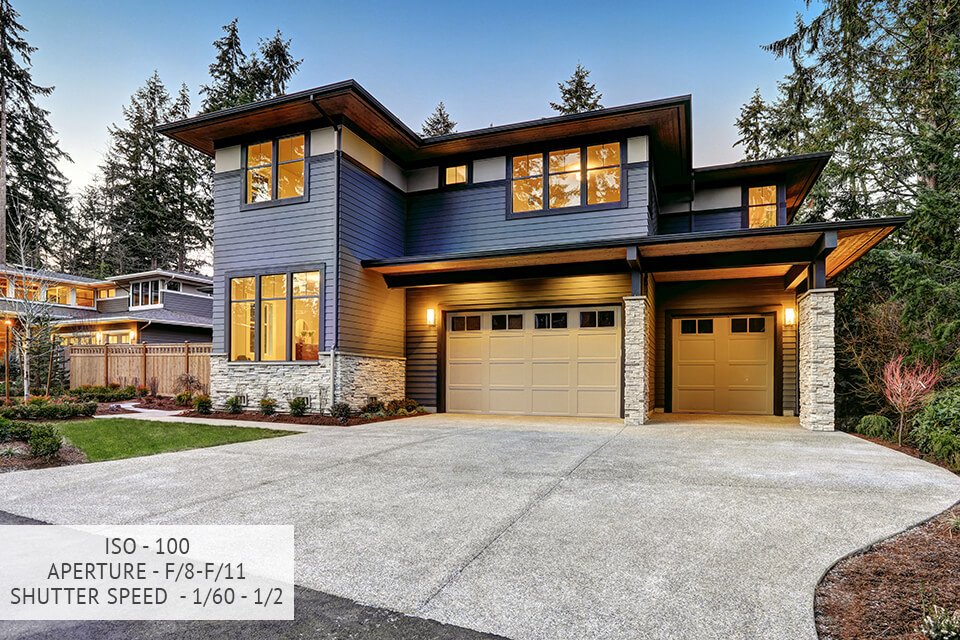
Real estate photography requires good lighting. If you do not have special lighting equipment or do not know how to use it, you can try these real estate photography camera settings to keep the quality of your photos high.
Aperture. Use an aperture value from f/7.1 to f/9. However, if you want to highlight some objects, you can try a shallow depth of field.
Shutter speed. The shutter speed should normally be between 1/60 and 1/2 a second. This value is dependent on the amount of light in the room.
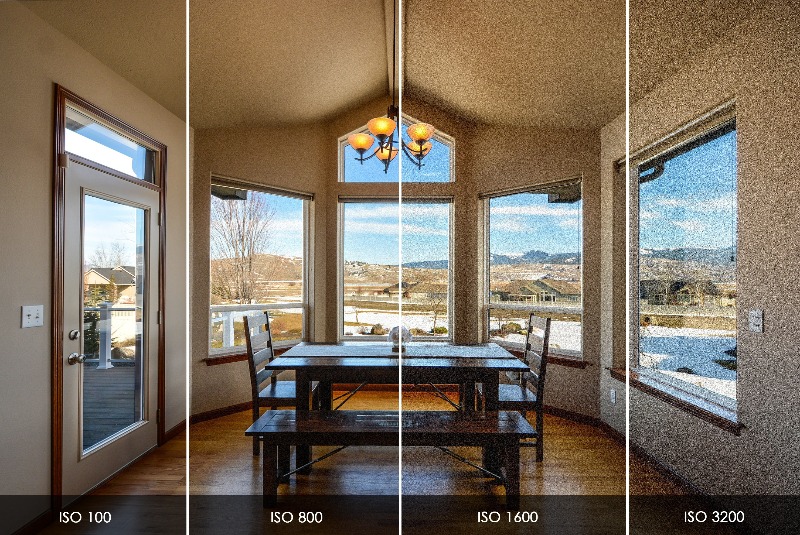
Higher shutter speeds require increasing the ISO value. Keep in mind that too high ISO can add a lot of digital noise to your photos. Try to set ISO below 400.
Learn your camera, experiment, and find the perfect value that will not spoil the quality of your pictures.

During the shooting, you need to be very careful with the lines. It is crucial to keep them straight and avoid bending. Either you are taking images of interior or exterior, you have to keep tabs on the lines and photograph them properly. However, you can always retouch them in Photoshop or similar programs.

The fact is that the result will depend not only on your skills and equipment. Typically, image quality hinges on many factors. For example, it may be affected by lighting, bad weather conditions, incorrect shadows, or clutter.
Learn how to correct light temperature. Thus, you can fix many defects very easily and quickly.
For example, very often artificial lighting in the bathroom can give an unpleasant yellow tint. To get rid of this defect, you just need to move the yellow (or orange) slider until the yellow shade turns into a plain white light.
By the way, such a problem occurs quite often if you use different light sources simultaneously, for example, combining daylight with LED, CFL, and halogen lamps.
Perspective distortion is a fairly common problem in high end real estate photography. It appears because of the use of wide-angle lenses. There are two types of distortion:
Barrel distortion: This defect occurs when using ultra-wide zooms. In this case, a photographer gets curved lines near the edge of an image instead of straight ones.
Perspective distortion: This is a peculiarity of wide-angle lenses. The fact is that the perspective looks exaggerated because it differs from the way we usually perceive an object.
In order to eliminate defects, you need to use photo editing software correctly.
If your photos have strange yellow or blue hues, you have probably adjusted WB incorrectly during the shooting. Fortunately, you can easily fix this during photo editing. However, people may perceive one and the same color a bit differently, so adjust WB very accurately.
Is there is something that makes a photo look cluttered? This can be little elements like toys or cups, or something bigger, e.g., a car visible through an open window. No matter what an object is, you can easily remove it from an image using a professional photo editing program. Just remember to feel the empty space.
If you are lucky to take photos in sunny weather, you will definitely get nice images. However, sometimes photo sessions are scheduled on gloomy days, which is a disaster for real estate photographers. In such cases, property usually looks dull and dreary.
Fortunately, you can contact skilled retouchers and ask them to replace the overcast sky with a sunny one. Of course, they will also adjust the color gamut to get a well-balanced picture. You can even choose a sunset, sunrise, or evening sky. Alternatively, you can use a real estate sky replacer and handle the task on your own.
After taking pictures and editing them, it is time to create a photography portfolio and share your images. If you want to get a professional-looking image gallery, I advise you to go with WordPress.

To achieve professional-level real estate photography results, you can use tools I’ve described below. Check out this selection of professional Photoshop actions that allow you to quickly and efficiently adjust colors in your photos while making them look more appealing.
These actions allow you to enhance pictures of buildings, houses, office spaces, and interiors while being compatible with the latest versions of Photoshop (CC and CS6).


