If you don’t know how to add watermark in Lightroom, you absolutely need this tutorial. Every shooter engaged in the photography sphere clearly understands that watermarking is necessary especially if you share images online and it’s your source of income.
In the post, I have described the main steps of adding watermark in Lightroom making batch work twice easier.

So, what is watermarking? It is the process of applying something to your images when you export or publish them on the net. The Lightroom watermark is not visible in the program itself. You may use watermarks while working in Lr Modules like Print, Web or Slideshow.
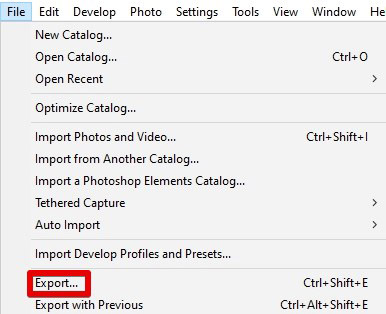
If you want to add watermark in Lightroom when working on a desktop computer, you should go to the Edit Menu and click on “Edit Watermarks”.
In case you work on a Mac, choose “Edit Watermarks” in the Lr Menu. You will see a new dialog box looking like this.

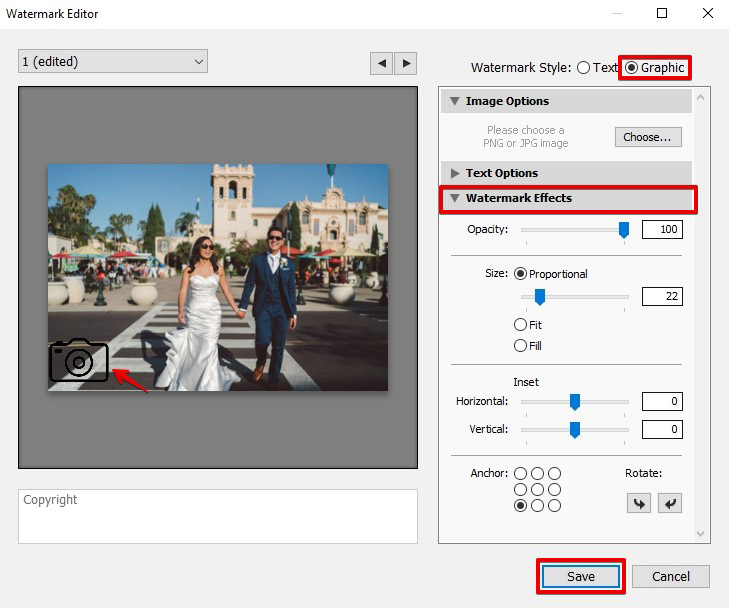
Your next step is to choose what type of Lightroom watermark you want to have. Do it in the upper-right corner of the Watermark Editor. It may be a graphic or text watermark.
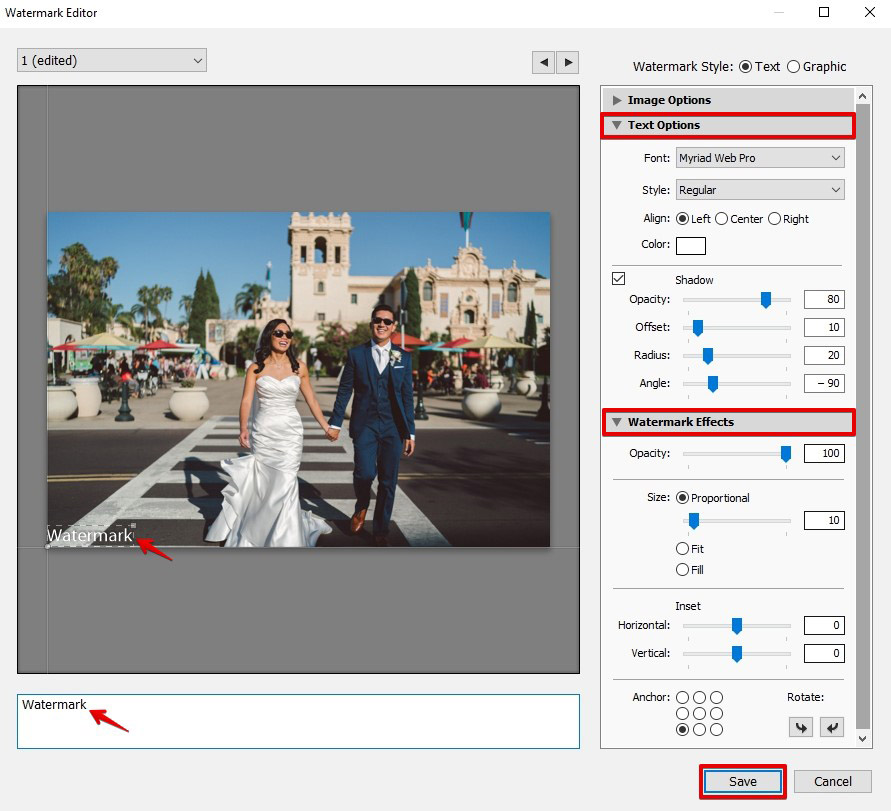
In case you decide on text watermark, you will have to type in the necessary text. You are free to use any font available on your computer.
If you choose a graphic watermark Lightroom, you are to have an image that will be attached to your picture. I recommend saving this image in PNG format, setting the background to transparent.
When figuring out how to make a watermark in Lightroom, you should also know that you are not limited to a particular look of the watermark. You can easily change it in the Watermark Editor found in the options menu.
Working with a text watermark, you may choose a font and shadow options. Such a setting as opacity is available for both types of watermarks. Of course, you may select the position of the text as well as graphics watermark. Test these options and don’t be afraid to experiment.
If you have created a Lightroom watermark and adjusted all the settings, you may save it and give it an original name. After this, you may use it in all Lr modules, allowing you to apply watermarks while exporting or publishing photos.
As far as I know, the number of Lr watermarks you can create is not limited. So, you may create various watermarks for different purposes if you like to.
Underneath the photo, you will see a Text Field. Type the text you want to use as a watermark in this field. It may be your name, your brand or copyright.
To quickly add the copyright symbol, use a keyboard shortcut. It’s Alt+0169.
Now experiment with various watermark settings. For example, you may choose a unique font from the collection of fonts available.
Then, pay attention to the shadows. Add them to the text; adjust the opacity, offset, radius and angle using the shadow slides.
Pay attention to some other effects that may alter your Lightroom watermark. For instance, regulate the opacity in such a way that it stands out more or less.
If you are not satisfied with the size of your watermark, you may alter it. Select “Proportional” and use the slide to find the perfect size for the watermark.
In case you want to save your time and the watermark size is not important for you, click “Fit” and Lr will automatically choose the necessary size. Horizontal and vertical margins are controlled via the “Inset” option.
Speaking about the position of your watermark, you may place it in one of the 9 locations offered by Lightroom.
Here, you may also rotate the image and position it horizontally or vertically. This option is available via the “Rotate” arrows.
When everything is ready and your Lightroom watermark looks perfect, you have to save it. Find the menu option called “Custom” and select “Save current settings as New Preset”. Here, don’t be too quick to complete the operation. Think about an original name for your watermark that will be easily recognized.
Eventually, you will have several watermarks so save them using straightforward names like “Copyright + Name + Position”.

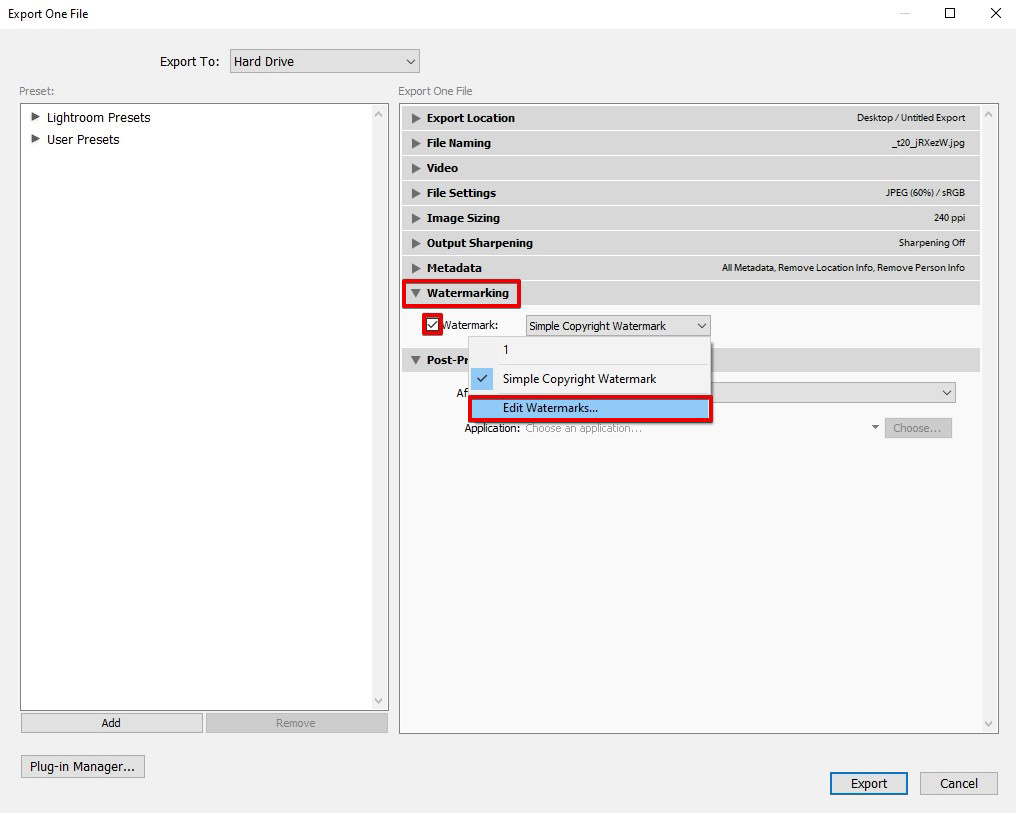
The final step is to add watermark in Lightroom. Ensure that the Watermark checkbox is selected and all the export settings in the Export dialogue are correct and press “Export”.
In such a way, the watermark will be automatically added to the selected images. Now, every time you export pics to apply a watermark, you preset will be in this section of the Export dialog (step 1).
Now the process is easier and faster because you have added a watermark Lightroom just in several clicks.
No matter what module it is, click Edit > Edit Watermarks (Windows) or Lightroom Classic > Edit Watermarks (Mac OS).
In case you have ticked several images in the Filmstrip, press the Left and Right navigation arrow buttons and see how the watermark will look on every photograph.
Click “Save” to save these settings as a preset and exit the Watermark Editor. If you want to save the watermark and continue working in the Watermark Editor, find the Preset Menu. It is in the upper-left corner of the window. Then, select “Save Current Settings as New Preset”. Enter the name in the New Preset dialog box and press “Create”.
In the upper-left corner of the window, there is the Preset Menu. Here, you may choose the Lightroom watermark.
In order to regulate its look and size, tinker with the settings in the Preset Menu. Then, click Update Preset [name].
If you want to rename a copyright watermark, go to the Preset Menu, pick the necessary watermark, click the menu again and press Rename Preset [name].
If you decide to delete the watermark, go to the Preset Menu, pick the necessary watermark, click the menu again and press Delete Preset [name].
Why do we use watermarks? Although they don’t guarantee a 100 % protection from theft, watermarks are a great way to promote your business and can be easily added or removed using watermark remover online tools, ensuring your images are both secure and visually appealing. Adding a watermark to your photos, you remind the viewer who the author of the image is.
If you work in Lr, you have two variants of watermarks available ‒ text and graphic. Here, the choice depends on the content you want to add to the image. If it’s your name and copyright, you create a text watermark. In case you promote your logo, you make a graphic watermark.
If you learn how to add watermark in Lightroom, you will save much time in the future. The process is quite simple and you may apply the ready watermarks to several images.
The watermark is attached in the process of Export. So, when you edit the pics in the Library or the Develop modules, the watermark is not visible for you.
Yes, Lightroom allows you to remove or modify the watermark at any time. You can easily make changes to the watermark settings or choose to remove it altogether without affecting the original image.
Yes, Lightroom allows you to create transparent watermarks by adjusting the opacity settings. This allows your watermark to be subtly visible without overpowering the image.
Lightroom primarily offers options for watermarking in black or white. However, you can create custom watermarks with graphic elements that include colors to add a unique touch to your images.
Absolutely! Lightroom allows you to include URLs, social media handles, or any other additional information as part of your watermark. This helps to promote your online presence alongside your images.


