Learning how to edit night sky photos in Photoshop or Lightroom is an essential step in creating awesome astrophotography. The main task here is to enhance details while preserving the natural shades, as well as remove distortions and noise which isn’t always easy.
Produce breathtaking photos of the night sky by following these easy tutorials for Photoshop, and Lightroom.

Before you begin editing night sky pictures, make sure to install powerful astrophotography software and night photography apps. The best choices are Ps and Lr.
If you are interested in complex manipulations, you have to learn how to edit night sky photos in Photoshop, and free Photoshop alternatives. Below, I have listed several proven techniques for you to try.

Image stacking involves merging all the light and calibration frames in one picture. This is one of the indispensable steps of the astrophotography editing routine.
Stacking boosts the signal-to-noise ratio, contributing to a crisp and detailed shot. The stacked shots even out the values in the entire picture, decreasing the noise. The signal isn’t being lowered, which results in a clearer shot.
Select the layers, then choose Auto-Blend Layers in the Edit menu at the top of the screen. By the way, you can also stack images in Lightroom, if you want to.
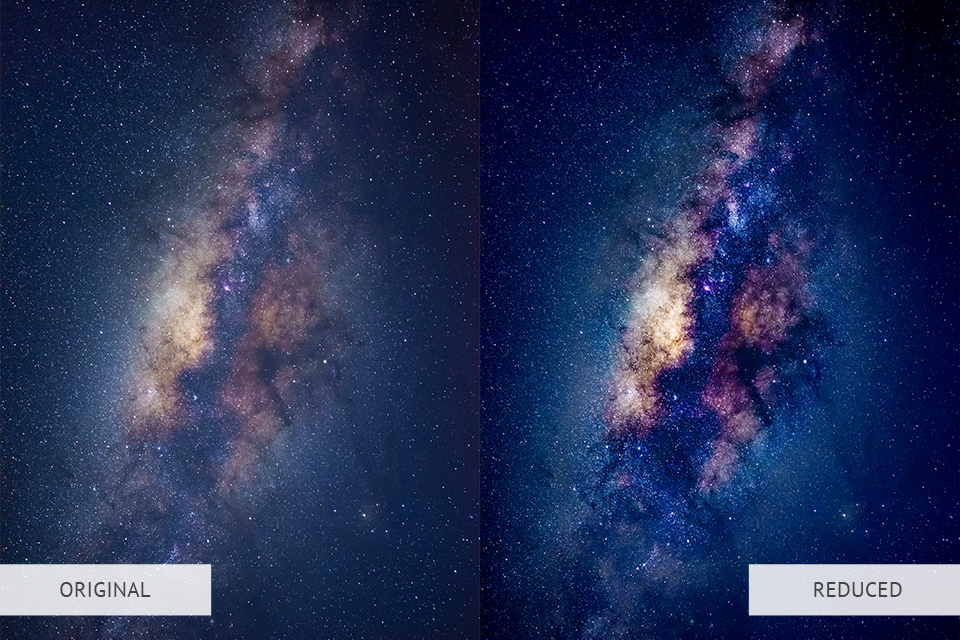
The key to editing night sky photos in Photoshop successfully is to lower the number of “peripheral” stars in the shot, emphasizing the sky. By eliminating some stars, you will achieve a cleaner night sky shot where the stars will be more distinguishable.
To lower the number of stars in Photoshop, apply the Eyedropper Tool and pick the color palette of stars that you wish to be less visible.
Tweak the Fuzziness level to ensure that you alter the required region. Play around with the Feather option, picking 1 or 2 pixels for the radius. Using the Filter options, check whether the roundness isn’t affected.
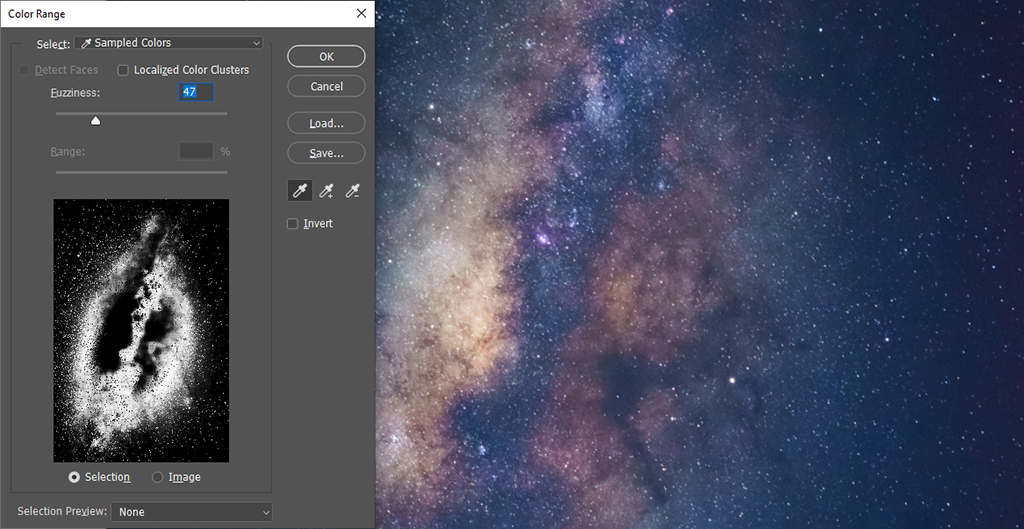
Sometimes it helps to bring out stars in Photoshop to add visual appeal to night sky shots. The process isn’t that difficult. Navigate to Select > Color Range > Select stars using the Sample tool. Copy the selection to a different layer. Then set the Layer Blending Mode to Screen.
To make the stars even more prominent, select the newly created Layers and group them using Photoshop keyboard shortcuts: Ctrl+G (Win)/Cmd+G (Mac). After that, add a mask from the layers panel to the group if you need to lower the intensity of the effect in certain parts of the shot. Last but not least, brush the parts with black.
For lighter manipulations and work with the colors, I recommend using Lightroom. It allows you to work with each color individually, and correct common drawbacks like distortions, or noise.
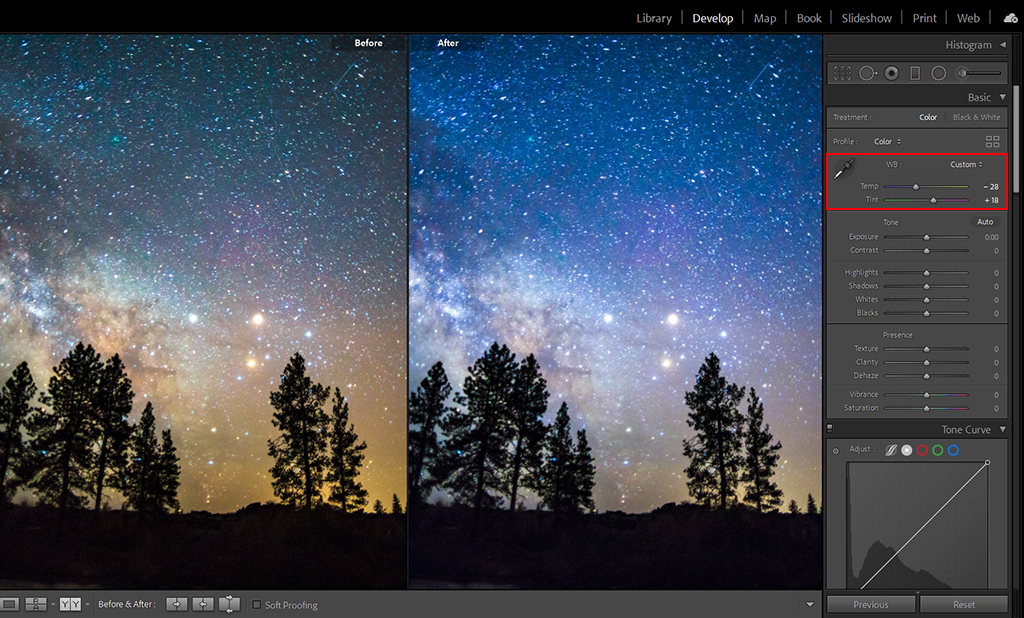
While shooting at night, it may be really hard to tweak the white balance accordingly, since the color of the night sky is affected by different natural phenomena, like twilight, light pollution, airglow, moonlight and so on.
Suppose you don’t own special cameras for astrophotography yet. In that case, you need to try your best to adjust the proper white balance that emphasizes the rich color palette and correct vibrancy. In Lightroom, there is the WB: Temp slider at the top of the Basic panel.
In most cases, Milky Way shots have too much warmth, and an abundance of brown or red shades. To fix that, move the Temp slider to the left to make the temperature in the picture colder. Consequently, if the overall tones of the shot are too cold, drifting toward blue ones, move that same slider to the right to get rid of the blueish tint.
When figuring out how to edit night sky photos in Photoshop, and Lightroom, don’t forget about contrast. If you set the Blacks option to a negative value, you will make the colors and starlight more prominent. The black areas in the shot will be darkened.
For a similar effect of brighter stars and darker skies, play around with the Whites value until you achieve an appropriate contrast of dark and light regions. To additionally enhance the contrast, tweak the contrast value bar as soon as you are done adjusting the Blacks and Whites sliders.
Although the picture with raised contrast appears vivid and bold, it may seem too obscure for some. If that is the case, raise the value of the Exposure option to make the shot lighter. Mind not to go overboard, otherwise, the result will be completely washed out.

Unless you are shooting with a professional lens for astrophotography, the final pictures may appear a bit distorted. You may spot a vignette, occasionally stretched foreground, or a ruined curve of the Milky Way that looks nothing like it is in real life.
The main reason for these distortions is the camera lens. Thankfully, there is a way to deal with that – by using the Lens Correction option in Lightroom. While editing star photos, check the box next to the “Enable Profile Correction” option.
Another box for you to check is “Remove Chromatic Aberration”. By doing this, you will eliminate all the unattractive blue, purple or green haloes that may surround dazzling stars.
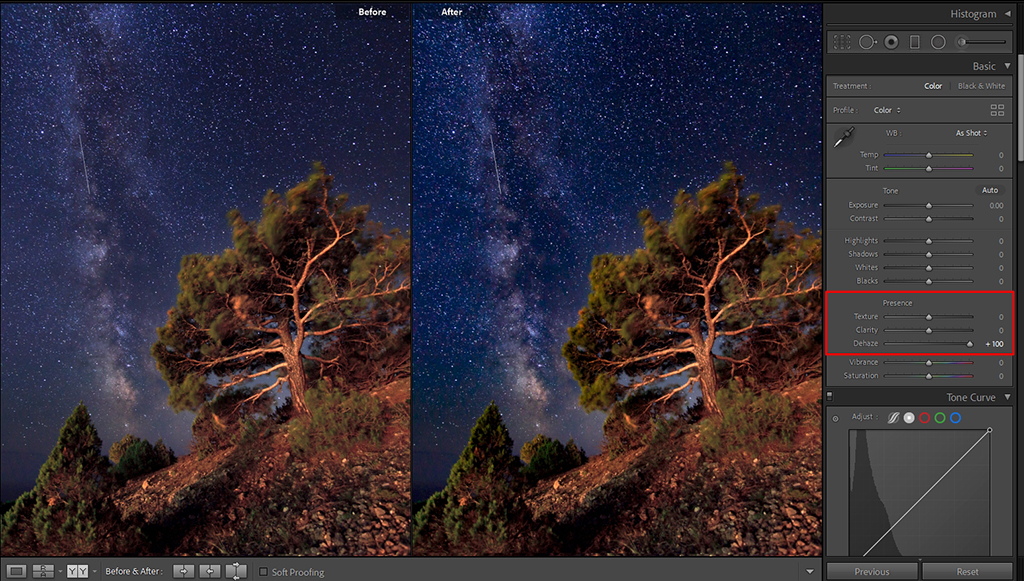
Even though the primary goal of the Lightroom Dehaze Tool is to restore the details in shots influenced by outdoor fog or haze, this tool will efficiently cope with light pollution, raising the contrast and vibrancy of the Milky Way in the night sky shots.
To find the tool, go to the Effects menu of the Develop Module. Remember to use it in moderation in order not to introduce unnecessary noise in the picture.
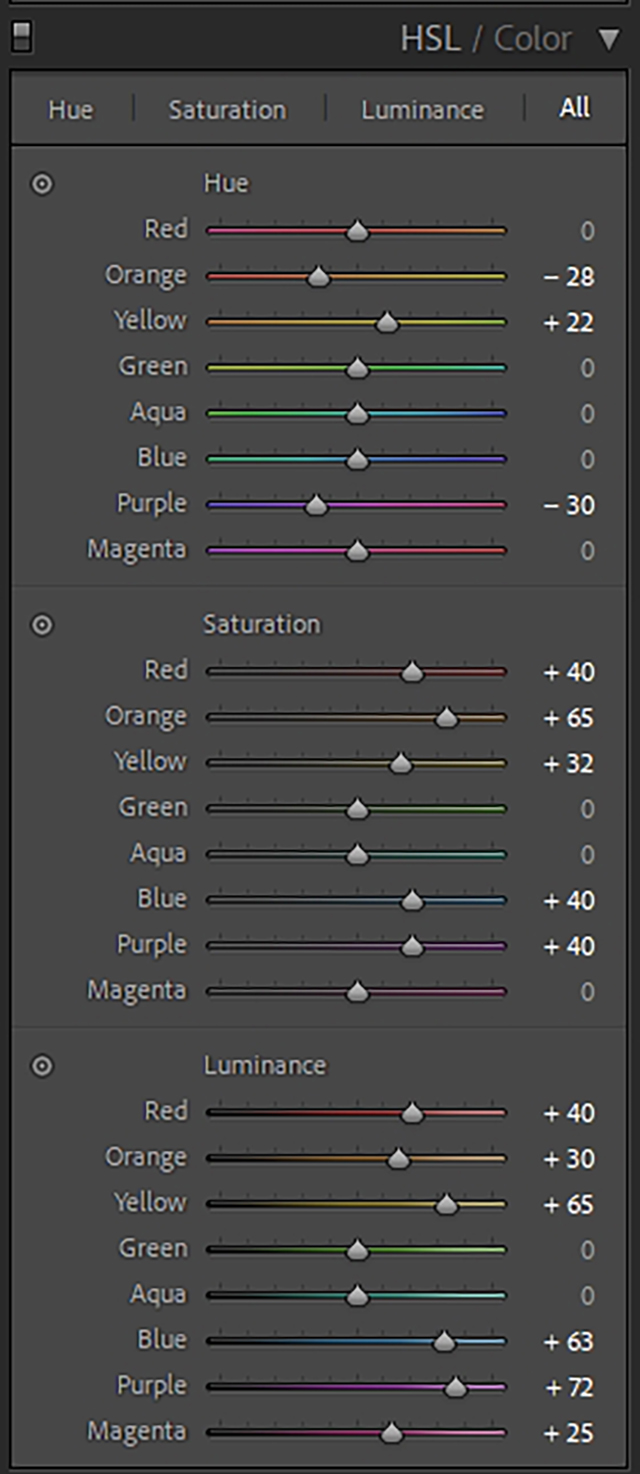
Apart from the standard sliders in the Basic panel, try experimenting with the sliders in the HSL panel. They are meant to tweak separate colors in the picture. The panel unites eight color sliders divided into three categories: Hue, Saturation, and Luminance. For a natural look of the sky, be extra careful while adjusting colors.
You should definitely play around with the blue slider. In case you are editing shots of the northern lights, I suggest that you decrease saturation for green shades since digital cameras tend to oversaturate them. If you don’t have time to adjust the colors, apply free Lightroom presets for quick results right on the spot, or approach a pro color correction service.
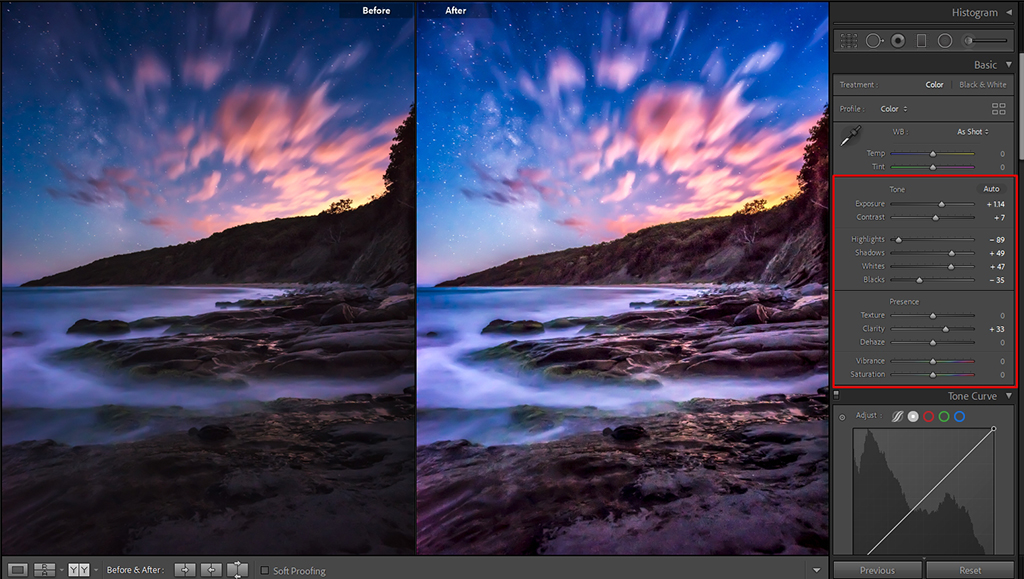
Learning how to edit night sky photos in Photoshop, and Lightroom, remember that the increased values of exposure and contrast make the particular parts of the shot extremely bright. If you notice that you have already taken it too far, simply tweak the Highlights and Shadows sliders.
For milder contrast, I recommend decreasing the Highlights value. Speaking of the Shadows value, it may be as low or as high – this depends on the initial picture and your preferences. For instance, in case adjusting the Shadows slider leads to distorted contrast, which you have previously fixed, revert the changes and continue tweaking until you are satisfied.

While editing night sky photos, you may be inclined to boost details in particular regions of the shot. To do that, apply local adjustments in Lightroom. Try the Gradient tool to raise the brightness of the foreground or bring the entire sky to the spotlight in the shot.
One more effective tool that belongs to the list of local adjustments is the Adjustment Brush tool. It has all the power of the Basic panel but lets you apply the tweaks to a particular area, not to the whole shot.
Play around with such parameters as Clarity, Exposure, Contrast, Shadows, Saturation, Brush Size, Flow, Density, and Feathering for greater control over the size and strength of the brush strokes.
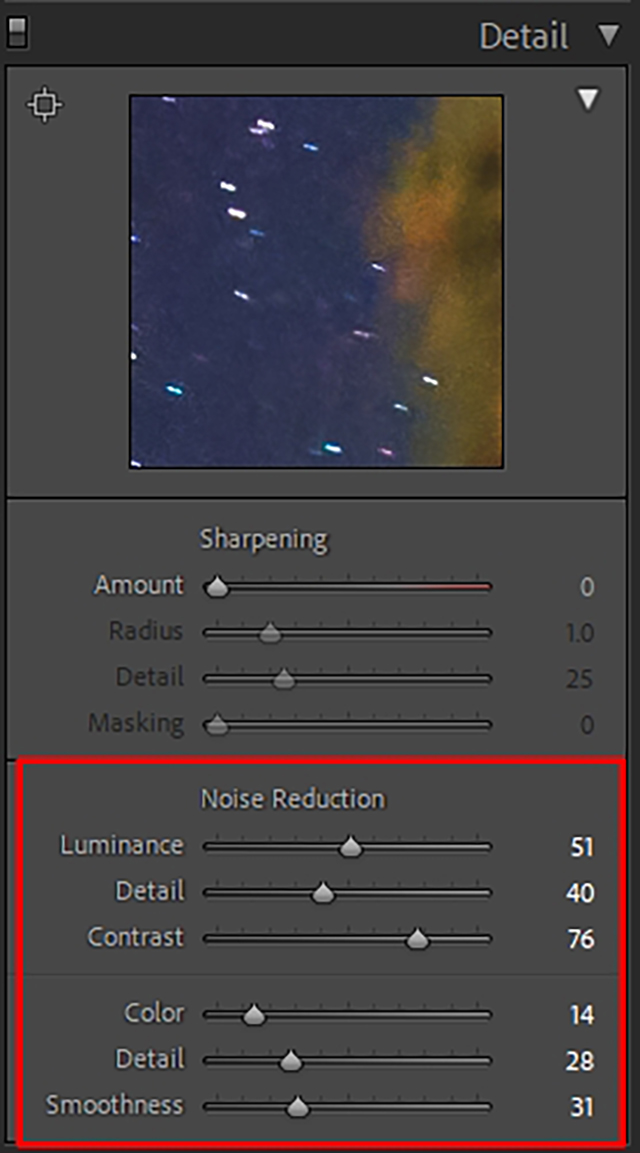
More often than not, you have to configure high ISO values during night. It leads to undesired noise, which needs to be corrected at the picture post-production stage. You may do that using specific tools in the Detail panel. Just note to keep the noise reduction to the minimum for better results.
As for color noise reduction, don’t push the values too high since it may leave some stars colorless. The recommended value is below 60. One more slider you shouldn’t miss is the Masking one. With its help, it is possible to hide sharpening in particular regions of the picture, for instance, wherever the noise is.
By holding the Alt/Opt key and moving the Masking slider, you will be able to distinguish the areas that are being sharpened. If you use Lightroom as a star photo editor, the suggested values of the Masking slider are around 90.
You may have tons of creative night photography ideas, but if you don’t know how to photograph the moon, stars, and sky, you won’t be able to realize them.

There are several things your night shots are impossible without.
First and foremost is a tripod. When optical exposure is long, it is impossible to take a good photo of the sky without a tripod brand like Manfrotto BeFree.
A camera should be with manual settings, like Canon 6D Mark II and it is desirable to shoot in RAW because this format gives great possibilities for processing images. Just as well that the ISO can be put on 800-1600 without much damage to the image.
Large-aperture and wide angle lenses for shooting static stars and large coverage areas of the sky.
Camera remote for displaying long excerpts. A spare battery because it dies fast enough.
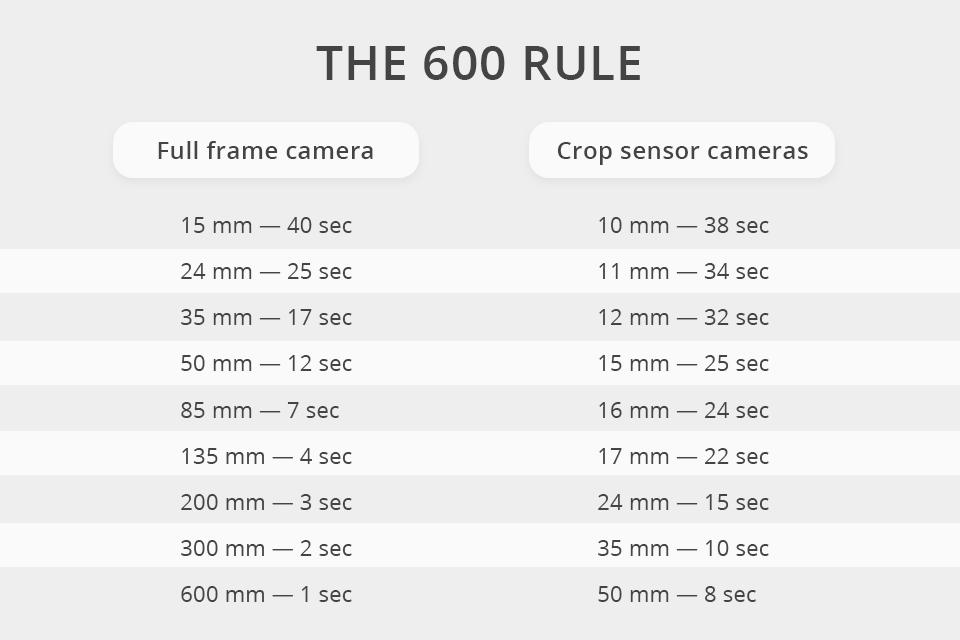
As you have already understood, because the stars move, they remain as fixed points only to a certain shutter speed. And if it would be of greater value, they turn into strips. And in order to calculate the critical importance of exposure time, there is a "600" rule.
You need to divide 600 in the focal length of your lens and we get maximum exposure, in which the stars are still points. You’ll find the calculation for crop and full frame camera in the picture above.
At night you can forget about the automatic focus, so you'll need to use only the manual focus. Usually, it is advised to put it in an extreme position to infinity, because we are shooting stars.
The diaphragm should be opened as widely as possible. 1.2-1.8 – if your camera allows.
The exposure time for shooting static stars should be 10-40 sec.
The exposure time for shooting star trails from 10 minutes to several hours.
Timelapse presupposes making lots of photos of static stars, and then turning them into a video with free time lapse software, like Adobe Premiere, or LRTimelapse. You can produce very beautiful videos like moving stars across the sky. Timelapse with stars is quite a long process. Here is a calculation of how many photos you will need to make a 1-minute video with the rotation of the sky.
The video contains 25 fps in 1 second, so it will be already 25 * 60 = 1500 FPS. We shoot each picture, for example, with 30 seconds shutter and the 1-sec interval between frames. This means, that for capturing 1500 FPS we have to spend 31 * 1500 = 46500 seconds, or 775 minutes ~ 13 hours.

If you are unwilling to fiddle with settings in Photoshop, use overlays in Photoshop for quick and qualitative editing of night sky pictures. This pack comes in handy for color correction purposes, as well as for adding gorgeous overlays with moon and bright stars. You’ll find suitable tools for both - a night sky and a day sky.


