How To Photograph The Solar Eclipse: 20 Tips
When you purchase through affiliate links on our site, we may earn a commission. Here’s how it works.
Would like to photograph the solar eclipse safely and beautifully? While lunar eclipses are safe for viewing, solar eclipses are a different story. You need to take special precautions to guarantee your safety. Besides, you need to buy protective gear for your camera and many other things which we’ll discuss below.
20 Tips for Photographing Solar Eclipse
A solar eclipse occurs during the moment when the Moon’s shadow covers Earth. This can happen only during the new moon phase when the Moon passes between the Sun and Earth.
Eclipse photography comes with a set of challenges such as the limited timeframe (no more than 7 minutes) so you have to act with speed and precision. Another difficulty is the dangerous nature of this spectacle. Read my article and you’ll be fully prepared for organizing a solar eclipse shoot.
1. Learn Everything about Solar Eclipse
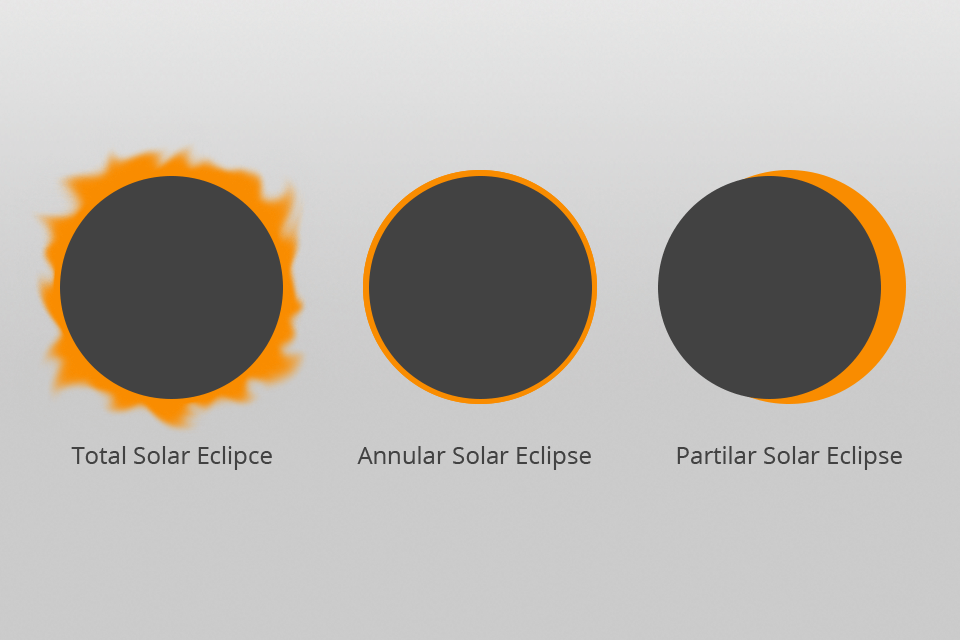
A solar eclipse is a rare occurrence that happens when the Moon moves between the Sun and Earth, partially or completely blocking sunrays while casting a shadow on Earth. If the observer is located within the shadowed area, they witness a total solar eclipse, during which the Moon completely hides the sun.
Meanwhile, the sky becomes dark and sometimes you can even see stars. The weather becomes a bit colder. Animals start showing concern, while some plants close their leaves. To keep track of different phases, time, and find the best location for an eclipse shoot, I suggest using the Total Solar Eclipse App.
- Learn more about sun photography.
2. Remember About Your Protection

Don’t look at the sun with unaided eyes as it can damage your eyesight and even cause blindness. To prevent any kind of damage, use certified sunglasses.
Additionally, to protect your camera, you shouldn’t aim it at the sun if the lens isn’t covered with a certified solar filter. The lens can increase the intensity and brightness of the sunlight and damage the equipment.
Don’t look through the camera’s viewfinder when it’s aimed at the sun or near it since that can also hurt your eyesight.
- Learn more about twilight photography.
3. Observe Solar Eclipse Safely

If for some reason, you don’t have sunglasses for watching the eclipse on you and no chance to get them in time, try out this solution:
- Use the camera in real-time/LCD-screen mode. If you plan to take photos, you can harmlessly look at the LCD screen while your camera is in real-time mode. Keep your gear protected from possible malfunctions by making sure the lens is covered with a very thick solar filter with neutral density.
- Build a small camera obscura/projector. Constructing such a device is very simple. Take two cards, make a small hole in one card, then take the second sheet with a pinhole and combine them with the sun. The image of the solar eclipse will be projected through the pinhole in the second card.
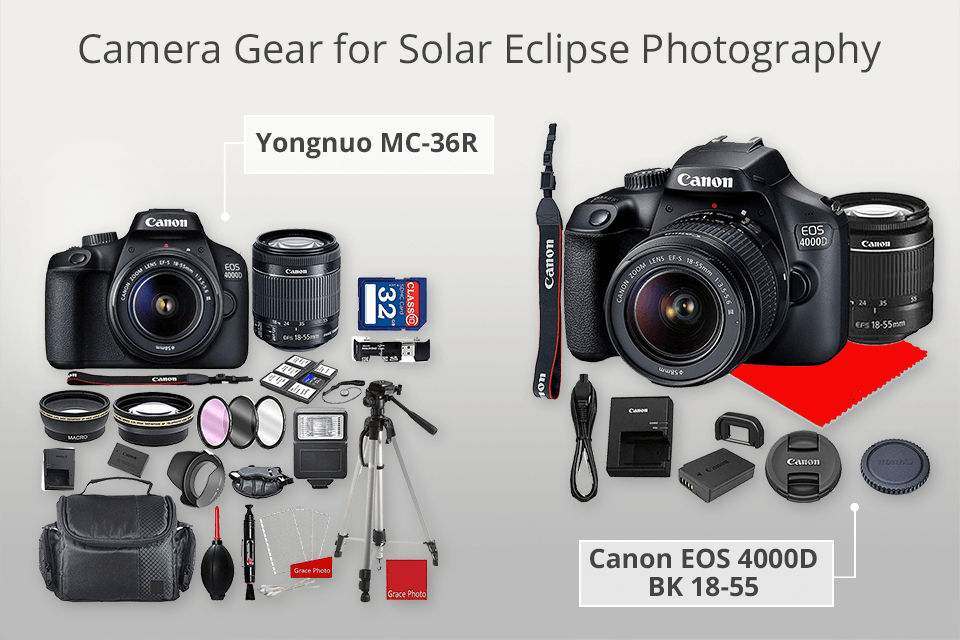
4. Prepare Gear in Advance

Ideally, you want to capture two types of images, which require two different set-ups such as a wide-angle view of the location where you’re shooting at and a close-up eclipse photo taken with a super telephoto lens.
Remember that the solar eclipse makes the shooting conditions rather dark so wide-angle landscape photos can turn out looking amazing, especially if you have something beautiful to include in the shot.
- DSLR - Canon EOS 4000D.
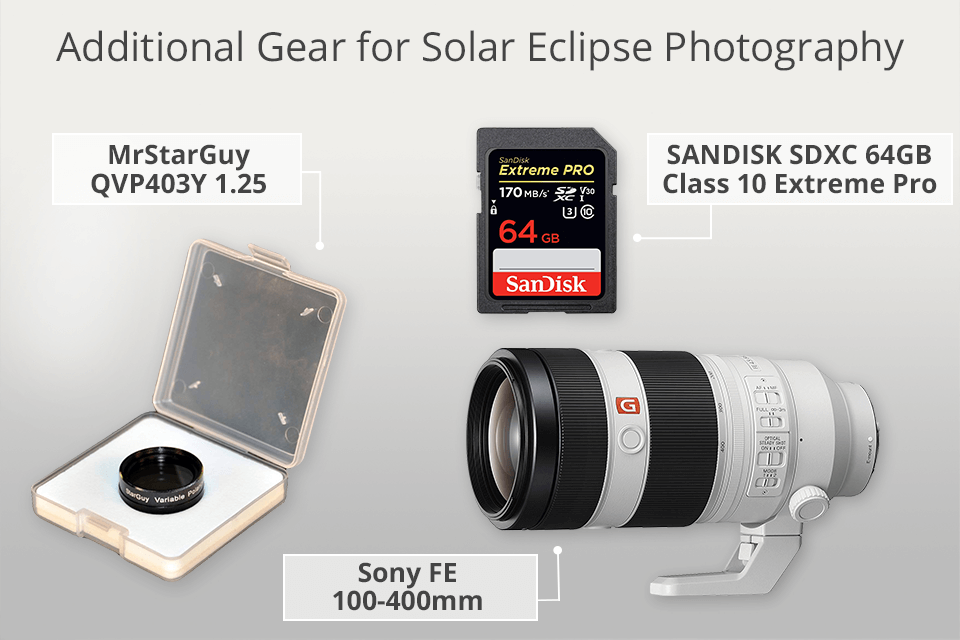
- Super telephoto lens - G Master 100-400mm.
- ND/Solar filter - MrStarGuy QVP403Y 1.25.
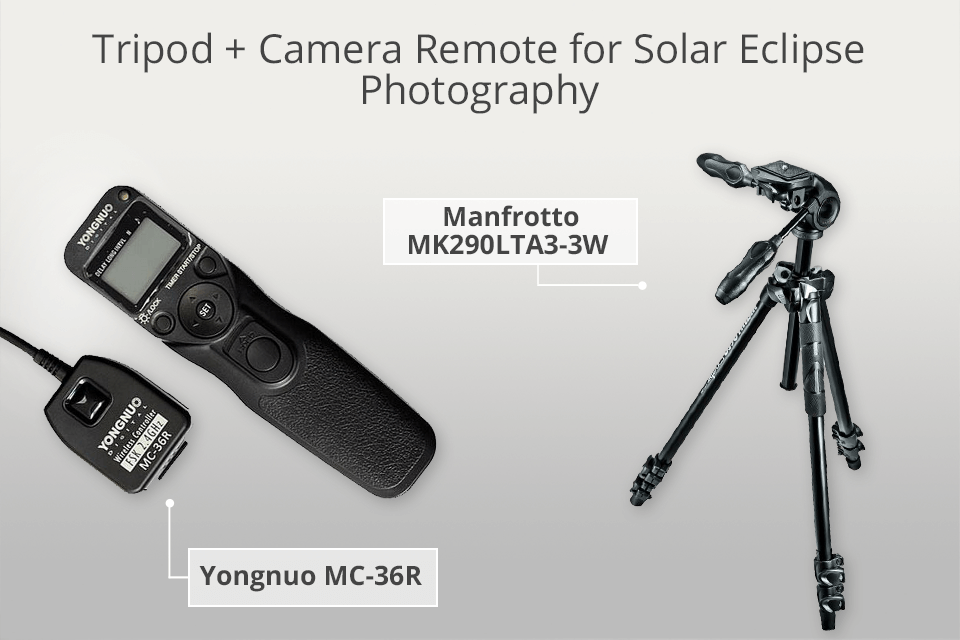
- Tripod - Manfrotto MK290LTA3-3W.
- Wireless shutter remote - Yongnuo MC-36R.
5. Use a Tripod
To ensure you take photos without camera shake, use a tripod to support your gear. Check if the tripod and its head are sturdy enough to support the weight of your equipment.
I recommend using a carbon fiber tripod as they are more lightweight and sturdier compared to aluminum models while costing only a tad more. Among the good tripods I’ve tried, I suggest you get Manfrotto Mk290lta3-3w. Try to make your construction as portable, easy to set-up and use as possible. Portability is the key to success if you’ll need to quickly move to a different place for a better view.
- Learn more about how to use a tripod.
6. Have Several Solar Filters
When taking pictures of solar eclipse, you need a solar filter to protect your camera and lens. I can recommend the Helios 20-Stop Solar Filter as this filter shows the sun in a neutral-white color without a blue or red tone, which are common for many glass and film filters.
The only time when you don’t need a filter is when the sun is completely hidden behind the moon, aka during the full solar eclipse.
When it comes to solar filters, you have several options: a filter-sheet, a spin-on front filter or a polarizer filter, installed between your camera and the lens on a model with interchangeable lenses.
7. Only DSLR
Many photographers prefer to use DSLR cameras as they are the most versatile solution. The only drawback of such cameras is the price as their cost can scare away a beginner photographer. However, if you happen to have such a camera – you’re in luck! You can use all kinds of lenses with this camera, depending on what photos you want to take. Telephoto and wide-angle lenses are the most popular options, while some photographers even connect their DSLRs directly to telescopes to fill the shot with the scary might of the dark sun. When picking a DSLR camera, I recommend going with Canon EOS 4000D BK 18-55 to learn how to photograph a solar eclipse Canon.
- Learn more about the best DSLR cameras.
8. Choose the Correct Camera Settings
The first thing you have to do is install a good solar eclipse filter onto your lens. Next, you have to adjust the following settings:
- Set the camera to shoot in RAW (or JPEG of the highest quality)
- Set the aperture at f/8
- In manual mode, set the camera’s focus to infinity
- Keep ISO at the lowest possible value
- Use the smallest shutter speed (I recommend 1/8000)
However, you should remember that these are the starting settings that always have to be adjusted according to the shooting conditions during the eclipse. However, you should remember that these are the starting settings that always have to be adjusted according to the shooting conditions during the eclipse, otherwise, you'll have to spend much time in astrophotography software improving your photos.
9. Use High ISO
When photographing the solar eclipse, you need to set the ISO sensitivity of your camera to 400 (or higher) to keep the shutter speed low, minimizing the blur created by vibrations and tracking mistakes. DSLRs usually don’t show noise while ISO doesn’t exceed 400.
Before the eclipse begins, make sure you’ve manually set the ISO value. Don’t let your camera do it for you (via the “auto ISO” function). Here are some ISO combinations that eclipse photography experts have been using for years: ISO 100, ISO 200, or ISO 400. If you’re under haze or thin clouds, you’ll need to increase the exposure time by two or even more.
10. Don’t Save Money on Your Memory Card
During a solar eclipse photography shoot, use a reliable high-speed SD card with plenty of storage space (16GB or more). I would suggest getting SANDISK SDXC 64GB Class 10 Extreme Pro to receive the fastest recording speed possible.
I also suggest taking additional SD cards to ensure you have enough space to take as many photos as you can for future editing. At least put one spare SD card to be prepared for any unpleasant surprises.
- View the best SD card holders.
11. Check the Image Settings

Always check if you have the correct camera settings for solar eclipse before the shoot. If you have a chance to take some test shots, then make use of it. This will help you understand what exposure settings you should use in combination with your filters.
Such a test will also show all possible focusing and vibration problems as well as possible inner reflections and vignettes (dark image edges). Remember that the solar eclipse doesn’t last long so you won’t have much time to do everything right.
12. Learn What Bailey’s Beads Are

Bailey’s beads are a sequence of bright spots along the lunar limb. They appear when the solar disk is almost completely hidden by the moon. A few seconds before the final, you will see the effect of a diamond ring and Bailey's beads.
Both are short-lived and extremely beautiful. So it is rather important to be well-prepared and know how to photograph solar eclipse and what you should do to capture this phenomenon. You will need to shoot in burst mode because the aspect of the balls changes very quickly and the ring is ephemeral.
You can start shooting the ring and beads in about 10 seconds before the second contact. During the shooting, you can remove the filter from the camera. Since there is no bright glow, you run the risk of getting just a dark picture if you use a filter.
I also advise you to use the burst shooting mode to capture the right moment. Remember, you should do everything very quickly since Bailey’s Beads phenomenon lasts less than a minute.
- Choose the best night photography app.
13. Pay Attention to the Accuracy and Sharpness of the Focus
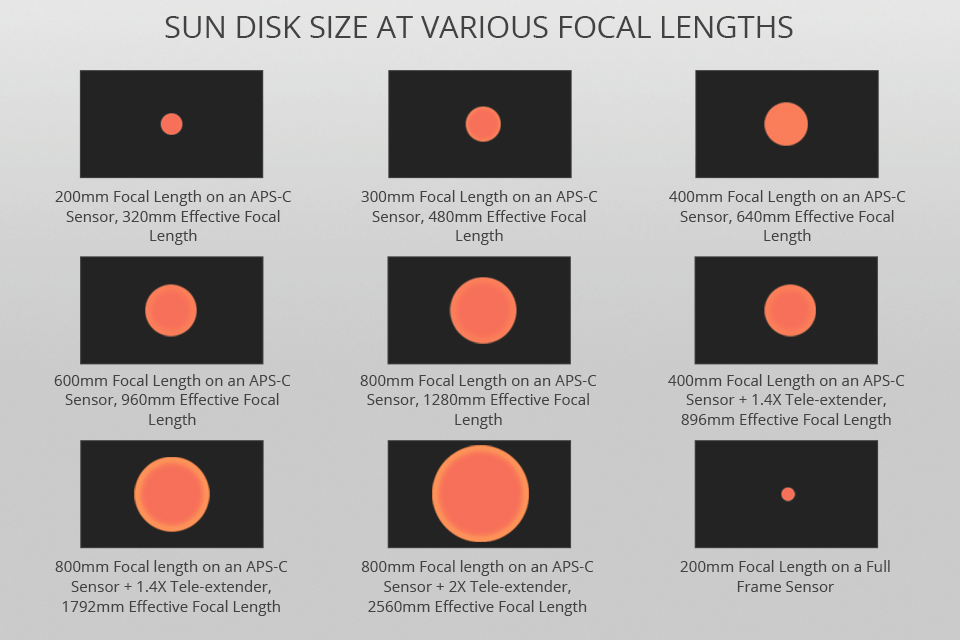
It doesn’t matter what lens you use for photographing the solar eclipse, it is important to get accurate focus on the sun and moon. You may not even think about trying to focus on the sun without an ND solar filter. It is too bright and can be too small in the frame.
Instead, I would advise you to use the moon as a focus object in the live view mode before a solar eclipse begins. In this way, you will get the correct focus from one time and then you will not need to try to correct or change something later. As a result, you will not waste too much time during an eclipse.
14. Look at Composition and Framing

When photographing solar eclipse with a super-telephoto lens for close-ups, do not worry about the composition, you just need the sun and moon to be in the center of the frame. Location is not a big deal. You can easily crop the image during the editing.
If you have a couple of thick clouds in the frame, use this. Play around with the exposure and see if you can use them advantageously as part of the composition. If you plan to use a wide-angle lens for solar eclipse photography, you need to plan each shot and pay attention to both composition and framing.
Also, having an interesting object in the foreground will improve your picture, so spend some time looking for interesting places.
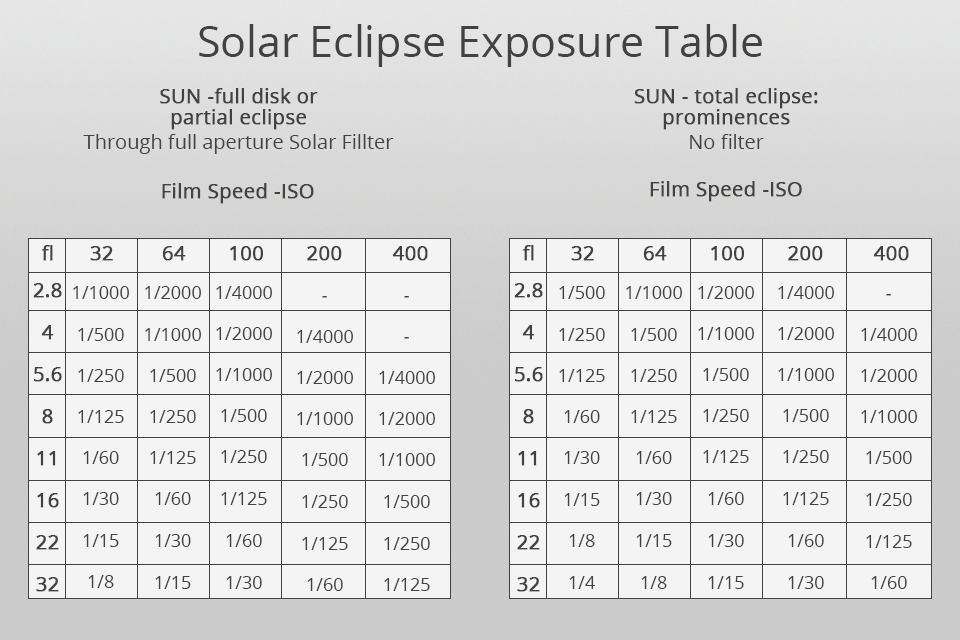
15. Look at the Initial Exposition

The easiest way to determine exposure is to carry out a calibration test in the clear sun on a bright day before the eclipse. Shoot the midday sun with a fixed aperture using each shutter speed from 1/4000 second to 1/30 second.
Take a few shots and choose a photo with the best combination of shutter speed and aperture. Then use these camera settings for solar eclipse shooting. A histogram function on your camera will help you choose the best exposure.
The histogram should not be cropped. It should lie to the upper limit of the brightness values. You can also decide to limit the exposure to take a picture of a solar eclipse with an ideal setting.
- Check out the best telescope for astrophotography.
16. Watch the Sun

If the camera setup has a short focal length, the liquid pan head provides smooth guidance when you manually track the position of the sun moving in the sky at 0.25 degrees per minute. When taking pictures of solar eclipse, you should set slow shutter speed (no more than a second).
In this way, the image will not be blurry because of the Earth rotation. If you use a telephoto lens with extra-long focusing, then the equatorial mount with slow-motion controls or a motor drive will be ideal for you.
The motor drive is convenient because it keeps the center of the sun in the frame when focusing, adjusts the exposure settings and takes pictures.
- Explore the best lens for astrophotography.
17. Capture Every Phase of an Eclipse
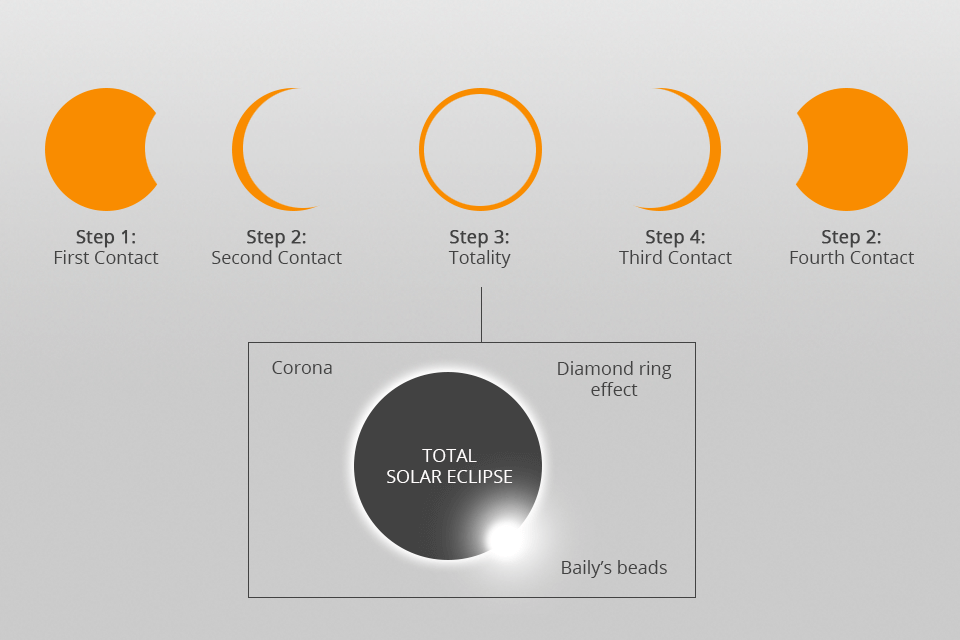
When preparing for eclipse photography, you should decide whether you will shoot the entire sequence of the solar eclipse or just the time when the moon overlaps the sun. I recommend you to capture the entire sequence from start to finish.
As a result, you’ll have photographs of each phase. You will get the most interesting thing when you combine snapshots of each phase into one. You must be patient while photographing the solar eclipse as you need to wait until the moment when you can fix a new phase.
If you don’t have time to stay during the entire eclipse, then I would advise focusing at the time of the total eclipse or the moment near it.
- Learn more about shooting at night.
18. Try Photographing a Total Solar Eclipse

For me, the most magical phase of an eclipse is a total solar eclipse. When within a few minutes the pearl-white crown of the Sun and the chromosphere are visible. During the phase of the total solar eclipse, all filters must be removed because the solar crown has a surface brightness thousands of times weaker than the visible disk or photosphere of the Sun.
So be sure to take off the filters. Besides, it is completely safe to observe a total eclipse with the naked eye. You have to deal with camera and exposure settings because photographers are usually distracted by viewing this phase of the solar eclipse that they forget to take pictures.
- Use these night photography ideas for your photoshoot.
19. Make a Backup
Besides the information on how to take pictures of solar eclipse, you should know how to store your images safely. After the shooting, mark the memory cards and create a back up of all the image files by copying them to your hard drive, CD or flash drive.
Store the original images in a separate folder or on the disk, and edit only copies of the images. This is to ensure that you save images even if you accidentally delete them.
20. Edit Your Images

Since the original camera data is already in digital format, you can easily enhance your shots after taking pictures of solar eclipse. Use Adobe Photoshop to make your photos better. You can adjust the brightness, contrast, sharpness and color balance of the image.
You can highlight the full range of crown brightness levels by digitally folding several different exposures into a single composite image. Remember to take a few minutes to enjoy the whole phenomenon with the naked eye or with binoculars.
Freebies for Solar Eclipse Photography
Using these presets, you can turn your photos into real pieces of art. Use them and amaze everyone with your pictures.
1. Darken
This preset will allow you to enhance your picture in one click. It will give the image warm shades and highlight the necessary details.
2. Soft HDR
This free filter is suitable for any type of photography. This HDR preset softens the photo, adding saturation and a bit of contrast.
3. Sunny Day
This preset will help you enhance the colors in your image and add brightness, purple and yellow tones that complement the picture of any genre.


