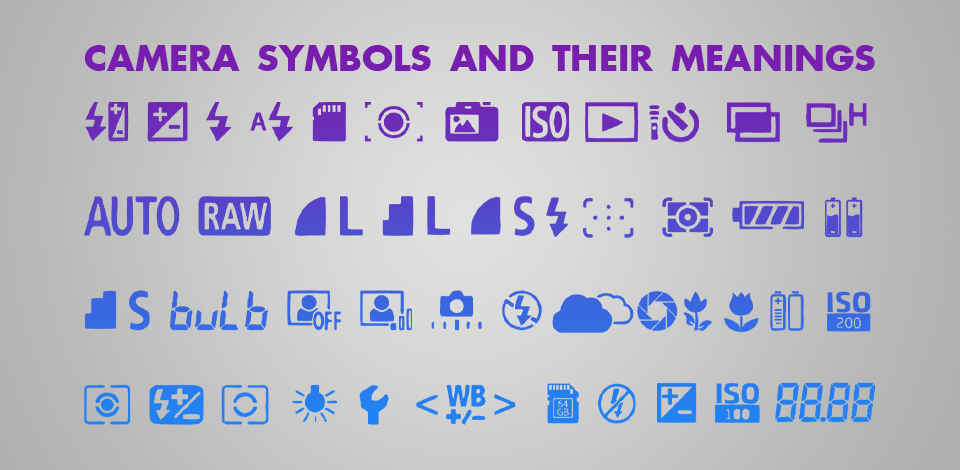
Modern cameras come with a broad range of settings and icons. New users can easily get lost in them since some symbols are hard to identify. Additionally, depending on your level of photography experience, you can either dive deeper and research all available settings or stay on the surface level and delegate most of the work to your camera. This article offers a brief description of all camera symbols meaning to help you learn what you’re dealing with.
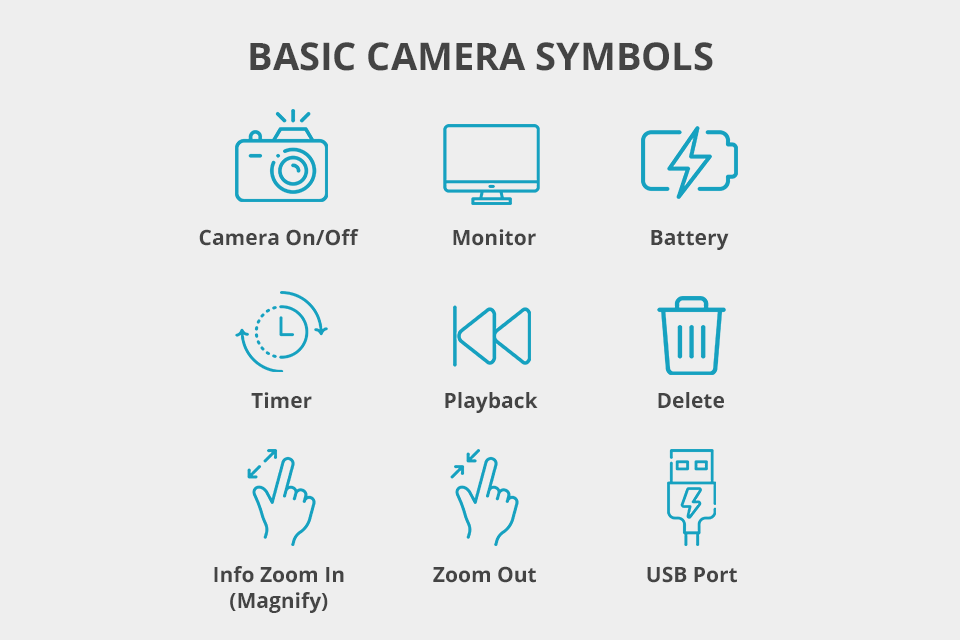
Camera On/Off: Is used for turning the camera on/off.
Monitor: Used for turning the display on/off.
Battery: Displays the amount of remaining battery life.
Timer: Lets you choose when the shutter will be released, allowing you to get into the picture. Possible durations depend on the specific camera model. This feature is also handy for minimizing camera shake in low-light shooting conditions since you won't be pressing the button during shutter release.
Playback: Used for viewing photos stored on the camera via the built-in LCD screen.
Delete: Deleted unnecessary photos. Most cameras offer a menu that requires you to confirm the deletion of either individual photos or all photos. Once removed, images can’t be restored.
Info Button: As you can guess from its name, this camera symbol will bring up a screen that contains information regarding the current shooting parameters. If you push this button in live view, you’ll be able to switch between such options as histogram, grid, level adjustments, and so on.
Zoom in or Magnify: This allows zooming into the scene via the LCD screen in preview mode to examine the focus area and various details. It can also be used in live view to make sure the shot is properly focused.
Zoom Out: This allows you to back out from a zoomed-in picture or in playback mode, letting you view photo thumbnails on the LCD.
USB Port: Marks the location where you have to connect the USB cable to copy images to your PC or laptop.
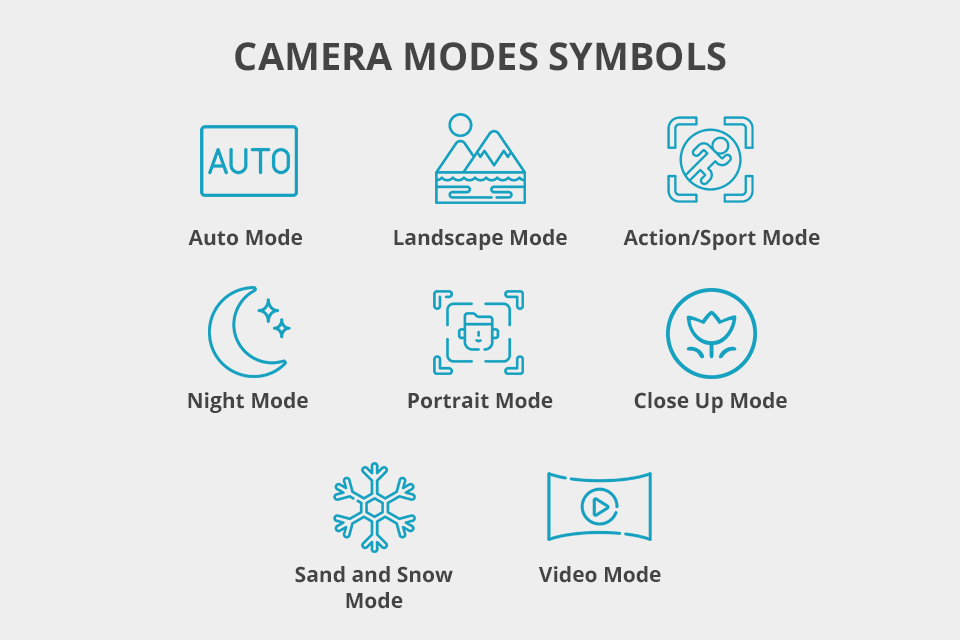
Automatic Mode: This is typically the default mode used by the majority of digital cameras. Its camera icon may be marked as “AUTO.” This mode automatically focuses the shot while employing standard, average exposure parameters. It’s suitable for taking regular photos but if you want to enhance your photos with some special effects, you should check out all the other modes.
Landscape Mode: This mode is employed for taking photos of distant subjects. Avoid using flash for such pictures at all costs. This mode can also be marked with an "8" icon.
Action/Sport Mode: If you frequently take photos of moving subjects, this is the optimal mode for you. It chooses the fastest shutter speed possible to help you capture motion in maximum detail. Using flash for such pictures is also permissible.
Night Mode: This camera mode is designed for taking photos at nighttime or in low-light settings. It relies on low shutter speeds and can also occasionally employ flash. The symbols used for marking night mode can vary from camera to camera. Another popular inclusion is a backlight mode that is accompanied by a fill flash icon. This mode is also useful for working with shadowed subjects. Remember to keep the camera perfectly still when using this mode. When setting slow shutter speeds, the lens remains open longer so any movement can result in a blurry photo.
Portrait Mode: This mode is designed for taking pictures of human faces. It excels at slightly blurring the backdrop while focusing the shot on the subject’s face. It provides terrific results when paired with the red-eye reduction mode when the situation calls for it.
Close Up Mode: This mode is aimed at taking photos of subjects that are only 2 feet away or closer, similar to macro photography. If you want to make sure the subject fills nearly the entire shot, go with this option. You should also remember that flash won’t be used automatically in this mode, so you have to enable it manually if needed. Photographers mainly use this setting for life-size photos of insects, flowers, and other small objects to bring out as much detail as possible.
Sand and Snow Mode: Bright and glaring backdrops can make the camera underexpose the subject. This mode ensures the shot is overexposed to capture details that wouldn't be included otherwise.
Video Mode: If you want to record videos with your DSLR, set the mode to this icon. This mode is particularly useful for recording short clips that can be used as stock footage.
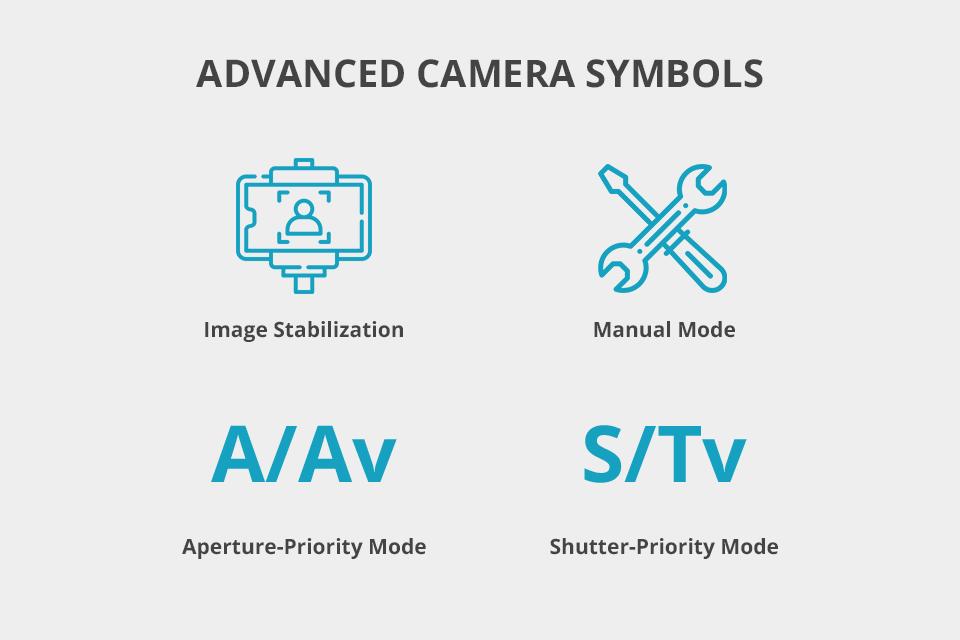
Image Stabilization: If your hands are prone to shaking when taking photos, this mode is here to help. It will stabilize the shot to ensure it doesn’t end up looking blurry.
Manual Mode: This is another popular mode among professional photographers. It lets you employ the camera’s main buttons to adjust the shutter speed and aperture but keep in mind that you’ll no longer have a safety net around you so make sure you don’t over- or underexpose the shot.
Aperture-Priority Mode: This mode lets you manually adjust the aperture (determines the diameter of the lens) while the system automatically chooses the shutter speed. Once you’ve chosen the desired aperture, the camera will ensure you get the perfect amount of light to properly expose the photo. You can use this mode to blur the backdrop or to ensure the entire scene is in focus, depending on your vision.
Shutter-Priority Mode: This mode is the direct opposite of the previous one. You can use it to manually set the shutter speed while the system chooses the aperture.
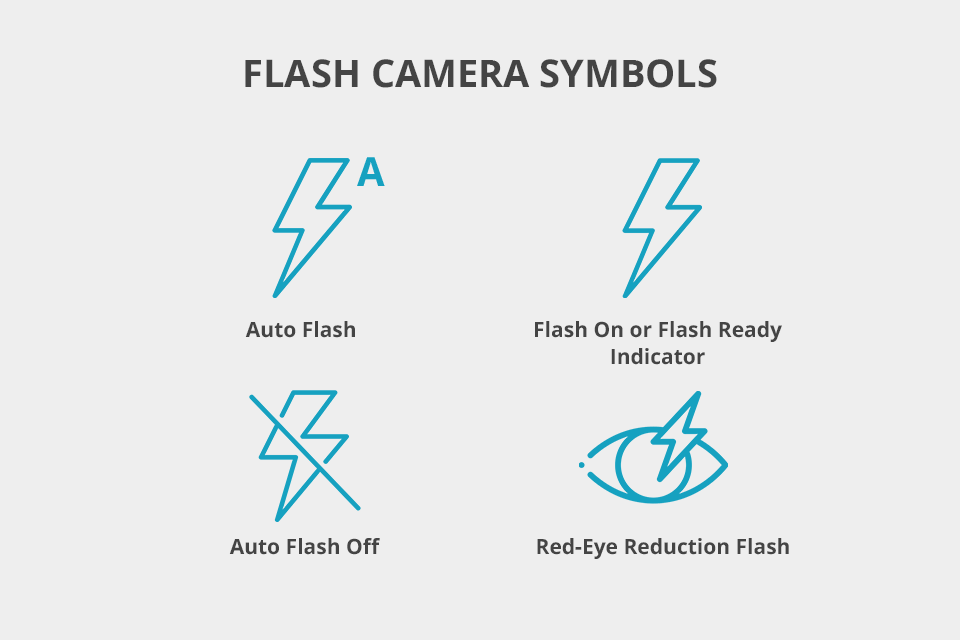
Auto Flash: This setting will let the camera automatically pop up the flash whenever the shutter button is half-pressed. This feature is supported by auto mode and select scene modes.
Flash On or Flash Ready Indicator: This digital camera symbol lets you know that the flash is enabled and ready to be used when needed. In automatic mode, if the flash pops up automatically, you’ll only be able to take pictures when this indicator is turned on.
Auto Flash Off: This icon lets the camera know to not use the flash, allowing you to rely solely on natural/available light.
Red-Eye Reduction Flash: The red-eye reduction flash produces multiple rapid bursts of light before it emits the last flash and takes the photo. The initial flickering allows the pupils to contract to eliminate or at least significantly minimize the reflection.
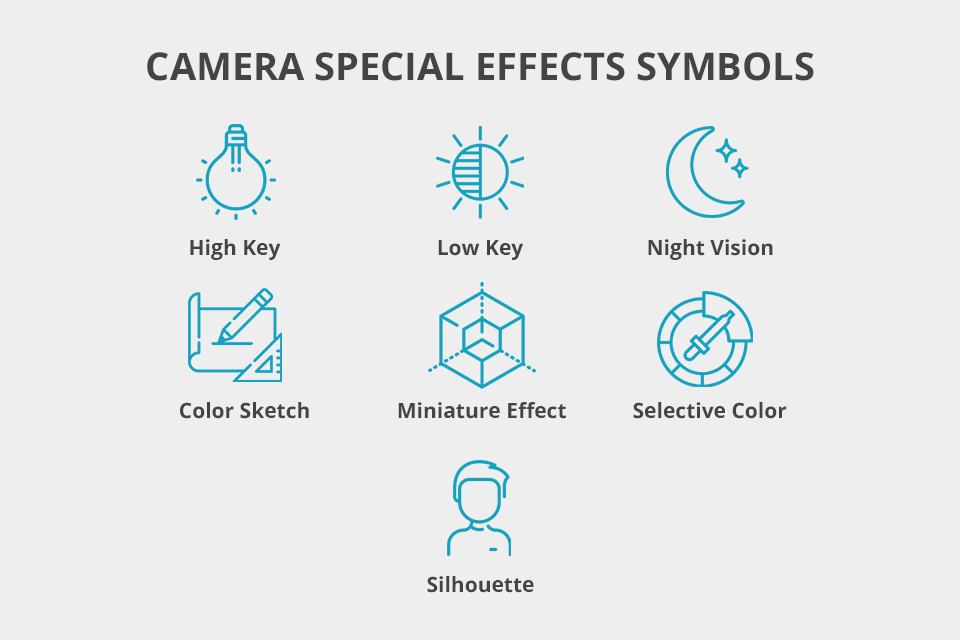
High Key: This effect is designed for capturing bright scenes to produce a high key picture without overly dark shadowed areas.
Low Key: You can take advantage of this feature when capturing dark scenes to receive a picture with highly-defined edges thanks to pronounced highlights and shadows.
Night Vision: This effect is aimed at monochrome late-night photos that can benefit from high ISO values.
Color Sketch: This feature examines the scene and draws the outlines to create a sketch effect.
Miniature Effect: This feature captures a miniature effect of the shot. It’s particularly useful for photos taken from high vantage points.
Selective Color: This feature turns all the colors other than the user-chosen one black-and-white.
Silhouette: This feature is aimed at backlit scenes for situations when you want to silhouette the subjects in the foreground.
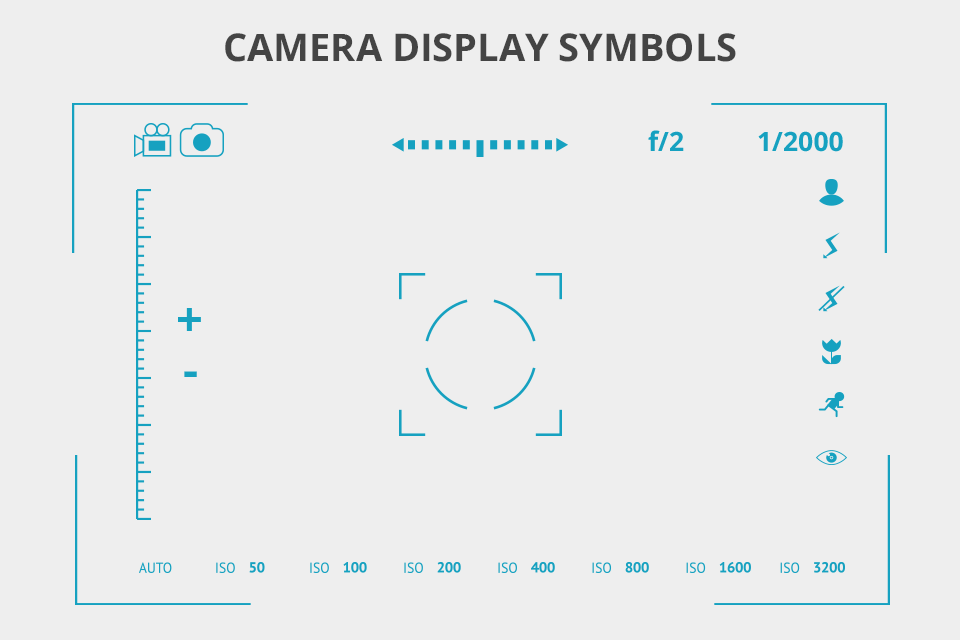
F or an f/ Followed by a Number like f/11 and f/2: lets you know the current aperture value (or f-stop) of the image. A higher value (marked by a lower F number) allows more light to fall onto the image sensor, letting you use higher shutter speeds. A higher F-number can add more depth to the picture by making sure a larger part of the scene is in focus. For portrait photos, give preference to smaller F values to ensure the subject is in focus while the background has a nice blur.
Number Listed as a Fraction, like 1/2000 and 1/250: lets you know the current shutter speed that is measured in second fractions. A shorter shutter speed allows better capturing subjects in motion. Some models present shutter speed as whole numbers like 2000 and 250 instead of fractions but the meaning of those numbers is identical.
Segmented Line: it looks similar to a ruler or tape measure and serves as an exposure or white balance indicator.
Number Inside a Set of Parentheses: lets you know how many photos you can still take with the current resolution settings before you fill the SD card. This number may or may not be in parentheses depending on the camera model.
Plus/Minus Icon (+/-): may be used for informing you about either exposure or flash compensation.
Movie Resolution: lets you know how much longer you can record video footage until you run out of memory. This value is typically represented in minutes and seconds, with minutes being followed by an apostrophe and seconds by a quotation mark.
ISO Icon: shows the current ISO value. Higher ISO values are beneficial for shooting in low-light conditions.
QUAL Icon or Number with M: shows the currently chosen resolution and image quality. L typically stands for the largest available resolution value while S stands for the smallest one.

Auto White Balance: The camera automatically chooses a white balance parameter in the 3500K to 8000K range depending on how the scene is lit.
Incandescent: The camera will pick the optimal parameter for incandescent lighting, which is 3000K.
Fluorescent: The system will offer a preset white balance value or different fluorescent values for you to pick from depending on the fluorescent lighting used for the photo. The offered possibilities range from 2700K to 7200K.
Direct Sunlight: The system will set the white balance to about 5200K. Some camera models call this mode daylight instead.
Cloudy: Most cameras have a special white balance setting of 6000K for cloudy photos.
Shade: This is a separate preset for shaded scenes that has a white balance value of 8000K.
Preset Manual: If you want to save a specific white balance setting as a preset to later quickly apply it in the future, you can take advantage of this feature.
Kelvin Temperature: If you’re not afraid to tinker with more advanced settings, you can manually set the color temperature based on the scene’s lighting. You can freely choose any value between 2500K and 10,000K.
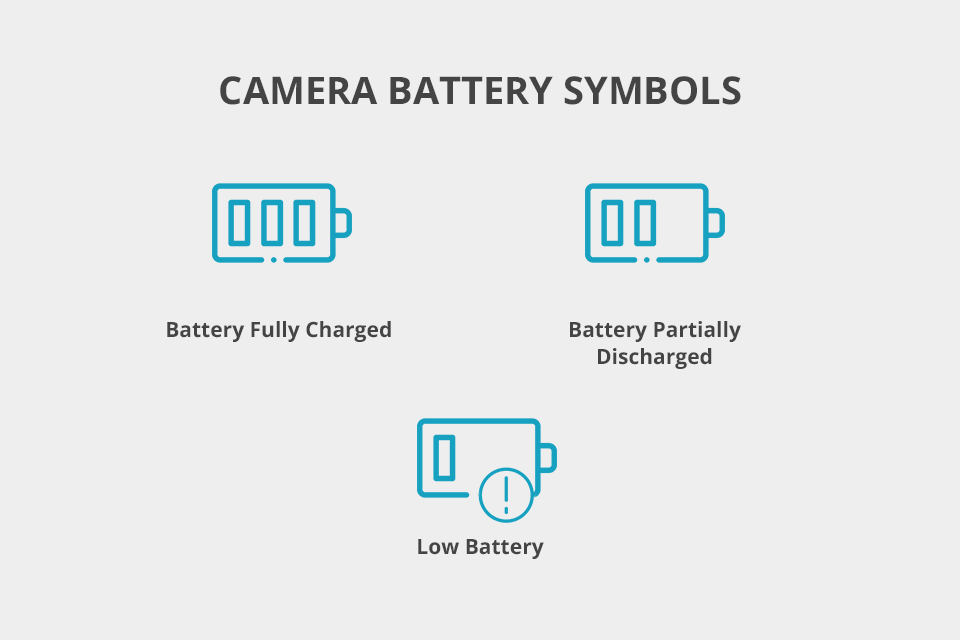
Battery Fully Charged: This camera icon lets you know that the battery life is full and is ready for work.
Battery Partially Discharged: This icon informs you that the battery has lost at least part of its full charge.
Low Battery: This camera symbol shows that the battery is running low on power. If you notice that this icon is flashing, know that the shutter release will be turned off so you’ll have to swap the battery to continue using your camera.
In most cases, the camera dial is used exclusively for switching between different shooting modes. The majority of DSLRs and SLRs allow you to select the desired mode by either using a rotary dial or the built-in menu and the same is mostly true for more advanced point-and-shoot models.
If your goal is to have complete control over the camera, go with aperture priority or manual mode. On the other hand, if you’re just a beginner, stick to the most convenient automatic mode. If you’re somewhere in the middle, pick program mode.
It’s the flash button with a capital “H” that has a lightning symbol. If you enable this feature, the camera and flash will become synchronized at shutter speeds faster than 1/250.
If you want to take breathtaking photos, you have to master the 3 most essential camera parameters: Aperture, ISO, and Shutter Speed. These settings are included in all modern cameras and are irreplaceable when it comes to controlling your camera.
The main parts of camera are the main body, the camera shutter, the lens, the lens aperture, and the integrated image sensor. Discovering the purpose and capabilities of each component will help you pick the optimal camera for your needs and learn how to deal with possible technical issues.