Turn Photo Into Stencil – 3 Easy Methods
How to turn photo into stencil in the fastest way? It is not very difficult but will take some time. Any image can become a stencil you can use to transfer onto a different surface with paint or use it as a coloring page.
When turning pictures into stencils, you will lose detail and color but you can always return it with the help of a brush and creativity. In this article, I’m going to tell you about 3 ways to make a stencil from a photograph using Photoshop, Illustrator, Microsoft Word, and free picture stencil makers.
Method #1 - How to Make a Stencil in Photoshop

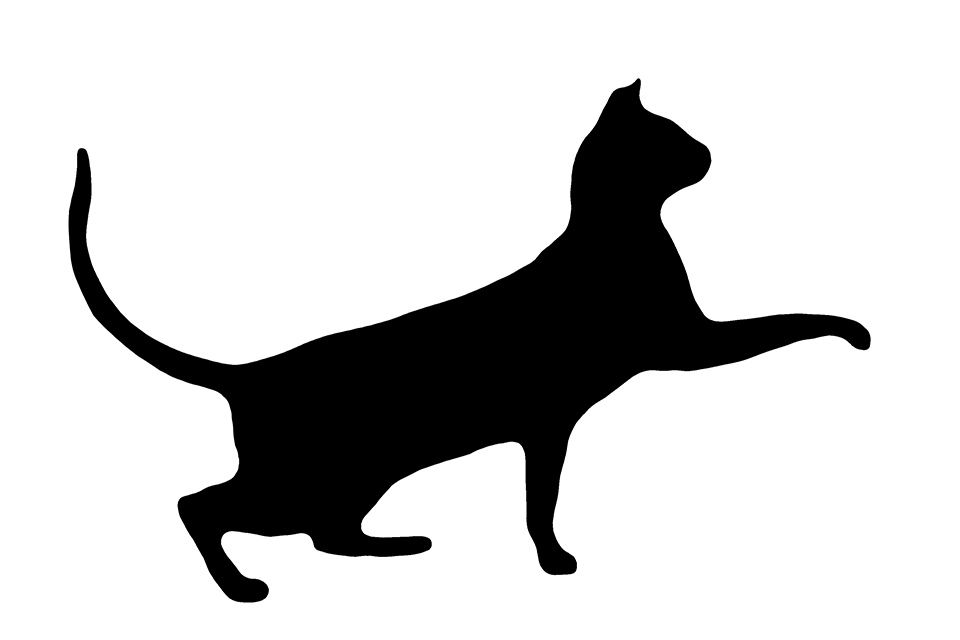
Photoshop is a powerful tool that is popular among many photo editing specialists. It gives us endless opportunities to change images. You can turn a picture to stencil with the help of the “Cutout” filter in no time at all. By printing it onto some thick paper, like cardboard, you will be able to use it in any way you want.
Step 1. Open the Image that You Want to Turn into a Stencil
Find the photo you want to stencil and open it in the program.
Step 2. Open the Threshold Tool
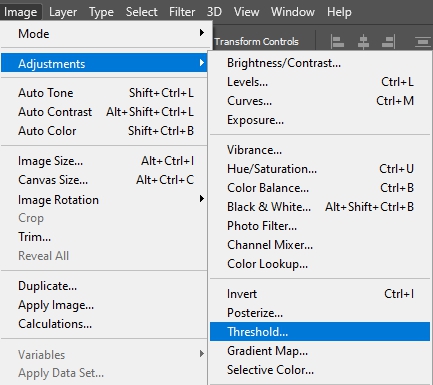
Go to “Image”>“Adjustment”>“Threshold”. The image will become black and white.
Step 3. Drag the Threshold Slider to Adjust the Level of Detail
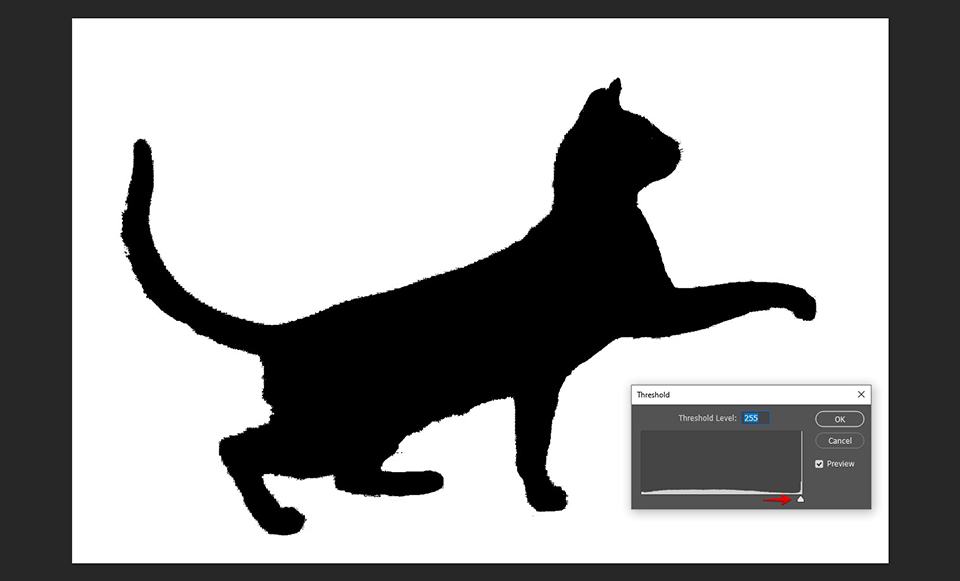
Dragging the slider, you can see how the level of detail in the image increases or decreases. The key is to find that golden middle between strong lines and a certain level of detail.
Step 4. Clear Up Any Background Details You Don't Want
In case your photograph has details in the background, it will look untidy when you turn picture into stencil. With the white Paintbrush, you can erase anything that you don’t want to see in your finished stencil.
After that, fill the white spaces with the black Paintbrush. The Crop tool will make cleaning up large areas in the image faster.
- Find out how to blur edges in Photoshop.
Step 5. Link Any Islands of White Space
As your stencil is being cut out, it is the black areas that are removed to be painted over. So, if there are any details that are isolated from the rest of the image, they need to be connected with it, otherwise, cutting them out will be problematic.
With the white Paintbrush, create lines to connect the detail to other white areas. Remember about the structural integrity of the stencil you will get in the end and create links accordingly.
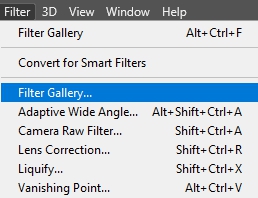
Step 6. Open the Cutout Filter
Go to “Filter”>“Artistic”>“Cutout” (in Photoshop CS6+, artistic filters can be found in “Preferences”>“Plug-ins”>“Show All Filter Gallery Groups and Names”).
With this filter applied, the lines in your image will be straightened, making them easier to cut out.
Step 7. Adjust the Cutout Filter Settings
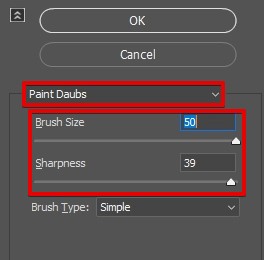
You have several sliders that can change the look of your final stencil. For example, the “Edge Simplicity” is the slider you need to straighten the edges in your picture making it look more like an actual stencil.
The downside of this is a considerable drop in detail, however, it is what will make cutting out the stencil easier.
Step 8. Review Your Stencil Before Printing
Give your stencil a final revision. Check if all the details in the image are connected. If you happen to have a line here and there, just ignore it, you will simply cut it out.
Step 9. Print Your Stencil
When you are happy with what you have, it means that you are ready to print it. Remember that you need to use heavy-duty paper. Set the print mode to black and white to save the ink.
Step 10. Cut Out Your Stencil
Now that you have printed the stencil, you need to cut it out. With your scissors remove all the black parts of the picture. Be careful not to cut off your links, as you risk losing some parts of your image.
When you are done, you will only have your white areas left and all you need to do now is have fun with some paint.
- Read more about how to download Photoshop for free.
Method #2 - How to Make a Stencil from a Photo in Illustrator?


Photoshop is definitely one of the handiest programs you can use to turn photo into stencil, but how about trying and making a vector image in Adobe Illustrator to use as a virtual stencil.
Step 1. Prepare Reference Image
I recommend finding a good reference image, certainly, you can create something original but I am going to convert photo to stencil going the easier route this time.
Now, all you need is a background picture, some knowledge of the software, the Pen Tool and, definitely, some patience.
Step 2. Convert in Black and White
Before opening the reference image in Illustrator, I would advise turning your photo into a black and white image with increased contrast in Photoshop.
Step 3. Use the Pen Tool
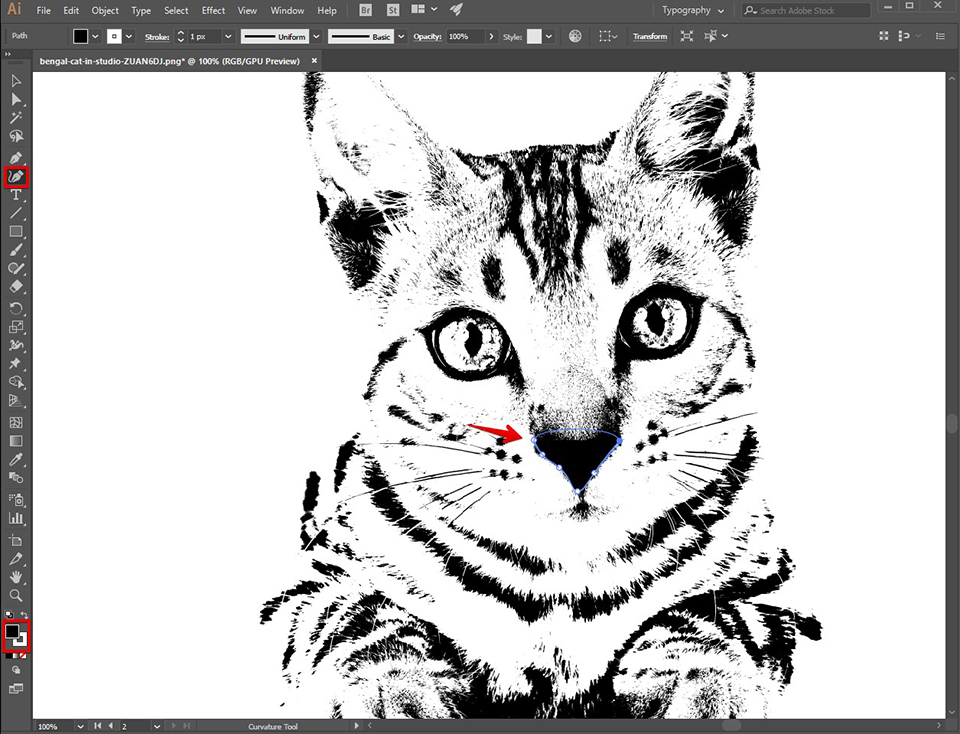
With the Pen Tool, create paths around the dark spaces of your picture. That requires some knowledge of the Pen Tool, so make sure you get acquainted with it.
Step 4. Creating Spray Effect
This is the most difficult task so far, I hope I managed to make it easy to follow. We are going to imitate the effect of the spray paint used with a real stencil.
You start by selecting all the paths and going to the Pathfinder window. Then, click the ‘Add to Shape Area’ symbol in the ‘Shape modes’ section to create a single shape.
Step 5. Creating Granularity
Select the whole shape, then, go to Effect>Photoshop Effects>Film Grain. Don’t change any other settings than Grain, which should be set to 3.
Step 6. Applying a Blur
Now, you need to make the whole image a little less sharp, this will imitate the effect of dispersed spray paint that you get in real life. To do this, you will need to apply the Gaussian blur to your stencil.
With your stencil selected, copy it and select again. Now, go to Effect>Photoshop Effects>Gaussian Blur, set the blur size to 1 pixel and apply all the changes by clicking OK.
Use CTR+F or Apple+F keyboard shortcut to paste the copied picture on top of the blurred one. This will help you keep the granular effect.
Finally, you can add your stencil to any wall in Photoshop or Illustrator; just add it as a layer with transparency set to Multiply. That’s it, you’re done with turning your image to stencil!
Method #3 - Picture to Stencil in Microsoft Word

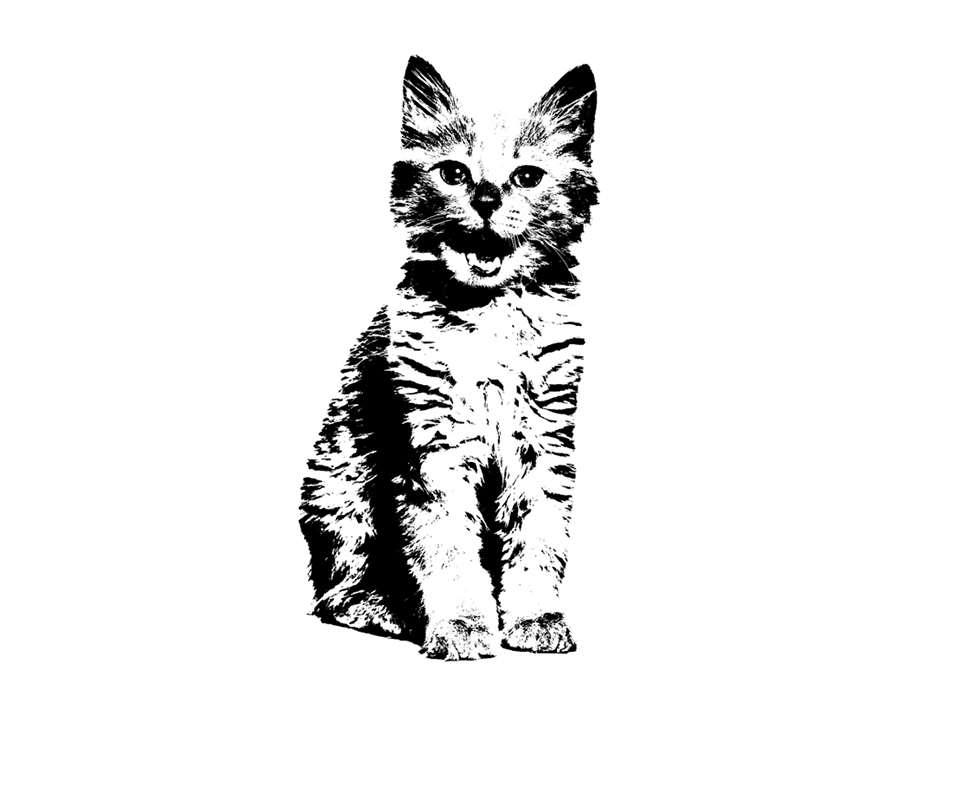
Stencil art is relatively easy to master. All you need are some cheap materials and you’re ready to create beautiful artworks. Actually, you can also easily make a stencil from a picture in Microsoft Office.
Step 1. Get a Photo
Prepare the photo. It can be either a drawing, a scheme, or even your portrait. You can use any type of image you want.
Step 2. Put Photo into Word
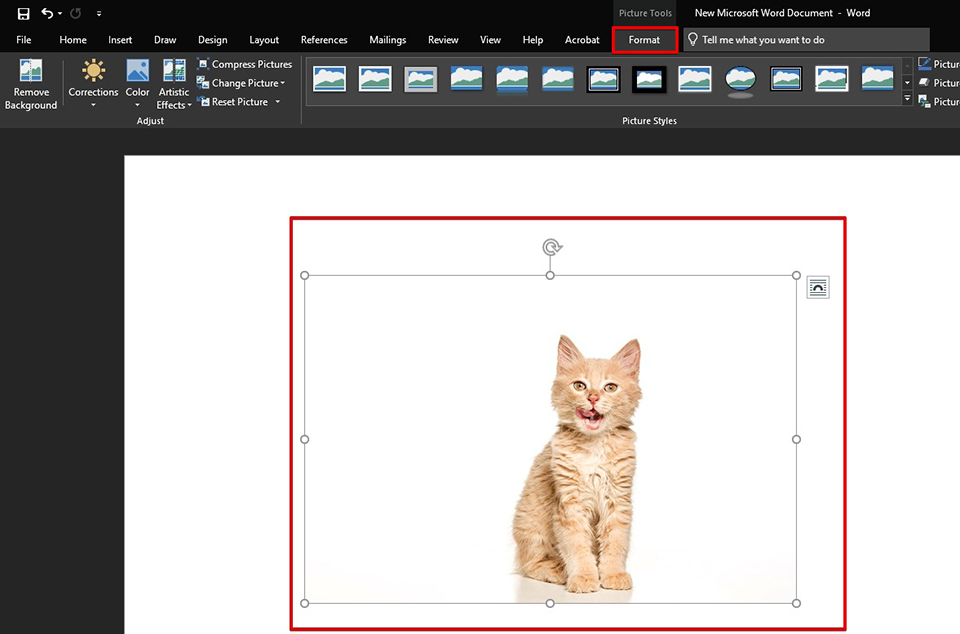
Add it by either pasting, dropping, or importing the image into the program.
Step 3. Change Photo to Black and White
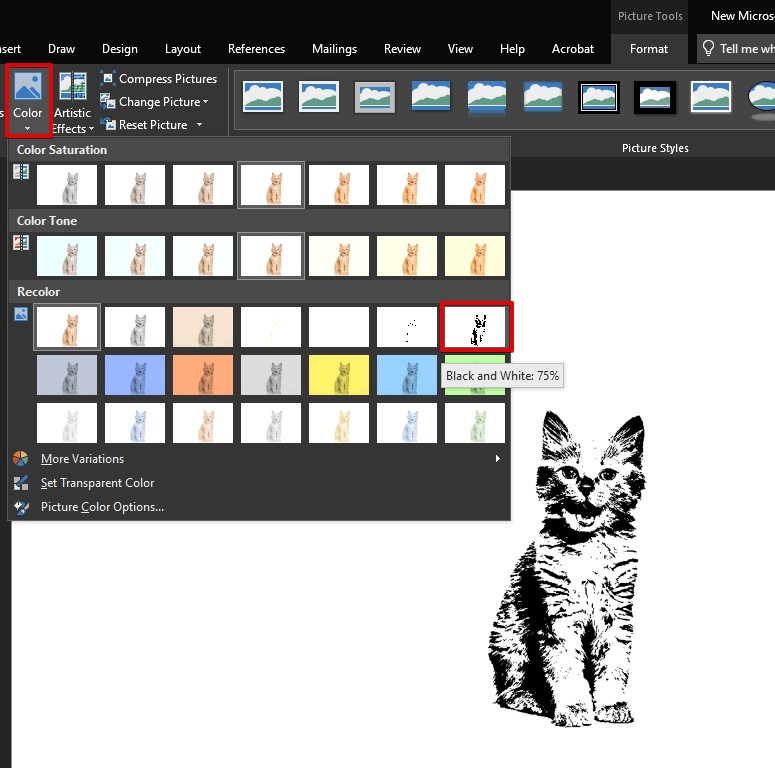
Find the color section in the image settings and select the B&W option.
Step 4. Play With Buttons
Once you’ve made it black & white, adjust the contrast and brightness settings to ensure the photo isn’t overly dark or light.
Step 5. Copy and Paste into Paint
Copy the image and open it in Paint. If your computer doesn’t have it, feel free to replace it with Adobe Ps or any other similar program that allows changing the resolution of a picture and saving it in JPG.
Step 6. Save and Print
Save the photo in your preferred format, print it out, and now you can use this stencil for further manipulations.
- Check out the easiest way to download Adobe Illustrator for free.
Online Editors for Turning Pictures into Stencils
All these picture stencil makers allow uploading images, transforming them into templates, and printing out the results on a piece of cardboard, before cutting them out and preparing for use as hanging art. Can’t wait to get your hands on these websites? Read on!
1. Free Picture Stencil Maker
Online
This is the first online app for turning pictures into stencils on this list. Not only is its name very fitting, but also using the app is very simple.
That statement is supported by everything: you don’t need to create an account to start converting, it won’t cost you a dime, and all of the app’s functions are instantly visible.
You can turn image to stencil by uploading your picture in the “Load a photo” window located at the left side of the screen, picking the desired effect one the opposite side (from 3 available options), tweak the sharpness and darkness settings, and finally yet importantly, see how the transformed picture looks in the preview window.
Once you’re done, you may either export the picture or print it out directly from the app.
2. Free Stencil Maker
Online
Do you feel like your photos could benefit from some text stencils to catch the viewer’s eye? This service was made by the same developer that produced the previous option on this list and is perfect for stenciling pictures with text.
This service invites you to pick from a broad array of fonts, add any text you want, and then tweak it with several available options. For instance, it’s possible to adjust the width of the text, the space between the letters as well as their color.
Similar to the previous service, you can download the edited file, print it out, or post it to your social media page by pressing one of the available buttons.
3. Stencilizr
Online
This is the third service on my list that allows converting picture to stencil online. From my experience, this option offers superior quality compared to most other programs and produces terrific results.
How do you use this service? Once you’ve opened the website, you have to import the needed photo by selecting the arrow icon, then adjust the B&W balance until you’re happy with what you see.
Another cool feature is the live preview window that enables you to check your progress at any time. Sadly, that is the last upside that is worth mentioning.
Moreover, the Balance tool is basically the only feature this service offers to you. Once finished, click “Push to finish” to save the created picture as an SVG file onto your PC.
4. Stencil Graffiti Creator
Online
This service is among the most unconventional sites that allow you to turn photo into stencil on the web. The feature that sets it apart from the rest is the unique visual effect that’s applied to your uploaded images.
Even though the effect looks more complex, learning how to make a stencil from a photograph on this website is incredibly simple. Go to the site’s landing page and import your image by clicking the “Choose Stencil Image” button.
Once imported and converted, you can either export the edited photo or use one of the two provided tools. The “Spray Can” allows you to pick a color that will be applied to your picture, while the “Brick” icon lets you choose a texture (like a wall or gate).
Honestly, I was blown away by such functionality and the ability to add a background was just the cherry on top of an already delicious cake.
5. Stencil Creator
Online
Any list of programs designed to convert photo to stencil online wouldn’t be complete without this service. While simple in name, I found the Stencil Creator to be among the most feature-packed modern tools available today.
It’s also quite user-friendly and includes instructions for every step you need to take to convert the image. What are those steps? Firstly, you’ll be asked to upload the picture you’d like to transform. Next, the website will offer you several options, which will help you adjust the color and depth of the applied effect.
Feel free to either keep creating random effects until you’re satisfied with the look or simply use the manual settings that cover parameters like contrast, color transformation, and effect levels.
Moreover, this program even gives you the option to add a filter like Gaussian and use the drawing tool to apply it.
7. Stencil Generator
Online
Stencil Generator is designed to generate letter stencils. Just like in the previous case, you’re going to have to deal with an outdated UI design and text-only functionality.
Anyway, you can use the available tools to turn photo into stencil on this website. While such limited functionality may be disheartening, the features offer plenty of useful options.
For instance, you can type in any text you want, select a font that suits your style, set the resolution of the file, and adjust the color and size of the letters.
Nothing to write long about, but still a quite efficient tool for what it does, and a solid alternative to similar services.
8. Photo2Stencil
Online
Photo2Stencil takes the last spot on my overview of the best services for stenciling pictures. The primary reason why this site deserves your attention is that it enables users to save stencils as vector images in SVG (similar to Stencilizr) and to perform the transformation based on either one color or 3 different tones.
Sadly, that’s where the feature list of this program ends. You won’t find any other functions and the sole way to get your file is to export it in SVG.
Thankfully, this service enables you to resize any image regardless of its resolution or quality and crop it as needed, ensuring you’ll greatly enjoy the result.


