Top 10 Crucial Tips to Transition from Photography to Videography
When you purchase through affiliate links on our site, we may earn a commission. Here’s how it works.
Top 10 Crucial Tips to Transition from Photography to Videography
Videography and photography production share enough similarities to make the jump possible and today’s technologies are ready to give you that extra helping hand.
Keep reading to learn the top 10 crucial tips on how to get into videography, motion graphics, and how to expand your videography skills and services. Invest the time now so you can rise to the top as the market becomes more and more competitive in the near future.
1. Choose the Right Frame Rate
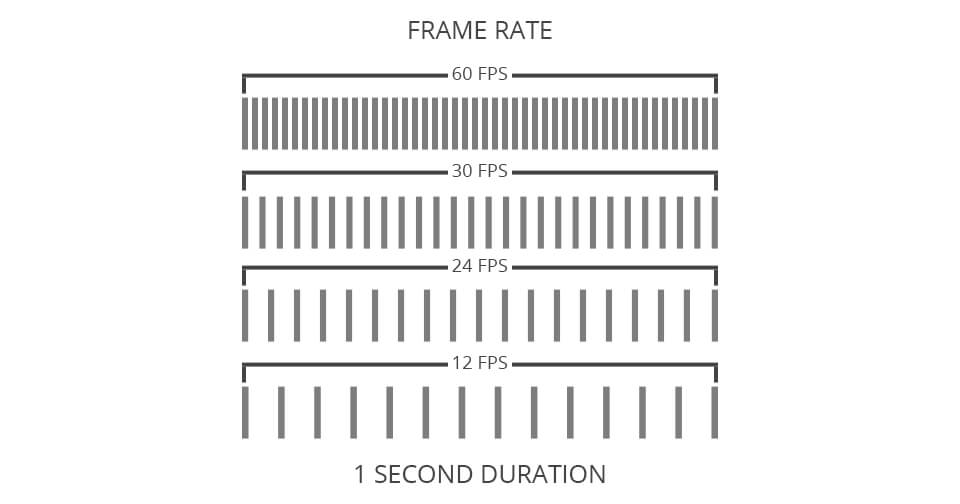
Selecting the correct shooting frame rate may be the most important tip in making photography videography transition. In photography, a single captured image equals one frame. When it comes to recording videos, you need to adopt the mindset of thinking in frames per second, which are stitched together to produce a motion picture.
Various fps settings lead to completely different results and the choice between them usually boils down to the level of realism you’re going for, or whether you want to explore still motion videography or introduce motion blur into your videos.
Typically, you can select from 24, 30, or 60 frames per second. Most Hollywood films are shot at 24 frames per second, which delivers a great cinematic appearance. However, most broadcasts on television are usually shot at 30 frames per second. If you’re into still motion videography, you’ll want to shoot at 60 frames per second. For most applications, the best default rate is 24 frames.
2. Follow the 180° Rule
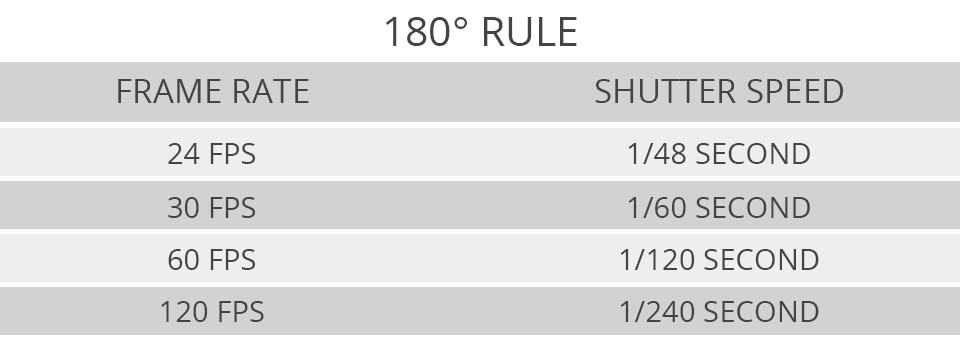
Shutter speed is directly related to your frame rate. The best rule of thumb, in this case, is to simply double your frame rate. For example, a frame rate of 24 would go best with a shutter speed of roughly 48. This formula will give you the most natural appearance in your completed video. If you boost your shutter speed too high, you’ll end up with a choppy product.
While generally not recommended, you can break the 180° rule if you aim to recreate the feel of a particular film era or need to record footage that is shaky on purpose.
3. Use Neutral Picture Profiles
As a photographer, you’re probably used to taking a great raw shot using your skills, lighting, and other factors during the actual shoot to ensure high quality. This is possible because a camera used for still photography is compressing your photo into one file to maximize the color grading.
When making that photography videography transition, you often will not get the high-quality raw footage you may be accustomed to. Don’t worry, though, because post-production tools can help you create a professional end product. Simply shoot using a neutral picture profile. This will preserve the greatest amount of color and dynamic range, giving you a great deal of flexibility later in the process.
- Check out the best DSLR for video.
4. Don’t Employ Shallow Depths of Field
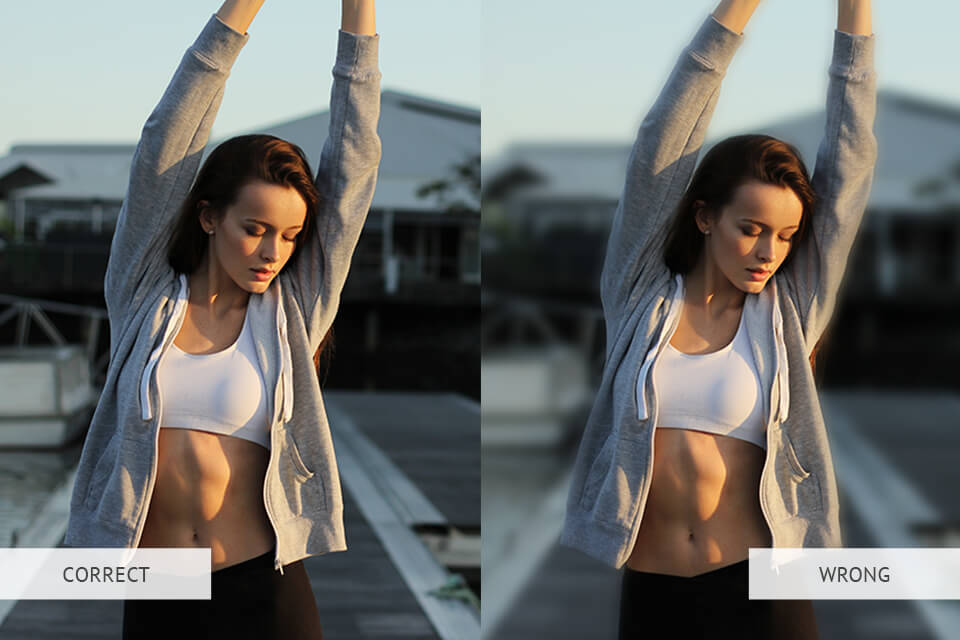
Although shallow depths of field may work best for photography, this is usually not the case in videography. Typically, you will be focusing by pulling back manually on a video camera, and this is more difficult to do if you’re shooting with a shallow depth of field.
In addition, when both you and your subjects are moving, a shallow depth of field makes it difficult to stay focused during the motion. In most cases, you should shoot using an aperture of between 2.8 to .5.6 for best results.
5. Shoot Different Perspective Angles
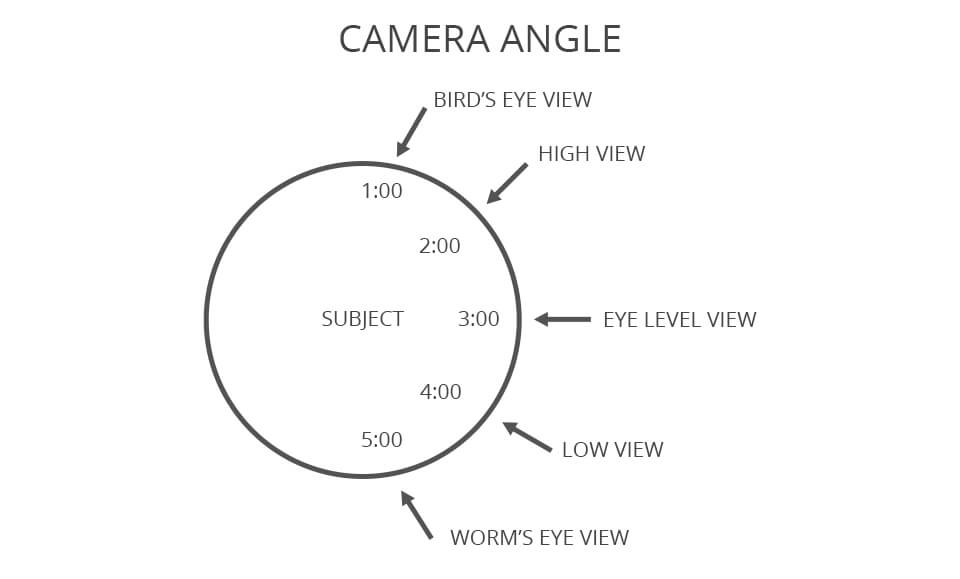
When you are taking a still picture as a photographer, you can find one magical moment to capture and be done. However, in a video, sequences of different perspectives play a crucial role in creating the right feeling or communicating the ideal message. Capturing the right movement and action are vital in producing a professional end product.
Each scene in your video should have a lead-in before you dwell on a beautiful shot for a moment. When you’re shooting, try to take three different perspective angles or focal points for every scene. This allows you to have the raw material that will help create a sequence in the finished video that tells a more compelling story.
There are a multiple camera angles you can try: bird's-eye view shot, high-angle shot, eye-level shot, low-angle shot, and a worm's-eye view.
6. Pick the Right Stabilization Tool

Videography photography stabilization tools are similar, but videographers have several more tools at their disposal: tripods, monopods, and gimbals. Understanding which stabilization tool works best in which scenarios will help you increase your video’s production value. Tripods allow you to focus on the framing of a particular scene and depends on the motion itself to tell the story.
Monopods, on the other hand, are extremely flexible and can be carried into many different shots, providing some stabilization with more of a human touch. Gimbals are a bit clunkier to work with; however, they give you a smooth, cinematic touch that can really boost your production to that Hollywood level.
- Check out the best video tripods.
7. Study Up on Motion Alternatives
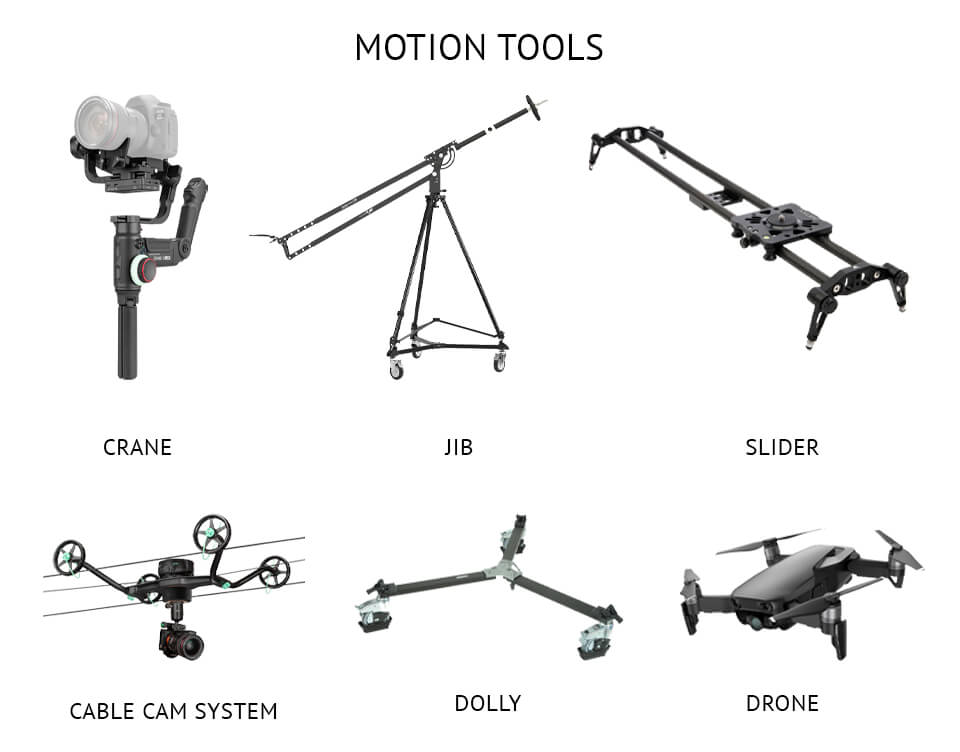
Another thing that differentiates videography and photography is motion. As a photographer, you’re used to no motion. This may be the most difficult transition into videography. After all, the video is all about motion.
Once you’ve mastered how to shoot with stabilizers, you’ll want to learn more about more advanced motion such as panning, craning, zooming, tracking, tilting, and dollying. The motion tools that will help you achieve this are cranes, jibs, sliders, cable cam systems, dollies as well as drones.
- View more about the best beginner drones.
8. Don’t Forget the Audio
When it comes to videography vs photography, you need to realize that videos are made up of a lot more components you should take care of. Remember that your video is really just half of your final production.
You’ll want to learn all about the audio components of videography as well. This may include recording audio during the shoot as well as the option of adding all sorts of audio effects, music, and other sounds during post-production.
Just like there are many stock shots and effects available, plenty of audio effects, sound effects, and royalty-free music are available online. Take advantage of these resources to help bring your finished product to a new level.
- Read more about how to get Adobe Audition free.
9. Use Videos to Boost Your Photography Business
While you’re busy learning how to transition from a photography business to a photography and videography business, use one to boost the other. Consider creating a behind-the-scenes video of your photography business, showcasing how you think and work.
By using a video as a medium, you can not only promote the photography side of your business, but you can also show your videography skills as well.
10. Use Motion Graphics Templates

It’s never been easier to make a professional video with all the motion graphics templates and effects available online today. Many special effects, intro footage, color grading tools, transitions, and light effects have been created and can be accessed as easily as borrowing a book from a library.
Many are available for free, and others can be purchased as part of a subscription. These templates make light work of creating an amazing video.
Are you ready for this adventure? Now, that you know how to get into videography, the market is waiting for you to up your game. There’s nothing better for improving your videography skills than to simply practice. Create as many videos as possible, using stock videos, video effects, and music from the online marketplace. Use devices like GoPro, Drones, and DSLR equipment to fine-tune the details. Motion graphics templates will help make your videos amazingly professional.
Get started. It won’t be long until you’ve found your own niche, style, and brand persona for your photography videography business.


