Take a look at how to install Lightroom presets in 6 easy steps. This step-by-step guide is recommended for presets in .xmp vs lrtemplate format. Also, I’ll show you easy steps for creating your own presets. Believe me, even a beginner Lightroom user can cope with this task fast.
This method works well on the latest Lightroom Classic CC 8.0 version. If you have problems adding presets, I suggest you upgrading your software's version.
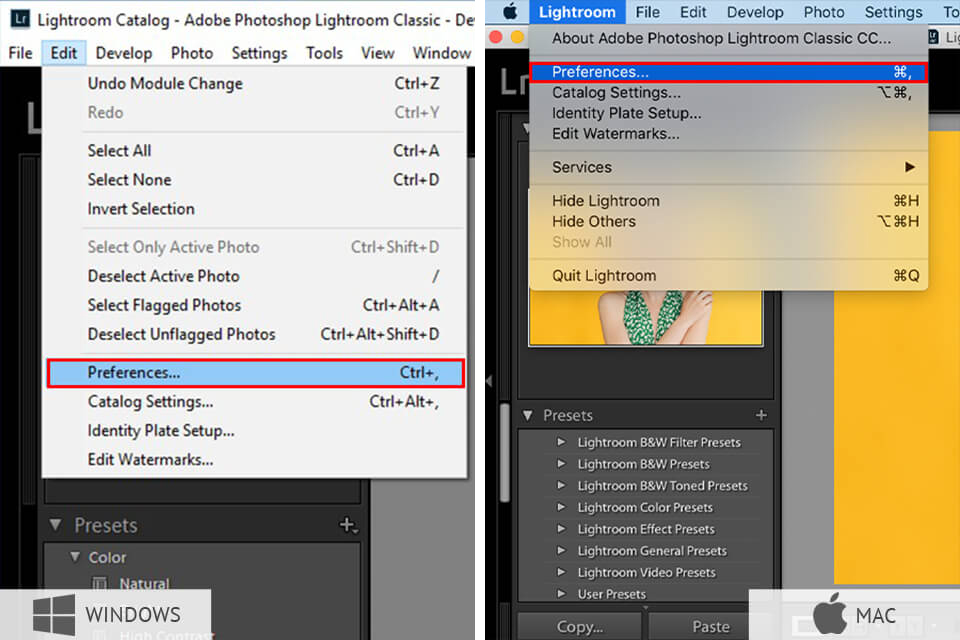
STEP 1. Go to Lightroom Preferences menu.
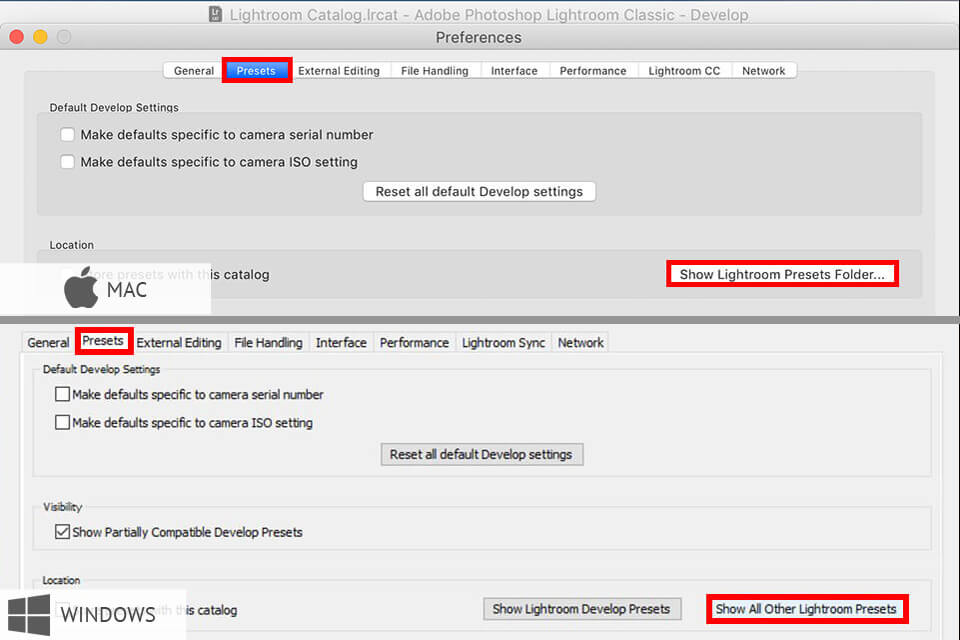
STEP 2. Tap on the panel, which is called Presets, then you will see appear, namely Show Lightroom Presets Folder, which is marked with a red color. This tab will show where our Presets were saved by default.
STEP 3. After clicking the button, you can open the file in which not only the Presets we need are stored, but all the data for Lightroom software. However, you won’t immediately see all the presets, but a folder with the Presets folder. So, open Develop Presets folder.
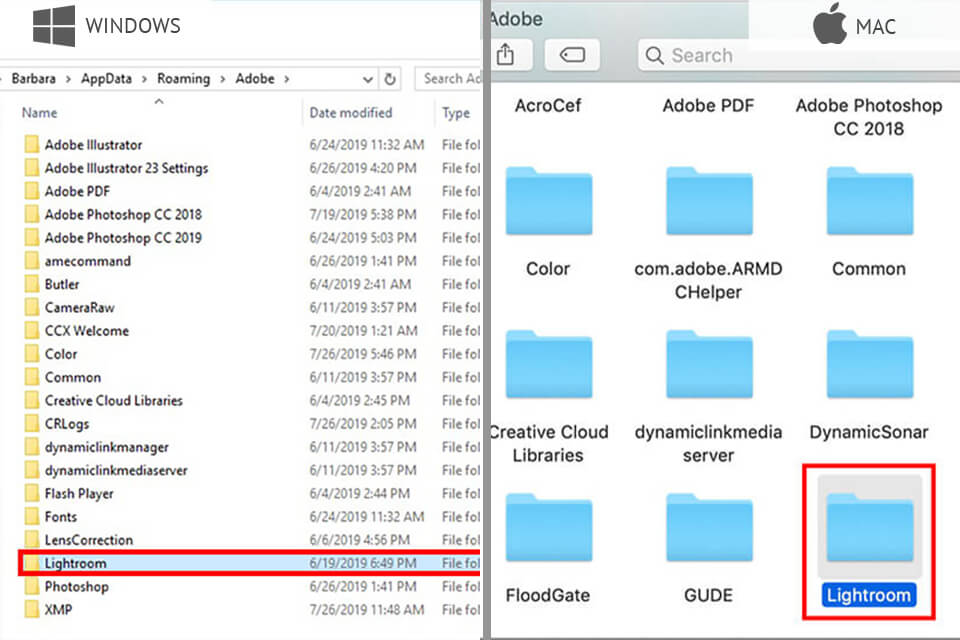
STEP 4. Opening the Develop Presets folder, you may see another folder called User Presets. Your individual Presets are saved here. Transfer all your presets to it.
STEP 5. You’ll have to restart the program, so that all the changes we made will be applied. Without restarting the program, Adobe will not allow downloading new presets.
.jpg)
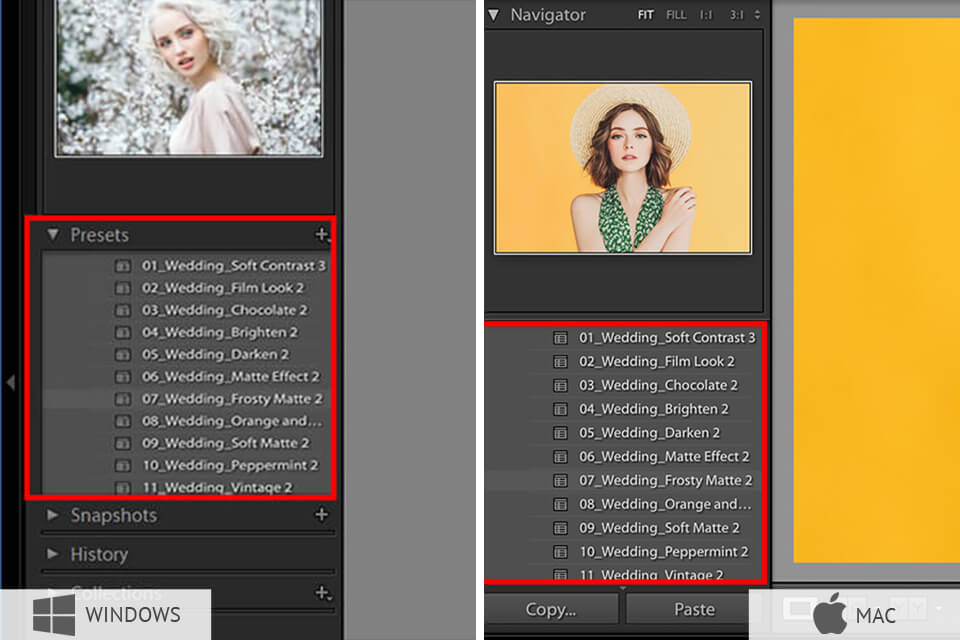
STEP 6. Well, now you already know how to add Lightroom presets. All previously loaded presets show up on the left side of the Develop Presets.
That's all, guys! So now you know how to add presets to Lightroom in detail. Seems like adding presets is not such a complicated process as you thought at the beginning. In total, you had to copy and drag files from one folder to another.
If you are using a basic version of Lightroom CC, it’s fairly easy to install presets. To do it, you just need to take a few simple steps. Then, you will be able to use installed presets right away.
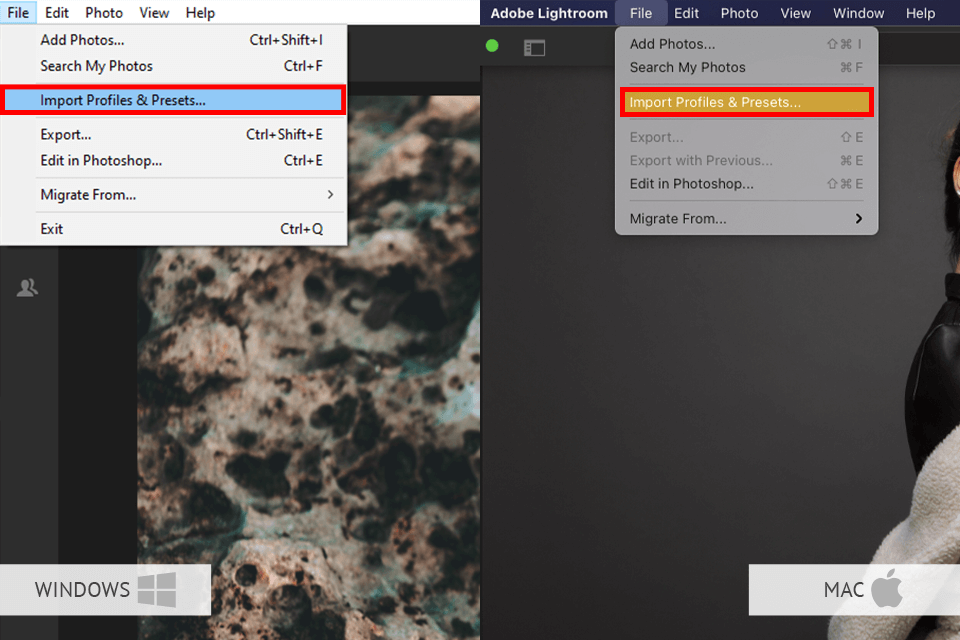
STEP 1. File (Lightroom for MacOS) - Import Profiles & Presets.
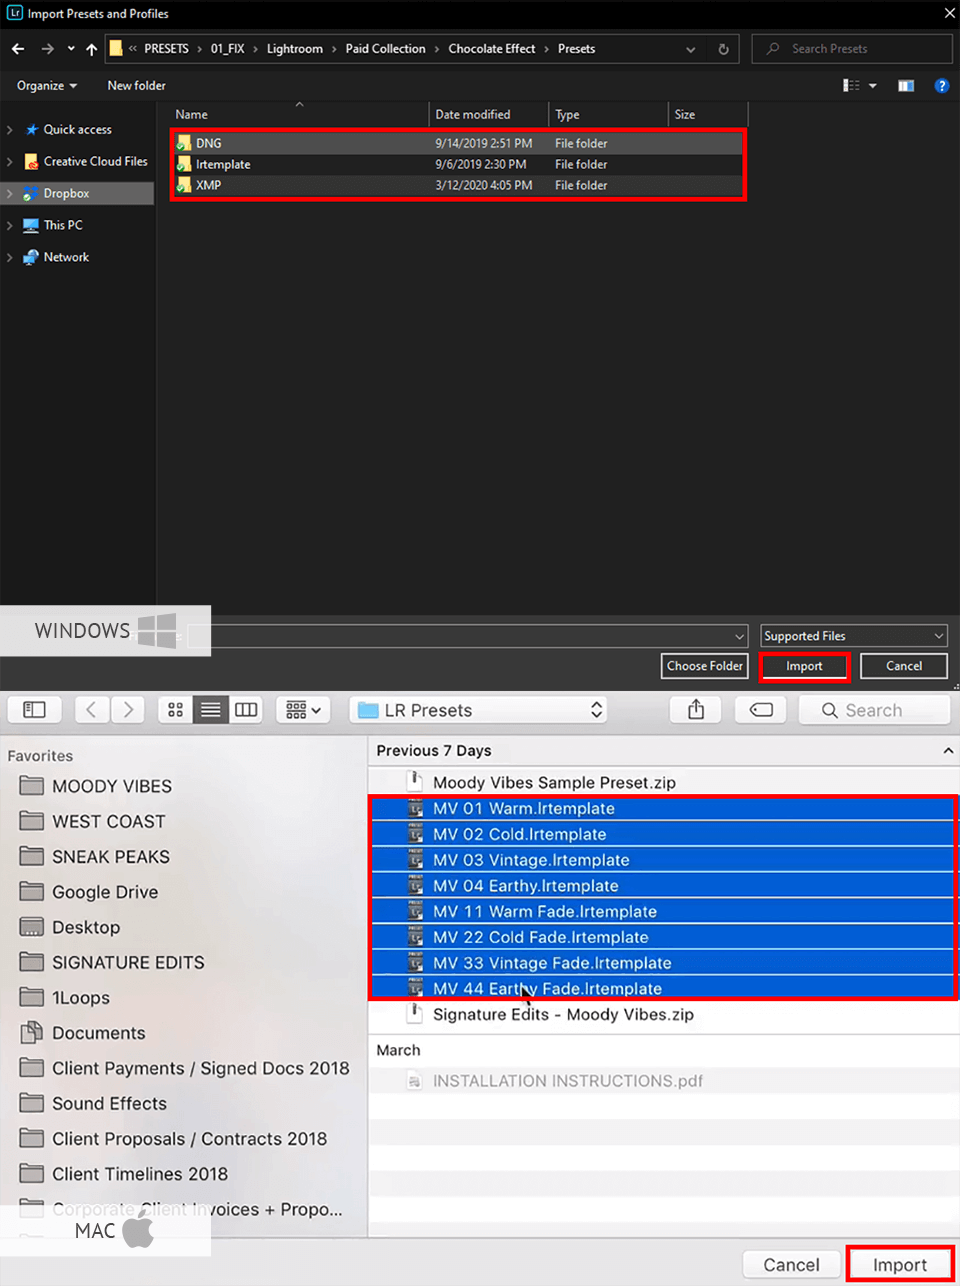
STEP 2. Find the presets that you want to use. For instance, you can import a ZIP file or add presets directly to the software by selecting them using the Ctrl (Cmd) + A shortcut.
As you can see, the process doesn’t take a lot of time. If you have any issues with installing or opening presets, check whether they are compatible with your version of Lightroom. Keep in mind that presets come in two formats, .xmp or .lrtemplate.
Lightroom has been using a proprietary file format with the extension .lrtemplate. It includes information and data about which color adjustments and settings are applied to a photo in this photo editing software. When you make color correction in Lightroom, you can save those adjustments so they can be recalled later on. They are saved into a .lrtemplate file.
A .xmp file is similar in many ways to .lrtemplate files. BUT .xmp files contain different data in the file is structured differently. With the latest update in April 2018, Adobe Co. has moved on from the .lrtemplate file format to the .xmp format. Don’t get upset because all .lrtemplate files still work with Adobe Lightroom 4, 5, 6, and Classic CC. All of our free and premium Lightroom presets come in both .lrtemplate and .xmp format.
After mastering Lightroom and gaining some confidence, you will be able to adjust colors yourself. Once you have selected colors that match your style, you will need to know how to save them. This is when you will need to know how to create your own presets.
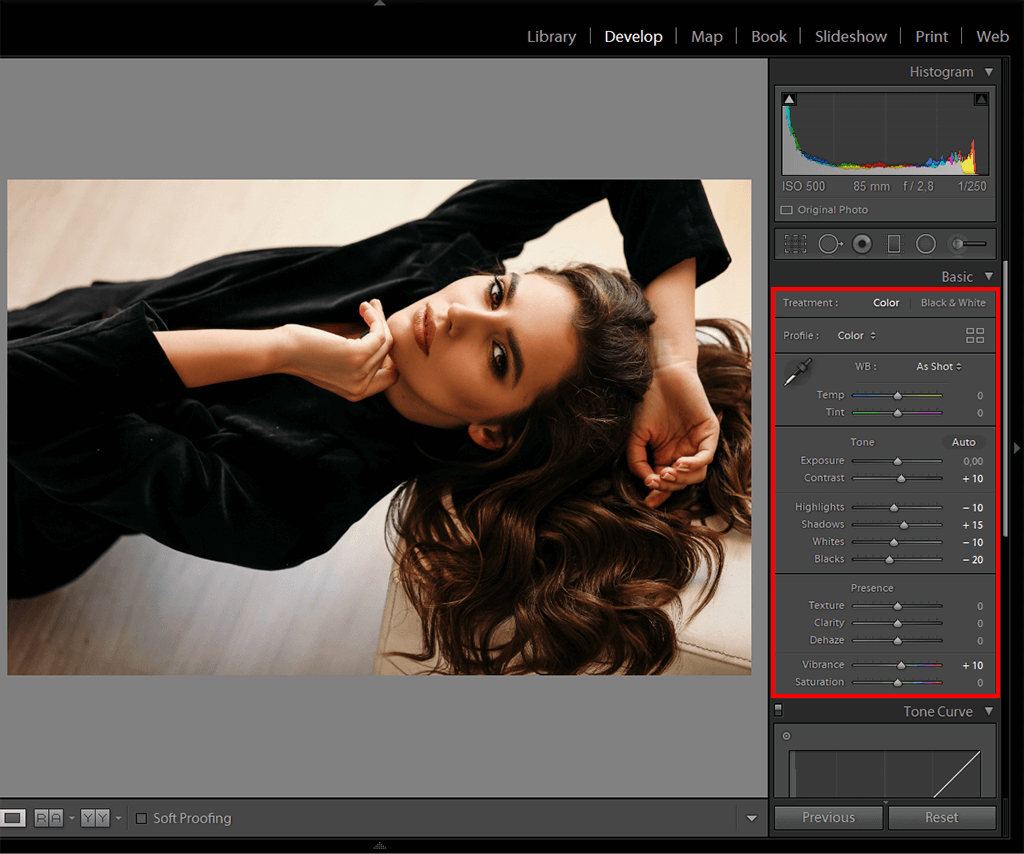
STEP 1. Find an image that you want to edit. On the right, you will see several tools for adjusting light, shadows, colors and adding a variety of creative effects.
Basic - it allows you to adjust light and shadow to your liking. This tool will come in handy when you need to embellish your photo or make it match your signature style by improving its color balance. Here, you can fix color temperature in the photo, adjust light and shadow, add contrast, sharpness and saturation to highlight important details.
Tone Curve - a very interesting tool, which can be controlled as a point-bending curve, or a little easier using sliders. There are additional elements which are responsible for light and shadow. Using them, you can make a more detailed adjustment of the light and shadows in the picture. You will also find three other curves in this section that influence green, red and blue. They are useful if you intend to do different effects.
HSL – “Hue” directly affects the color and the shades that are related to the main colors – for example, red may be transformed into orange or pink. “Saturation” affects the saturation of a particular color, while “Luminance” is responsible for light and shadow. For example, if you need to make skin a little lighter, but you don’t want to use a brush and lighten the whole image, these sliders are very useful.

STEP 2. If this is the source or JPG, which contains information about the way this photo was taken, it will save your image. For example, many lenses distort photos because of the lens itself, and sometimes due to improper lighting, chromatic aberration may appear, which is sometimes very difficult to remove from a shot. If you check these two boxes, it will automatically correct lens distortion and remove chromatic aberration.

STEP 3. Details section is responsible for noise and sharpness of a photo. Obviously, sharpening makes the images sharper. And if the photo turned out to be very noisy, you can raise the values of noise suppression, as well as light and color.

STEP 4. Using Effects section, you can add B&W vignetting to a photo. There is also a Grain section if you need to stylize a photo, making it like an old film and add the grain to achieve the realistic look.

STEP 5. Camera Calibration is a large section that helps to stylize a photo through shades while the colors may look very different, which cannot be achieved through pinpoint color correction.
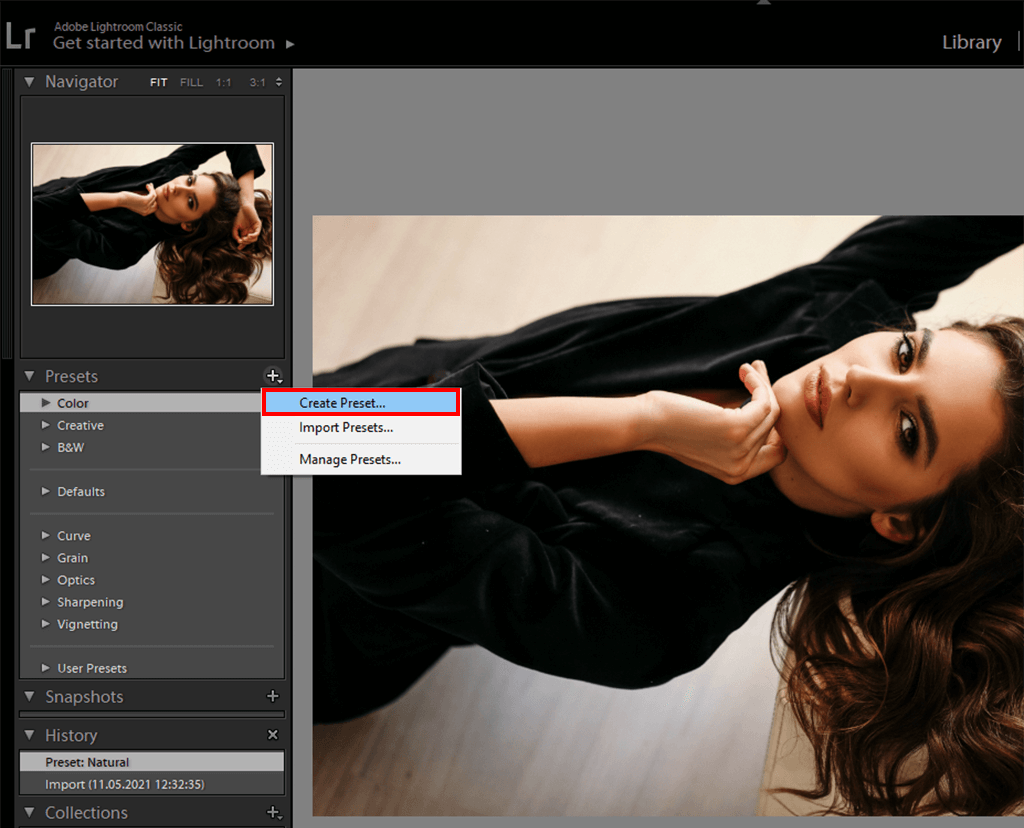
STEP 6. Now, you need to save your preset. To do it, click on the + icon in the Presets window on the left.
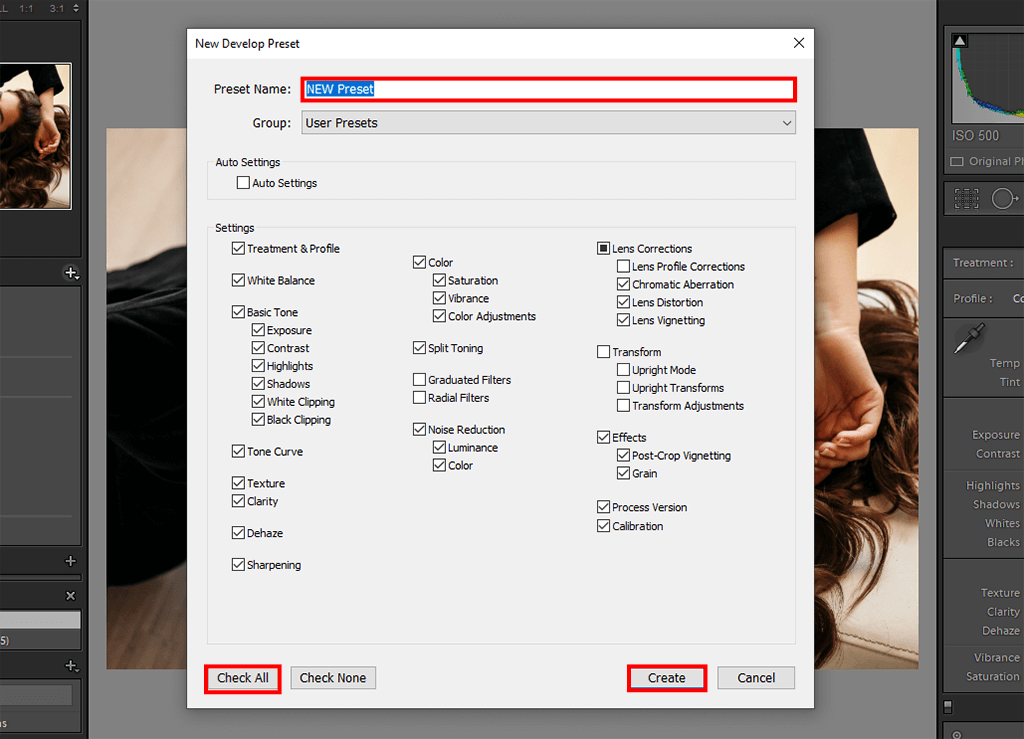
STEP 7. Then, you need to come up with a title for your preset and select settings that you want to save. I usually click on the Check All button. After that, I click on Create. When everything is done, you will be able to find your preset under the User Presets tab.
If you want to quickly use your preset, share it with your friend, or create your own bundle of presets, you can find all the created presets in a dedicated folder. There, you will also see other presets that you have installed on your device. We have discussed this in detail at the beginning of this article.
Being a professional photographer, I’m often asked not only how to import Lightroom presets but a variety of other question from newbies. Here I will answer those ones I receive most often, hoping it will help you understand everything concerning these Lightroom effects.
Adobe offers 3 different versions. Two versions are for PC: Lightroom CC and Lightroom Classic CC and the third one is for smartphones: Lightroom Mobile where you can use Lightroom mobile presets too. The fullest and most powerful is Lightroom Classic CC, widely used by photographers (me too).
If you are going to work with mobile presets, download Lightroom CC Mobile app. Will it be an iPhone or Android? No matter. I recommend you downloading a free Dropbox app to download presets onto your phone.
If you want to use presets on your smartphone and laptop, you will need any Lightroom version and a laptop/desktop that can run the photo editing program to use them on desktop and you will need an Android or iPhone with Lightroom Mobile installed. If you are subscribed to Adobe Creative Cloud you will not need Dropbox to add your mobile presets as this can be done easily and quickly through synchronization.
For those who have a Creative Cloud subscription, is variant is better. You will able to edit photos as on your smartphone before publishing in Instagram and you may edit your photos taken by your DSLR or mirrorless camera.
Absolutely no. There are so many variables in photo genre, light, colors, shadows, time of the day/year, location, camera settings, lens, image file (RAW or JPEG), etc. The list is endless. I always choose a preset and customize it according to each photo, especially if it is white balance adjustment.
At first, choose one preset and apply it to one image. Customize it until you like the result before using on other photos. Then mark these photographs that you want to enhance and press the Sync button (in the bottom) to open a dialog for choosing specific parameters to be synchronized in this case.
There are no differences in their work. You may use all presets and brushes both on Mac and Windows.
RAW, JPEG or DNG.
For those who followed my advice on how to import presets into Lightroom but it didn’t seem to work, don’t worry, there are minor things you might have missed. First, restart the program. Then update the Database.
Still didn’t work? Possibly you placed them in the wrong folder so double-check, and while you’re in it, make sure the files are not ZIPed. In most cases, the above-mentioned problems are the cause.
If you added many presets and chose the ones you like, you may delete a few needless options.
Right-click on an effect. There will open a drop-down menu where you can select “Delete”. To cancel the action press Ctrl + Z.
Go to the Lightroom presets location on your PC and delete them.

If you want to get even more spectacular results in portrait or wedding photography, I advise using our selection of filters for beginners.


