If you are wondering how to make a DIY smartphone projector by using recyclables and office supplies, make sure to read this detailed guide. By following these simple steps, you can create a DIY projector in less than half an hour.
Despite being hand-made, such projectors allow you to watch videos on a big screen and play games for hours. If you are in a mood for something creative, read on to learn how to build such a projector by yourself.
If you are on a budget, it’s better to postpone purchasing a regular projector until you have enough money to buy a high-quality device. Besides being quite expensive, such models take up too much space and are less energy-efficient than homemade projectors.
You also need to connect them to a power source, which makes them less portable. As opposed to that, a DIY smart phone projector won’t cost you a dime if you have all the necessary office supplies and a cardboard box. They are quite portable as well.
You can build such a projector with your child and use it to show pictures to your friends. Make sure to use a good magnifying glass to watch movies in high quality. Some photographers use DIY photography lighting. They project pictures on models to create unusual light effects. Here is my step-by-step guide on how to build a DIY projector.

To build a DIY projector, you need to use several everyday objects that can be found in almost any household. It’s better to find all these objects to ensure that you will get a high-quality image.
You need to use a cardboard box for directing the light from your smartphone towards a magnifying glass used as a lens. It will allow you to project an enlarged image onto the screen or white wall.
For this purpose, it’s better to take a regular shoebox. If you don’t have it, any rectangular-shaped box will do. You need to select a box that is slightly wider than your smartphone. It shouldn’t be too wide since you need to direct the light toward the magnifying glass.

If your box has white inner walls, the light from the screen of your smartphone will be reflected from them, which might result in poor image quality. To prevent it, you need to make these walls black. This way, the light won’t be dispersed and reflected, which will account for better image quality.
Take black paper and carefully glue it to the inner walls of the box. For this purpose, it’s crucial to use matte paper. You need to apply a thin layer of glue on a brush or your fingertips and spread it on the paper to ensure that it will be glued to the walls properly. If you don’t have the glue at hand, you can attach the paper with tape.
It’s better to use thick paper to make smartphone projector. Remember that you need to cut out one side so it’s important to make the construction more durable. Instead of black paper, you can use black paint. However, you will need to wait until the painted walls dry out.

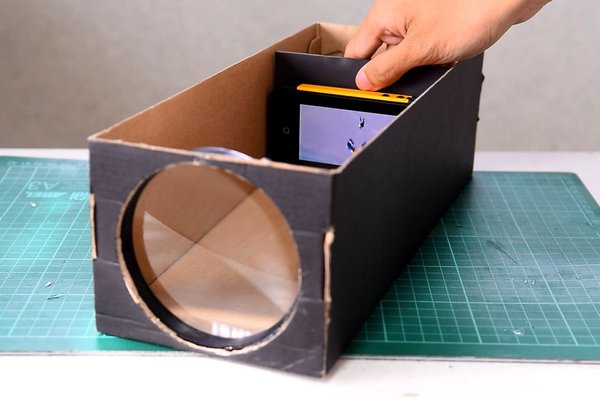
If you don’t know how to make a DIY smartphone projector, you need to follow these steps. Put the box on the table in front of you. While holding it upright, place a magnifying glass on the top and draw its outline with a pencil. Use a cardboard knife to cut out a hole for your lens.
A cut-out circle should be a bit smaller than the outline to prevent the magnifying glass from falling out.
When you place the lid on the box, it might cover a part of a magnifying glass. Make sure to cut off all the parts that block the light. Take a closer look at the cut out hole and use a cardboard knife to remove the parts of the box that might get in the way.

Find the right place for your magnifying glass behind the cut-out hole and glue it to keep it in place. If the handle of the magnifying glass gets in the way and doesn’t fit into the box, cut it off. You need to use a high-quality lens to get a sharp and detailed image.

To ensure that your smartphone is firmly attached to the inner walls of the box, you can use a stable iPhone tripod. However, even if you don’t have it, you can easily build a DIY iPhone Tripod from a foam board or binder clips. By using a tripod, you can put a smartphone opposite to the magnifying glass and keep it in place.

For a more enjoyable experience, it’s important to configure the settings of your smartphone properly.
Choose the highest brightness: Thanks to the high brightness, you will get a brighter output image.
Lock the screen of your smartphone: If you don’t want your image to rotate unexpectedly, turn off the auto-rotate option in the screen settings.
Turn off the sleep mode: Go to the screen sleep time settings and select “Never.” This way, your phone will work for hours.
Flip the image: Because of light refraction, a projected image will be inverted and flipped upside down. You can quickly solve this issue by using an application that changes the orientation of an output image.
Some people use a mirror to fix the inversion issue, however, it might be difficult to install it properly. You need to put the mirror at a 45-degree angle and place it opposite the magnifying glass.
If you have followed these steps, your projector should be almost ready. Similarly to regular devices, it requires calibration. To focus it, you need to put it opposite a screen.
Put a smartphone at the end of the shoebox and then start moving it towards the cut-out hole with the lens. The image on the screen will look less blurry. Move it until you find the right spot. Remember that you can also place your homemade smartphone projector further from the screen to get a high-quality image.
At this stage, you also need to check whether there are some parts of the box that you might want to remove. Besides, you will see if there are any holes in the box.
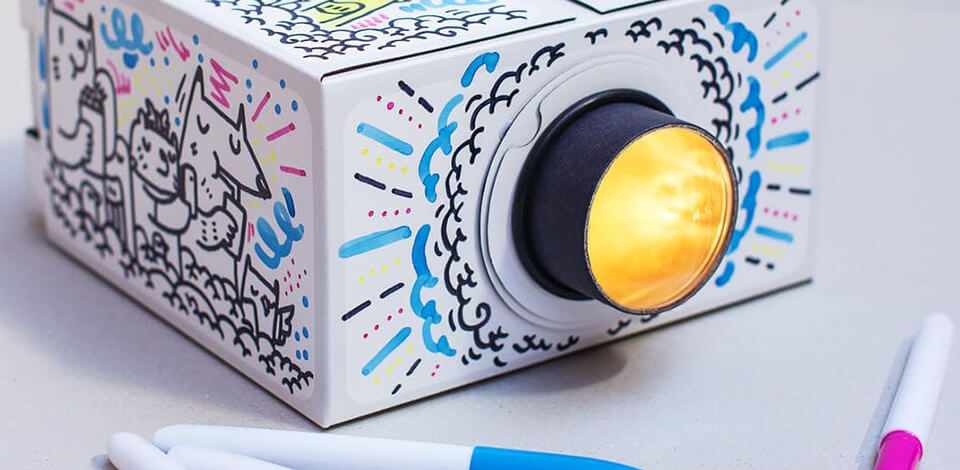
If everything works properly, you can start using your projector straight away. You can paint the box outside or glue color paper to it. When it is ready, turn off the light and start watching movies.
To build a durable projector, try implementing the ideas mentioned below. They will help you build a portable projector for home use and travels.
Difficulty Level: Medium
Estimated Time: 1 hour
Materials:
To make a phone projector, find a large-format thick page for paper bellows. You need to find a special template, print it, cut it out, make folds and spray paint them black from both sides.
It will allow you to improve the focusing capabilities of your projector by preventing light leaks.
Unlike other DIY projectors, this one has a smartphone on the top of the box. It should point down to the mirror. This allows you to flip the projected image.
Difficulty Level: Easy
Estimated Time: 30 minutes
Materials:
Difficulty Level: Easy
Estimated Time: 30 minutes
Materials:
If you want to learn how to make projector without magnifying glass, try using Fresnel lenses instead. They are designed for enlarging small text. If you use a projector in a big room, you might notice that the text on the screen seems to be blurry.
When you place a projector far from the wall, the light gets diffused, which results in lower image quality. To avoid it, you can use a Fresnel lens instead of a magnifying glass. This way, you can enlarge an image without quality loss. However, you will need to find a larger box to fit such a lens.