Although the OS can automatically detect and configure such image parameters as resolution, understanding how to calibrate a monitor will come in handy. Using the best monitor calibrators is an alternative to making a purchase because over time, the image on the monitor may become slightly dim or blurry.
You can calibrate your monitor following these ways:
For the photographer, it is important that the images retain an accurate representation of color saturation, monochrome toning, contrast and other characteristics of the camera. The designer needs screen calibration to match the color profile of the digital design with the printed version and accurately display color and contrast. Because the results of the work will be viewed by customers exactly as intended.
If the image on the monitor doesn't match the content captured by the camera, the images from these files won't look as you imagined, even if the best photo printing service takes over. Color balance may be ruined, colors may be blurry or too intense, images may have an undesirable hue.
By adjusting the settings on the monitor's keypad, you also calibrate it without knowing the approximate standard value for this model. So, the results will be mediated and will depend on your vision and perception “by eye”. Monitor calibration ensures maximum accuracy of colors, brightness, contrast and black levels.
This is a simple manual or semi-automated process of calibrating Adobe RGB monitors and sRGB models. Factory color calibration is only built into high-quality panels with a premium price tag. No matter whether you use the cheapest or the best touch screen monitor, you can calibrate it at home in three ways.
Windows and Mac OS have utilities that can help you adjust various calibration settings that are limited by the display type and model. Before you perform monitor color calibration, place the monitor in an environment with moderate neutral lighting, where direct natural or artificial light won't result in glare.
Ensure that the monitor is turned on for at least half an hour to warm up properly, and clean its surface from dirt with a special screen cleaner. By default, your monitor should display the image with the highest possible resolution required for calibration. If necessary, change it to the suggested resolution:
I wouldn't recommend this method to users for whom the monitor is a significant part of the job, and for high-performance 4K monitors with advanced settings.
SOLUTION:
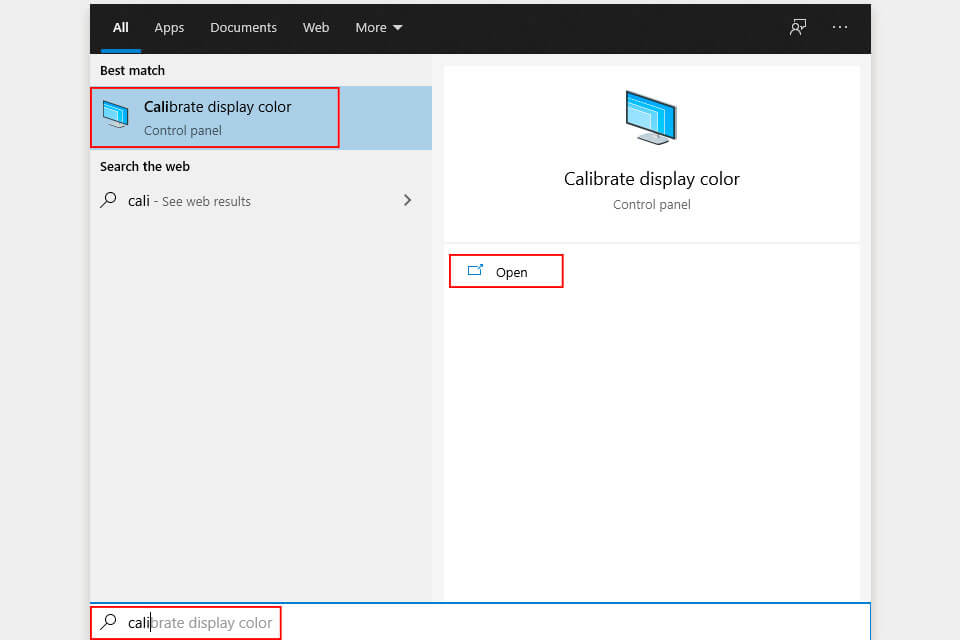
1. You can find the calibration utility through the desktop context menu (right-click > Display settings) and through system settings (Start> Settings> System> Display> Advanced display settings). But the search bar will work faster for all versions: enter the text «calibrate display» in the Search tool. Then click Calibrate display color at the top of the Start menu.
2. The wizard will guide you through the steps by accessing the monitor's OSD menu to set certain color options. Before the next step, the utility suggests restoring the default display color settings. If you are using a custom configuration, I recommend that you save these settings in case you want to undo the changes. Click Next to continue and follow the instructions in the wizard.
3. Adjust the display's Gamma slider to match the previously provided “good” image pattern. Move the slider until the dots in the center of the image become less visible. This will alter the brightness and color of the screen.
4. Use a high-contrast image sample to ensure that the monitor displays sufficient detail in the shadows without overexposing the light areas. Find the buttons or brightness controls on the monitor. Increase or decrease Brightness to the second last value when the cross merges with the wall. Then, click Next.
5. After viewing a good example of a monochrome image, adjust Contrast using the buttons on the monitor so that you can see the creases on the man's shirt in the photo. But the background of the image shouldn't be bright white. Click Next.
6. To adjust the color rendering accuracy, several grayscale diagrams are provided using a prominent color shade. The next screen shows separate RGB sliders for color output. Adjust Colour balance by moving the slider of each color until any color shade is removed from the gray bars. Click Next.
7. Click the Previous calibration or Current calibration button to compare the new changes with the previous settings. If the new color configuration is appropriate, click Finish to apply the settings or Cancel the new configuration. The new monitor calibration settings will be saved as a .ics color calibration file and will be displayed as an ICC profile in the color management settings app.
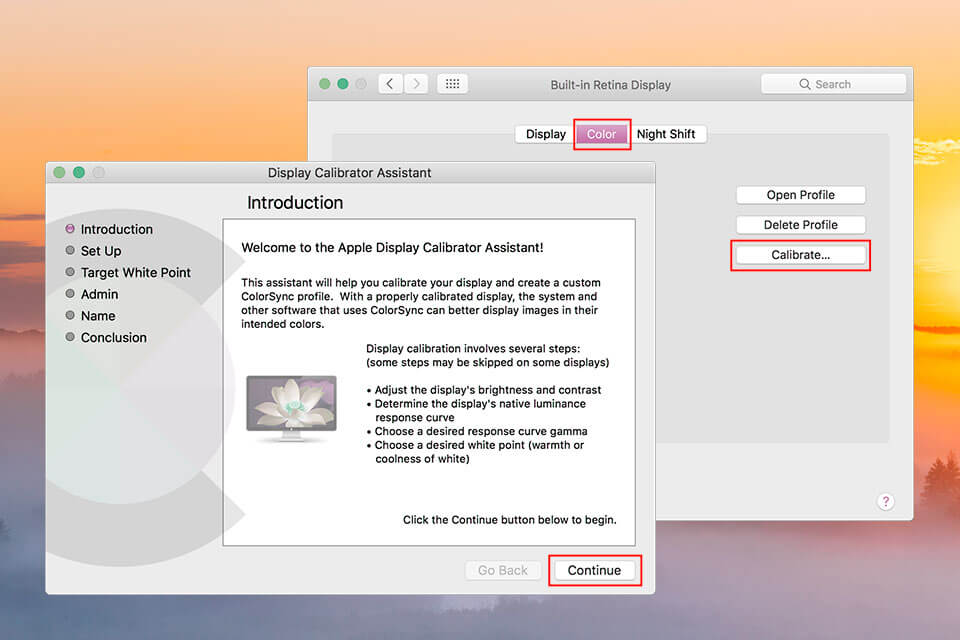
1. Navigate to System Preferences > Display > Color tab. Then, click the Calibrate button that will open the Display Calibrator Assistant. If you are unable to locate it, enter calibrate in Spotlight to search for it among the computer's numerous folders and files.
Note: if you don't pick the expert mode checkbox, you will get access only to two settings: target gamma and white point. In fact, this is one setting, because the target gamma is the term for contrast. In most cases, it should be set to standard.
2. The wizard will guide you through the process of calibrating the display, follow its instructions. Check the box next to Expert Mode. Now you have access to 5 test templates to adjust the gamma or brightness of the display, more options for the target gamma, as well as a white point that adjusts the overall color tone of the display.
Note: if you are not working specifically with graphics that require particular settings, it is better to use your own white point. Here, expert mode lets you act as an administrator and pick whether to allow other users to access this calibration profile.
3. Set display's Native response by adjusting two sliders to fine-tune brightness and color. Repeat the process to improve accuracy. Click Continue.
4. The next step of how to calibrate monitor Mac is to adjust the display contrast by picking the Target gamma setting. The available gamma scale is between 1.0 and 2.6. I suggest picking 2.2, as this value is expected by such applications as Photoshop. Click Continue.
5. The White point setting doesn't offer a large number of options. But it determines how the monitor will display white color: “colder” or “warmer” depending on personal preferences (daylight, warm white LED lamps). The D50 warm settings are too yellow, cool 9300 are too blue. Neutral white D65 and the standard settings are difficult to distinguish from each other. Click Continue.
Note: check the Use native white point tickbox just to be on the safe side. Or stick to a standard D50/D65 point to prevent strange tint issues.
6. Administrator access is important if you are worried that others will alter your particular color profile. Click Continue.
7. To finish, give your profile a Name and click Done. Your new profile will now be specified as a parameter in the “Color” tab of the “Display” parameter in the system settings.
Note: in case you didn't manage to calibrate monitor the way you intended to, select this new profile and pick Open Profile. You will see a new window that will have all the tags related to the color profile and detailed information about them. Certain tags will have standard color data. Other tags may be altered to change particular color factors.
Apple will attempt to identify your display and offer an array of color adjustments. Or it can skip the settings completely to the white point. Apple's native displays may have fewer color calibrations in steps 2-4 because Apple has already calibrated them.
There are several web-based calibration tools that can help you figure out how to calibrate monitor for photo editing manually. They are able to provide more precise or more individual calibration than built-in utilities.
Lagom LCD monitor test is a proven source of free test templates. The site will guide you through a series of tests to configure your monitor using OSD menu controls - a group of buttons or sensors on either side of the display. This set of calibration web pages is extensive and includes various images and diagrams to help you calibrate everything - from black level to sharpness.
Verdict: It is a simple downloadable application that helps you calibrate the colors of the monitor in 3-5 steps. Download the software and follow the procedure to create a reliable color profile and automatically adjust the monitor's colors. It contains calibration tools similar to those built into Windows and Mac OS X.
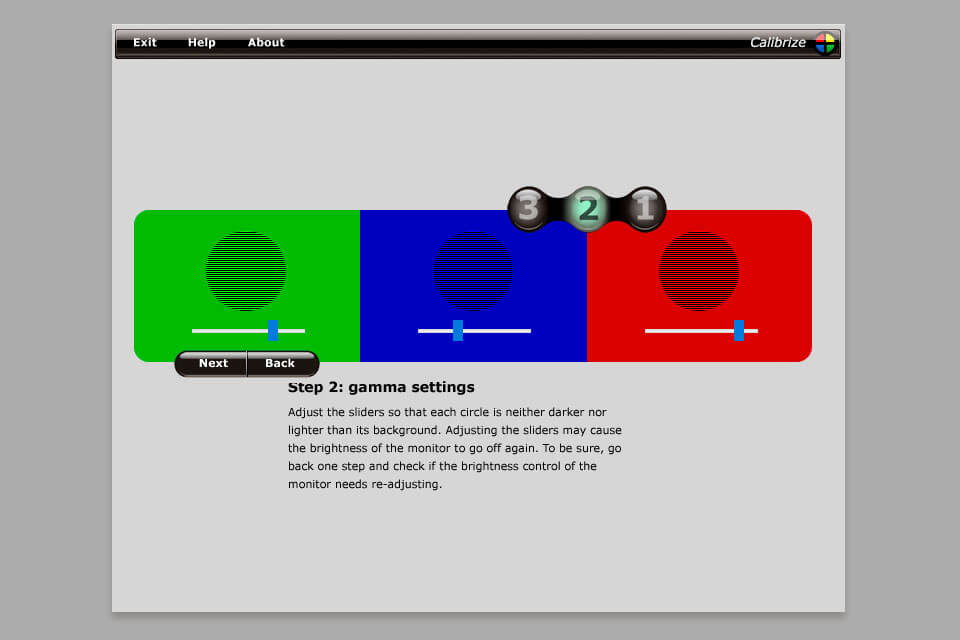
Black and white fields help you set brightness and contrast using the monitor's controls. Besides, you will find RGB sliders for color adjustment. Using the help information about the process, save your new profile at the end, and you are done.
If you require an effective monitor calibration tool that seamlessly integrates with other graphics software and goes further than native calibration settings, pay attention to Calibrize 2.0. Its free wizard will guide you through the entire process, explaining in detail how to calibrate color, grayscale, gamma and related settings on the PC.
Displays with new technologies - 4K UHD, HDR monitors and curved monitors are eye-pleasing only if they are properly calibrated. The eye can't objectively judge complex color balance or consistency. There are many optical illusions that prove the eye's tendency to make mistakes. That's why you may leave the calibration to electronics - a special calibrator or colorimeter.
These sleek gadgets only require a USB connection. Just hang it on top of the screen in the middle. Then the appropriate software will be switching different colors for them to be identified by the electronic eye. The calibrator will pass the color data to the software so that it can create its own color profile for Windows or OS X.
Buying the monitor color calibration tool is one way to get around the dilemma of human eye perception and ensure that the monitor is calibrated to its true potential. You will need to invest serious money if you are looking for more accuracy and control. But you may find the best monitor calibrators even for an inexpensive price. They will help you achieve color consistency on all your monitors.
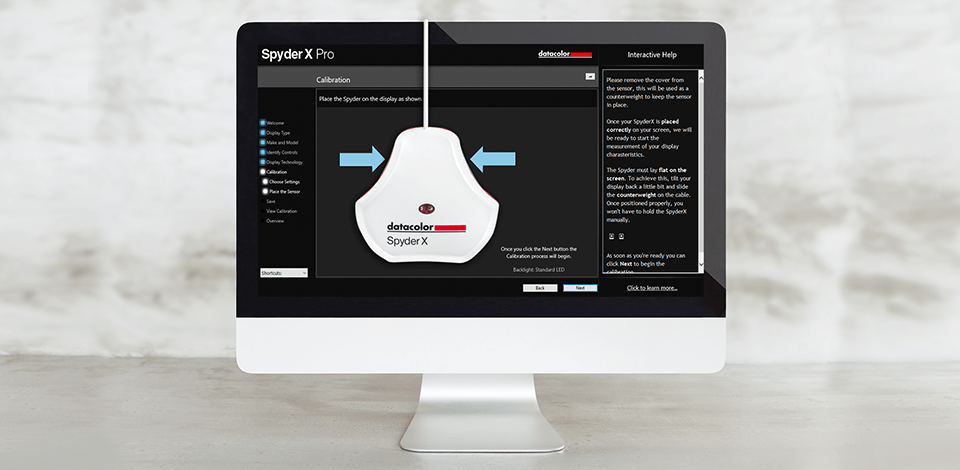
Such devices are equipped with a seven-color full-spectrum sensor that helps accurately characterize various displays with a wide color coverage. If you decide to purchase it, all you have to do is attach the device to the screen, connect to the USB port and run the included software. After that, it will guide you through the entire process.
Higher-level calibrators also tend to be faster - a calibrator like Datacolor's SpyderX Pro can calibrate a monitor in less than two minutes. This is useful when you need consistency so that your monitor constantly displays projects with critical color.
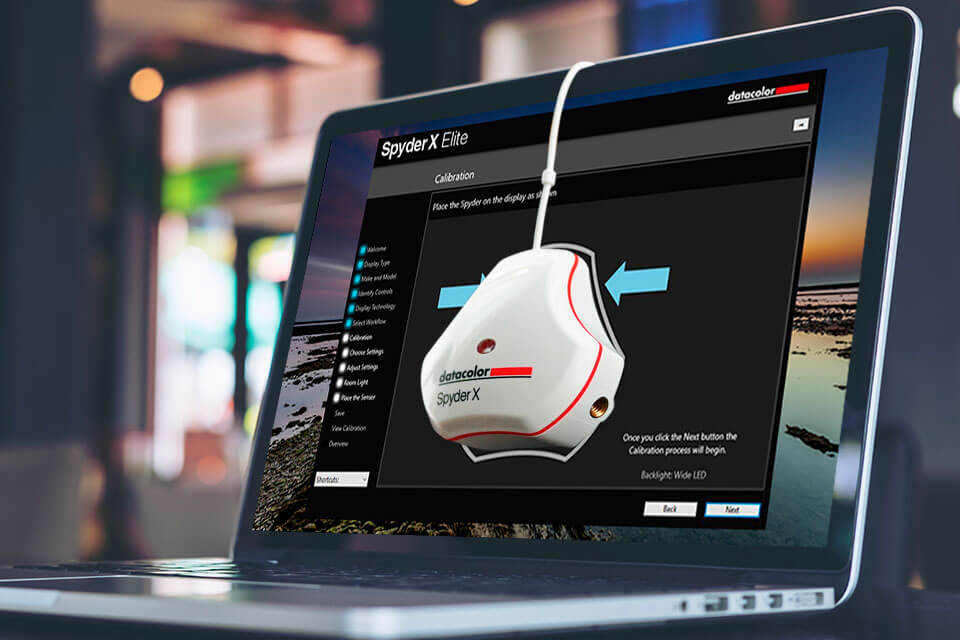
4. Hang, attach and point the colorimeter at the center of the screen so that the lens faces it, as in the manual. Most colorimeter programs display a contour corresponding to its shape to show the proper placement of the device.
5. After the start, during the calibration process, you may need to alter several parameters: set the screen resolution or other parameters to standard values. Typical suggested starting points: brightness, 120; gamma, 2.2 for PC, 1.8 for Mac; color temperature, 6500K; color display, 24 bits.
6. While the software is running, the screen displays a sequence of templates (color scales, brightness, grayscale) for calculating and saving the ICC profile. The calibration device indicator typically flashes during the calculation and stops when it is complete. After that, you will be prompted to remove the colorimeter.
7. Name the ready file, specifying the purpose for the newly calibrated monitor. Or save the file in a convenient place so that you can activate it when viewing images. The default setting automatically activates the profile every time you use the monitor to estimate an image.
Calibrate regularly. The majority of systems display a warning when it is time to recalibrate. Color calibration gamma can be faster if you activate the saved profile and use it as a starting point.
A standard monitor, also known as a traditional or non-touchscreen monitor, is a display device that allows you to view content but does not have touch-sensitive capabilities. It typically consists of a screen, a stand or mount, and various ports for connecting to a computer or other devices. On the other hand, a touchscreen monitor is a display device that not only allows you to view content but also enables interaction by directly touching the screen. Touchscreen monitors have touch-sensitive panels that can detect and respond to touch gestures such as tapping, swiping, pinching, or dragging.
It is generally recommended to calibrate your monitor every month to ensure accurate color representation and optimal display performance, although the frequency may vary depending on your specific needs and usage patterns. If you work in color-critical fields such as graphic design or photography, more frequent calibration, such as every two weeks, may be advisable.