Professional and high quality iPhone product photography sounds unbelievable and crazy? Stop believing stereotypes that taking good photos can only be real with an expensive DSLR camera and lens.
If you need to sell products on eBay, Amazon, Craigslist or Etsy on budget, this article will help you make excellent product photos with iPhone in just 7 steps.

If a few years ago you could say with certainty that for photographing products you need a good DSLR camera and expensive lighting, now you just need to take your iPhone and set the correct lighting (light box) and the background.
However, for making good product photos with iPhone, it's not enough just to place the product on the table and take a picture. I'll give you my basic list of all the necessary gear that you need and which I used in this tutorial:
You don’t need a lot to produce quality iPhone product photography results on a simple single-tone background, which is why beginners often start from this type of photos, while many continue to shoot exclusively with smartphones because of their superior convenience.
To be honest, you don't need to be a professional with 10 years of experience, since with the right guidance you can make professional iPhone product photos at home factually in half an hour.

This is the most important point of this list, since no matter how classy DSLR camera or smartphone you have - without good lighting it's just an expensive box. I won’t talk about which LED light you need to buy since it can be rather expensive and hard to set up. Artificial lighting has two large advantages: you can take product shots with iPhone cameras whenever and wherever you need, and you will always have enough lighting.
On the other hand, natural light is a lot easier to work with – it’s usually ambient and covers a larger area, and you don’t have to think about where to direct it or how to diffuse it. The light you receive from a window can be enough for a photo, especially if we’re talking about lifestyle product photography. I picked the best-lit window in my room and took my photos near it.

The best that you can come up with for product photography with iPhone is buying or creating a lightbox. My first makeup product photography was taken on the table with attached paper to the wall and two lamps placed on either side of the product.
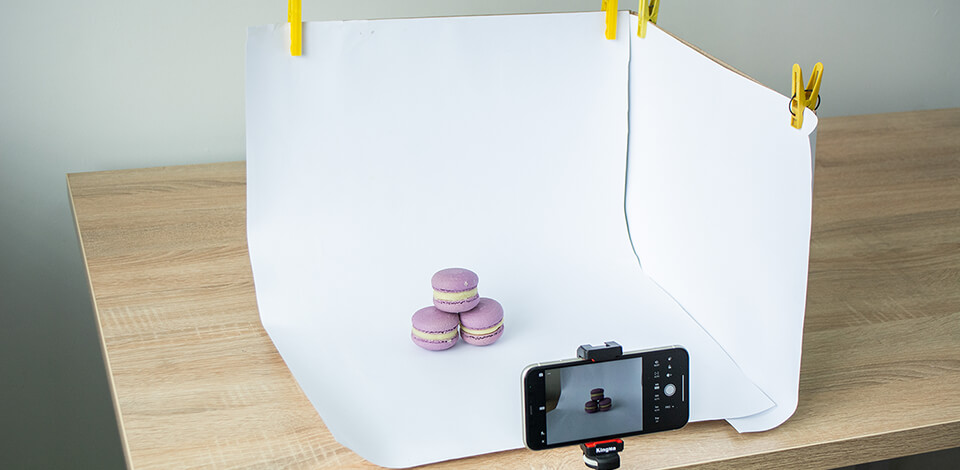
Today I’ve taken a familiar path and made a DIY lightbox with the help of a cardboard box, white paper, duct tape, and clothespins. Making it took less than 5 minutes, but now I can use it as much as I want.
If you’re using window light, keep one of the walls to reflect the light and get rid of deep shadows. I know plenty of photographers who take pictures with phone cameras for their Etsy or Instagram in a similar home photography studio and you’d never guess their photos were taken in such a setting.
If you plan to continue doing product photography on a white background for a long time, then you should consider purchasing a premade professional photo lightbox that comes with built-in lights. Why the best? Because it costs a little, but as a result, you get an easy, convenient and portable studio for professional product photography.

To get really sharp pictures - use a tripod. This is not so critical, because a few photos will be taken without it since you need to show different camera angles. Also, the iPhone camera for product photography has an excellent stabilization.
But if you want to get the best image - use a tripod and remote control. Even your finger on the screen will cause some motion. You can temporarily replace the remote control with headphones and take pictures with the sound button, but this is not convenient.
I use my Manfrotto Compact Tripod and a Universal Smartphone Clamp, so there’s no need for you to purchase a separate tripod if you already have one. The tripod will allow you to set longer exposure times than if you were holding the camera in your hands.

Undoubtedly, you can take pictures with the standard Camera application for iPhone, but it doesn't have any manual settings, which is very important for this kind of photography. The best camera app for iPhone is Camera+ with its extensive picture-setting functions.
Personally, I take photos using the Lightroom Mobile on the iPhone because it has all the necessary settings for the pictures, as well as possible to directly make editing or send photos to your PC using Adobe Creative Cloud.

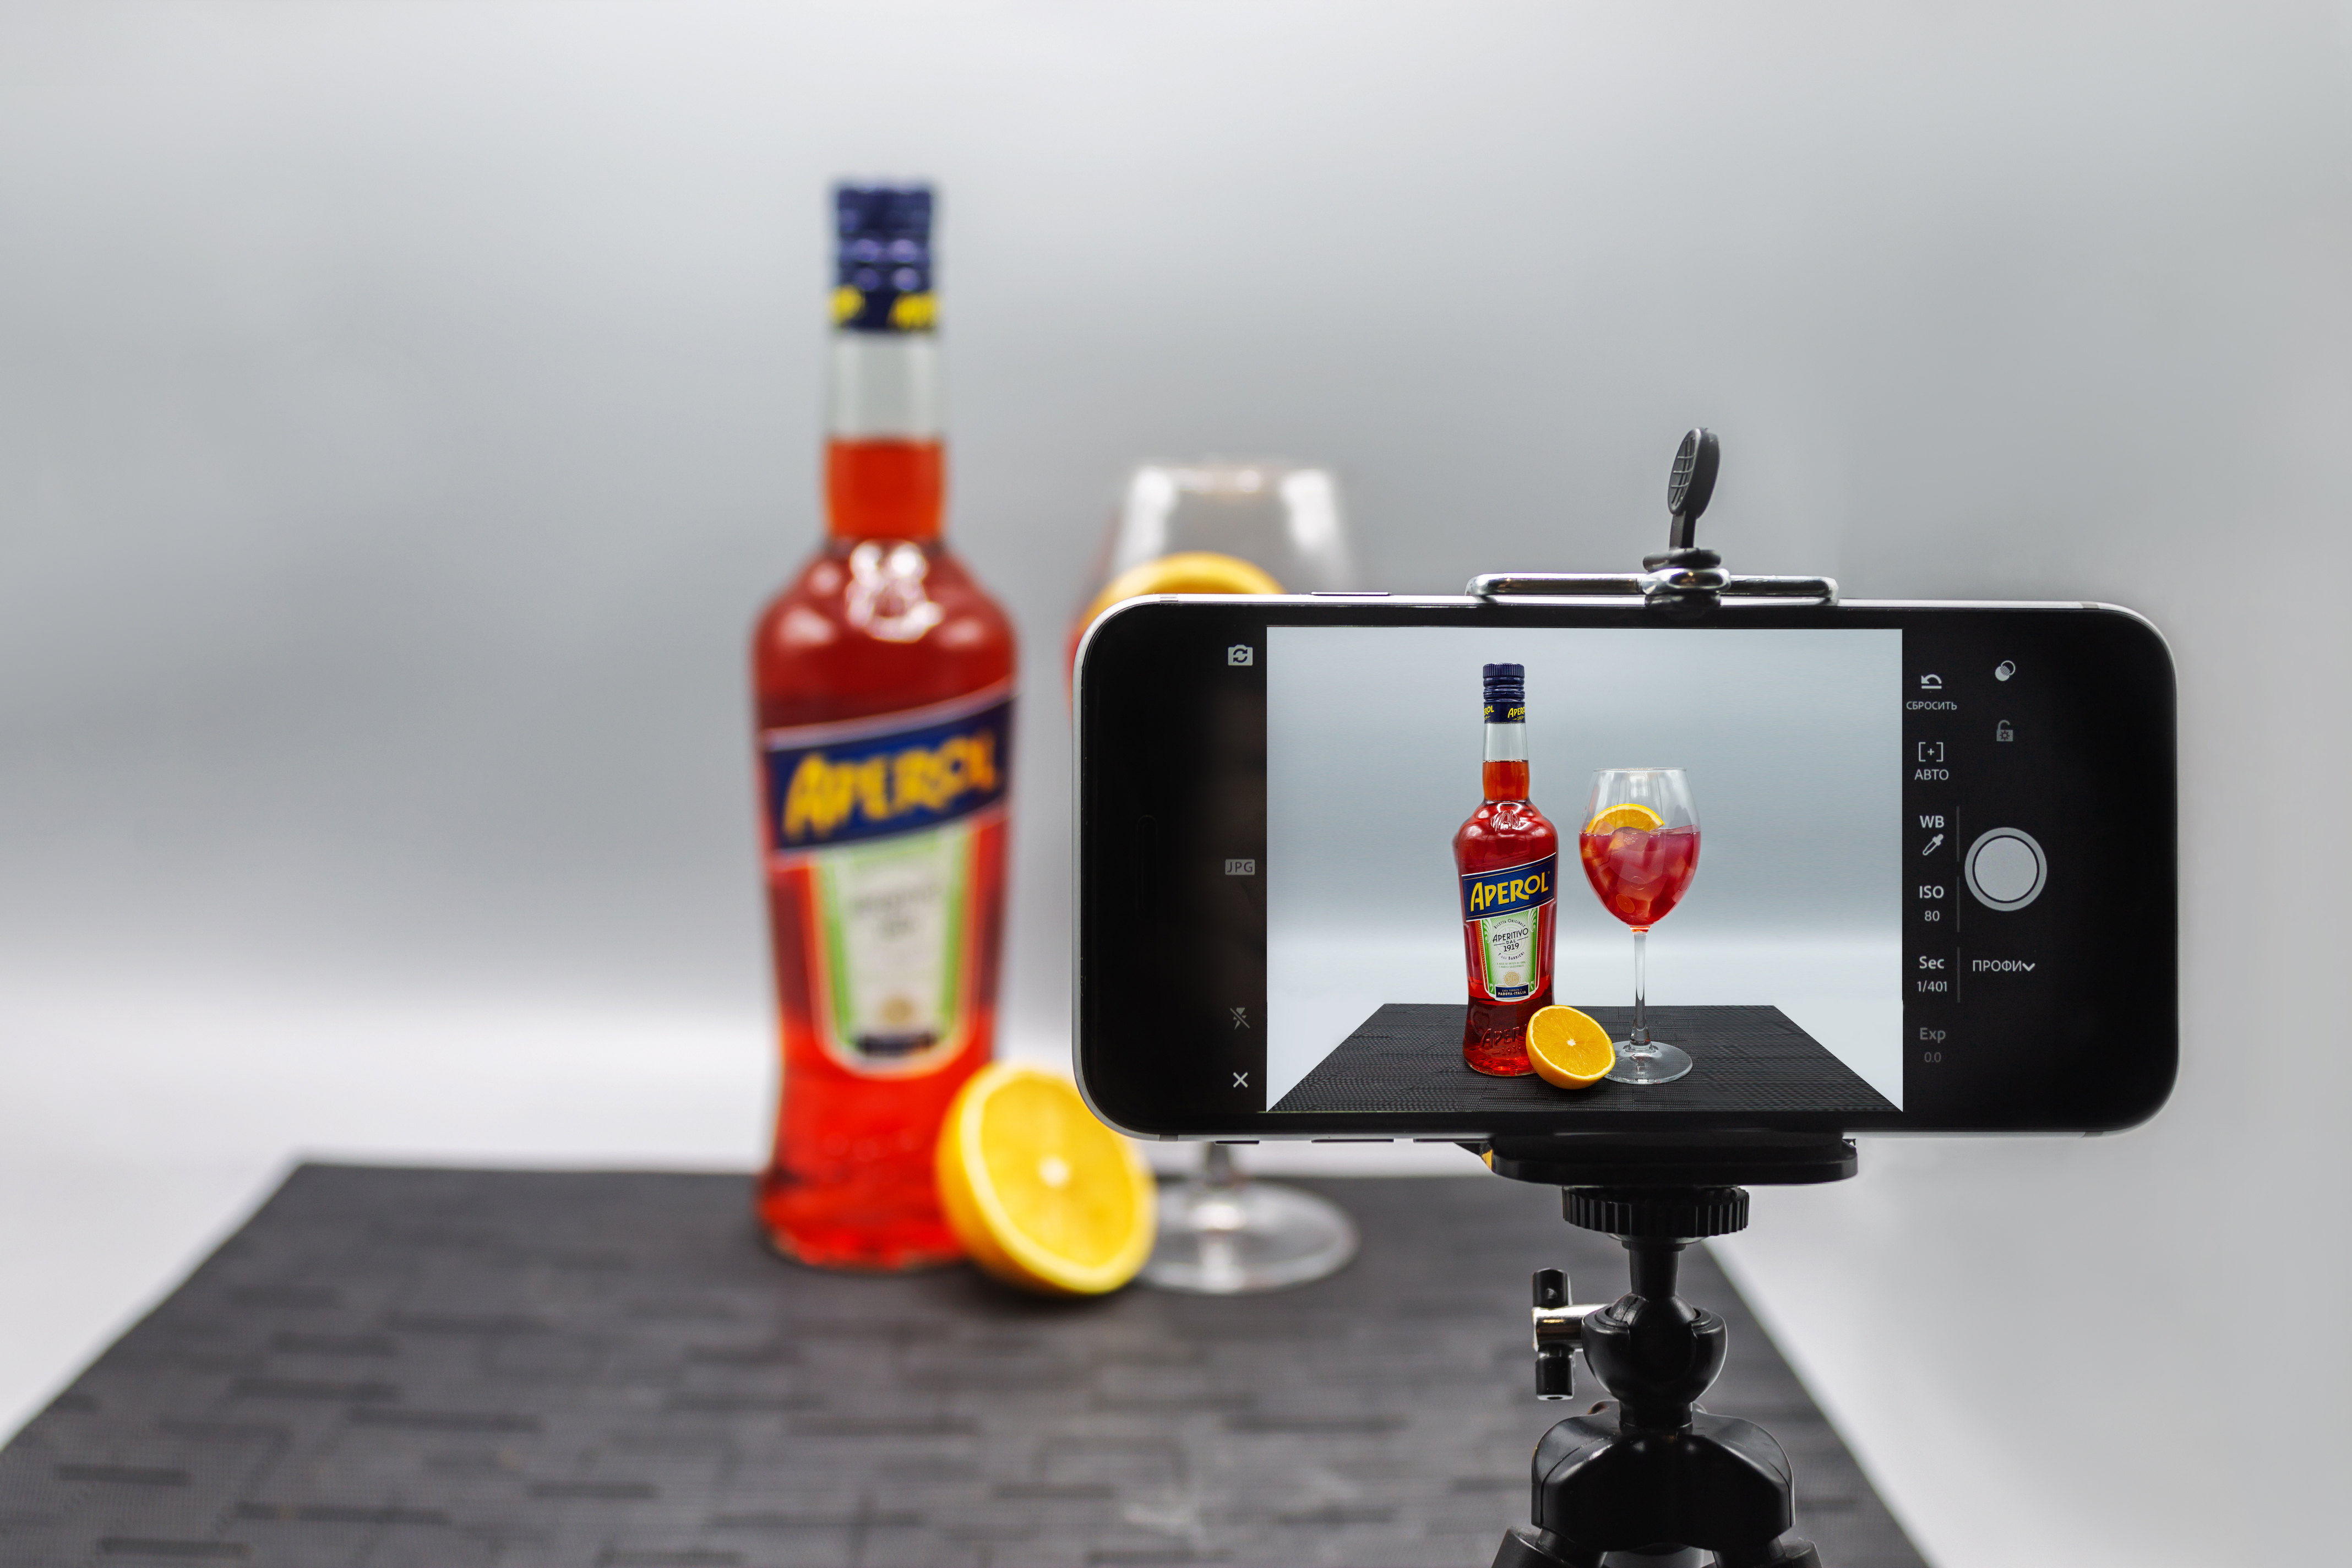
Once you're done with the preparations, start shooting! Having installed a smartphone in front of the product, you can start taking pictures. Don't put it too close, because it may cause distortion of the object. Choose PRO mode and adjust the camera to the values that show the best picture. In my case, it's 1/80 ISO A 32.
Adjust the white balance by selecting the eyedropper in the settings, but do it only after adjusting the lighting for product photography. Taking photos, play with camera angles and pick the best ones.

There are plenty of photo editing apps for smartphone users, but I prefer to rely on Lightroom CC Mobile because of how convenient it is. All you need is to make a color correction by adjusting the contrast, white balance and sharpness a bit.
To give your photos a magazine look and professional editing, outsource your images to professional photo editing service and receive a high-quality work for 24 hours.

Start by improving the lighting and making the background brighter by increasing the Exposure and Highlights. Try to adjust the White Balance, then go to the Colors tab, and play around with the colors. Pay special attention to Blues since white backgrounds tend to have a blueish tint.
If you need to make more serious changes or just look at your photos on the big screen - use Lightroom or Photoshop. You can also use Pixlr or Gimp to delete the background.
All you need is to clean the background, or better cut out the image, make a color correction as well as clean the object itself from dust, etc.
To further enhance your photos, you can use a variety of apps for photographers, but those can be narrowed down to the best options that offer the most flexibility when working with color and effects.

Highly functional application for shooting, color correction and batch post processing. It has a user-friendly interface in the style of all popular editors on mobile devices and a wide range of tools.
Suitable as the main mobile editor, and an excellent addition to the full desktop version. Lightroom deservedly received the award as the best application for editing on mobile devices.
Fotor is a great mobile editor with a wide range of features. There are all the necessary functions for iPhone product photography. Of course, this tool is more suitable for portraits and landscapes, as it has a huge set of effects, but it's quite suitable for professional editing too.

A powerful app for iPhone, iPad, and Android with extensive tools. Snapseed is suitable for both simple and deep editing directly on the screen of a tablet or smartphone.
Yes, and let’s not forget that it supports RAW files. Finally, what makes Snapseed the best editor is that it is completely free of charge, unlike two other apps that come with some paid features.
360 product photography is becoming more popular every year and allows you to increase sales due to the fact that the customer will be able to see every corner of the product and it will not have sudden surprises after purchase. It is proved that this method of taking product photos increases the number of customers and buyers.
In order to take such a picture, you need to purchase a special rotating panel like I have Foldio 360 or make it your own. I strongly recommend buying it on Amazon if you plan to shoot products permanently.
After you have received the required number of shots (in my case it is 36, i.e. one shot every 10 degrees, which is already enough for a great overview), you can take 360 shots. But it’s useless I think, you can immediately load your images into special programs – Spinzam, Sirv or Imajize and get a complete 360 image. If there are some flaws in your image, first make some photo retouching in Photoshop.

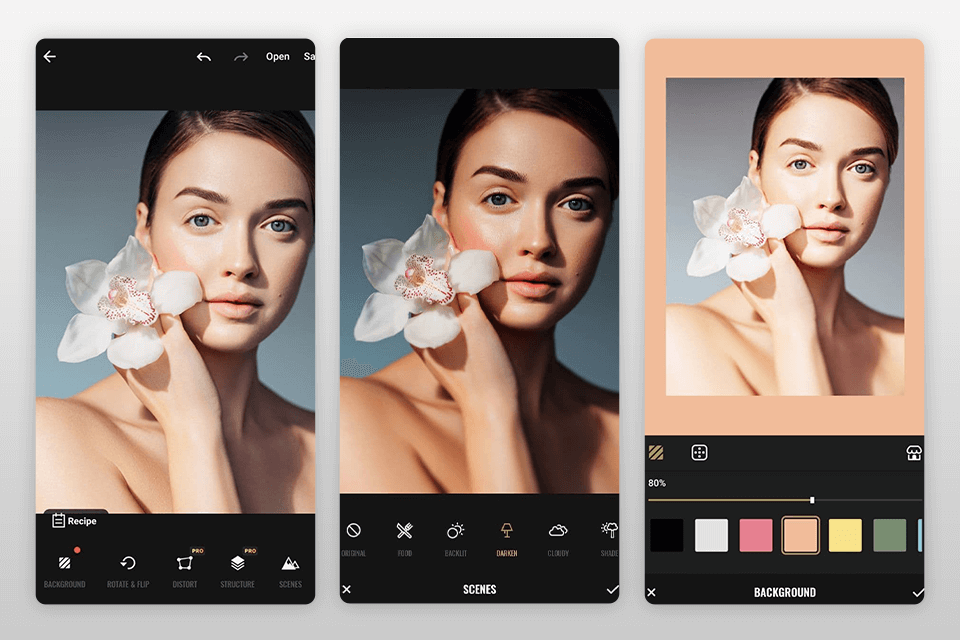
One of the main reasons why I recommend using LR Mobile for iPhone product photography is the ability to download and apply color correction effects straight to your smartphone. In a single click, you can make the colors of your photo special without having to meddle with each tool individually.
On the web, you can find a huge amount of reviews and training videos, but as I said above - such product photography tutorials have a lot of mistakes that can repel the beginners. I've found some really useful videos that visually show you how to shoot product photos with iPhone well.
The video tutorial from guys working at MyPhoto Studio. They produce lightboxes for professional photography, as well as excellent jewelry photography props (I'm using their reflective boards). Here you can find the basic tips for working with iPhone X.
This video lesson will teach you how to take great photos using creative backgrounds and natural light. However, be careful - you should have the same good lighting from the window as the author.
Unfortunately, it's a pretty unpopular video tutorial, even though this guy gives really great equipment tips for the professional pictures. His channel also offers a few videos about lighting, tips for shooting, and so on.


