How to Whiten Teeth in Photoshop
When you purchase through affiliate links on our site, we may earn a commission. Here’s how it works.
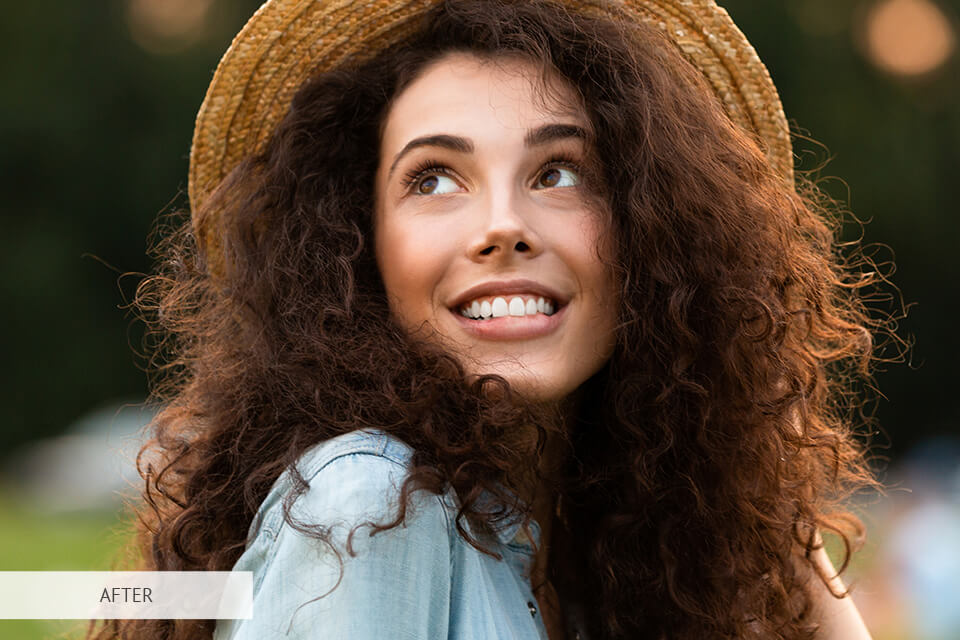
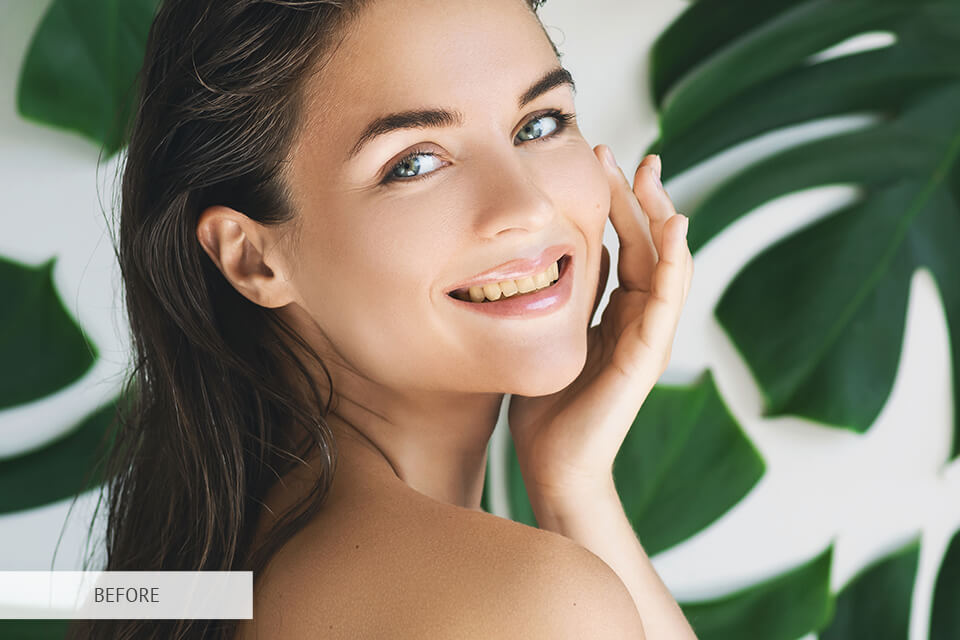
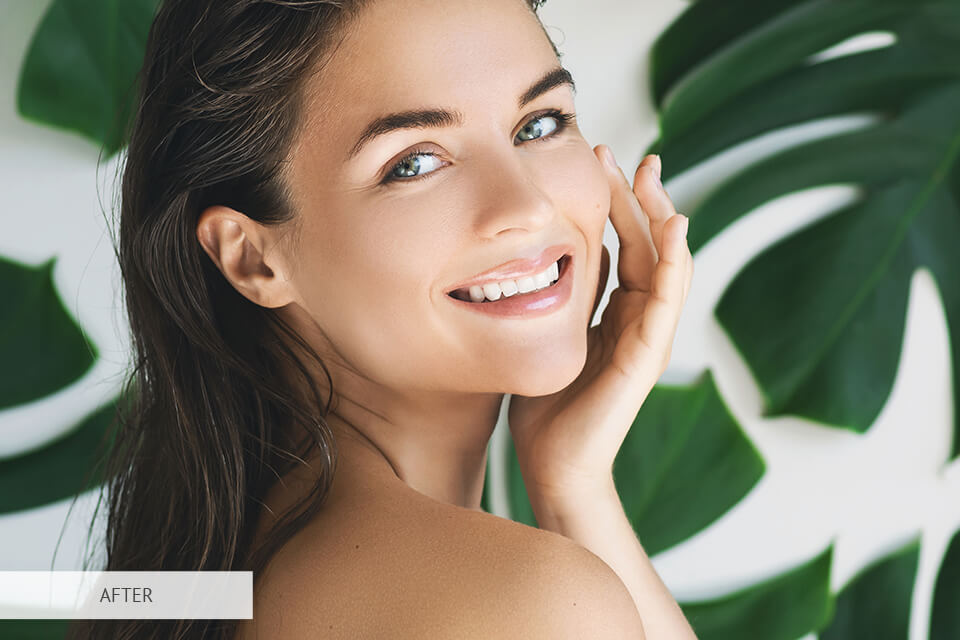
How to whiten teeth in Photoshop fast and don’t waste much time getting a natural look? No one wants to have yellow teeth in the photos but it often occurs that lightning makes them look worse than they are in real life. Give your models a real Hollywood smile in Photoshop.
Having studied and tested many online tutorials, I discovered that most of them bring either too unrealistic or faded results. That encouraged me to show you 3 reliable methods on how whiten teeth in Photoshop CC, so that the final photo looks nice and natural.
Method #1. Teeth Whitening Through Hue/Saturation Adjustment Layer


The first Photoshop whitening teeth method I’d like you to try is actually the most widely-used thanks to its simplicity. It implies adjusting of Hue/Saturation.
Step 1. Create a Hue/Saturation Adjustment Layer
On the Layers panel, find the New Fill or Adjustment Layer icon and click on it. Once the tab opens, select the Hue/Saturation adjustment layer.
By default, the Edit option is set to Master, which means that all the colors in a photo are equally affected by Hue/Saturation.
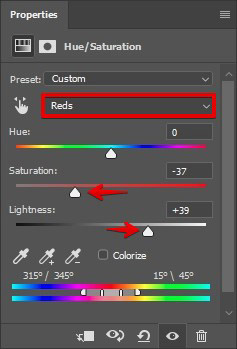

At this stage, you need to change the lightness and saturation of reds and yellows in the picture. You can enter the values you see in the photo below, or do it gradually, each time checking the way the teeth look.
You need to find such a position, in which teeth look white, but still preserving a slight touch of yellowness. This is done because a human’s teeth can’t be purely white!
- Read more about how to download Photoshop free.
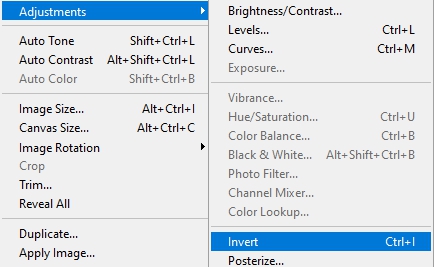
Step 2. Invert the Layer
Open the "Image" menu, go to "Adjustments" submenu and choose "Invert." You can also press "Ctrl-I" for a shortcut. This will hide the changes you’ve made.

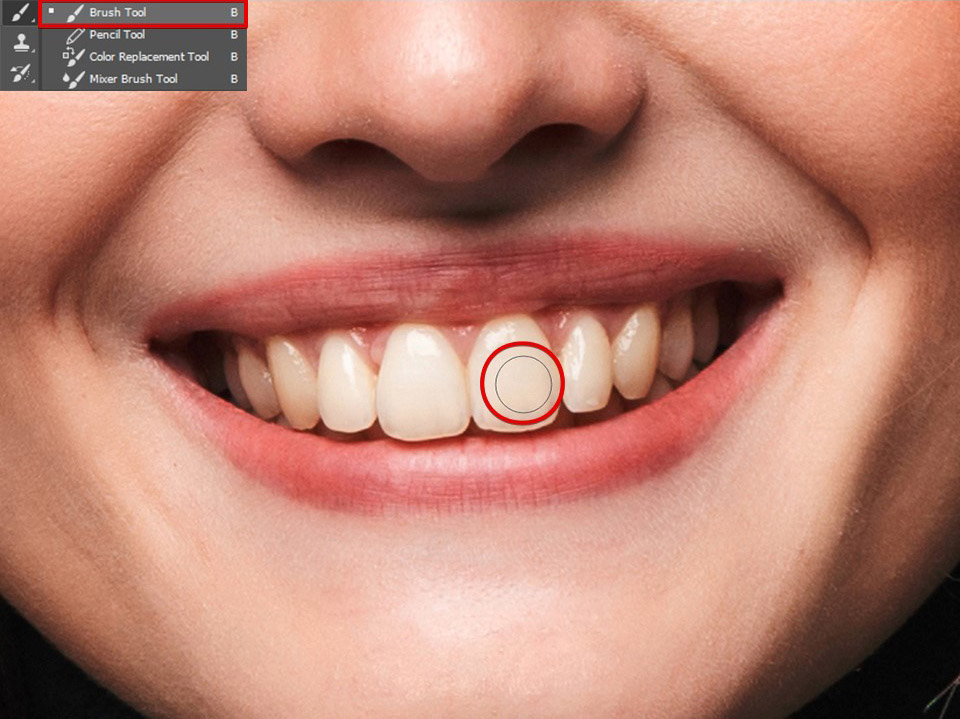
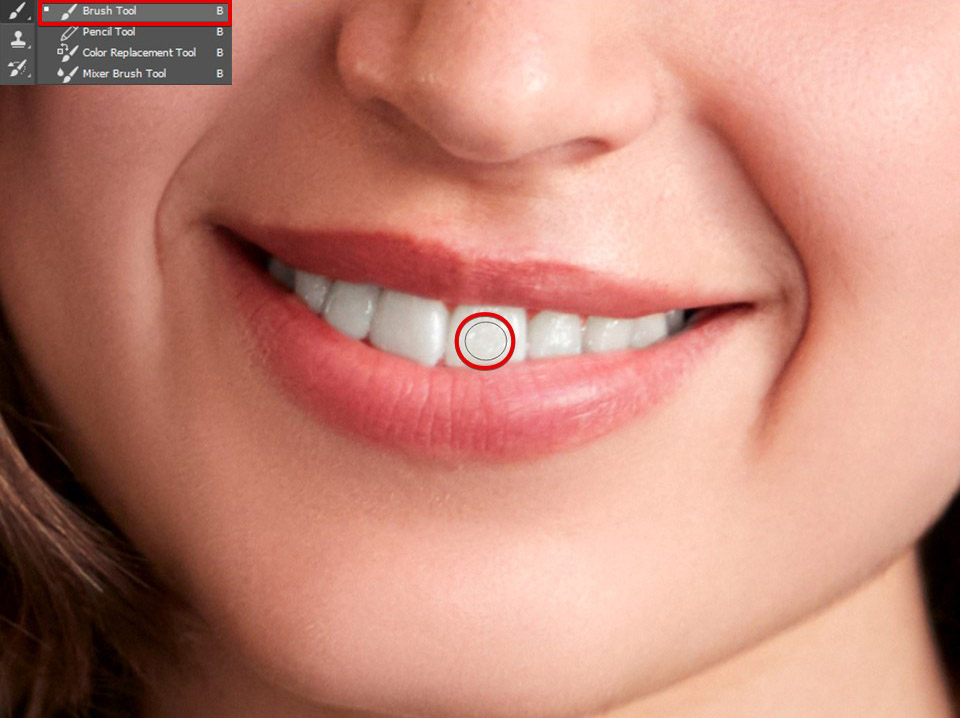
Step 3. Whiten the Teeth with Brush Tool
Using the brush, paint over the teeth on the layer mask. The effect of the hue saturation layer is now only seen on the teeth.
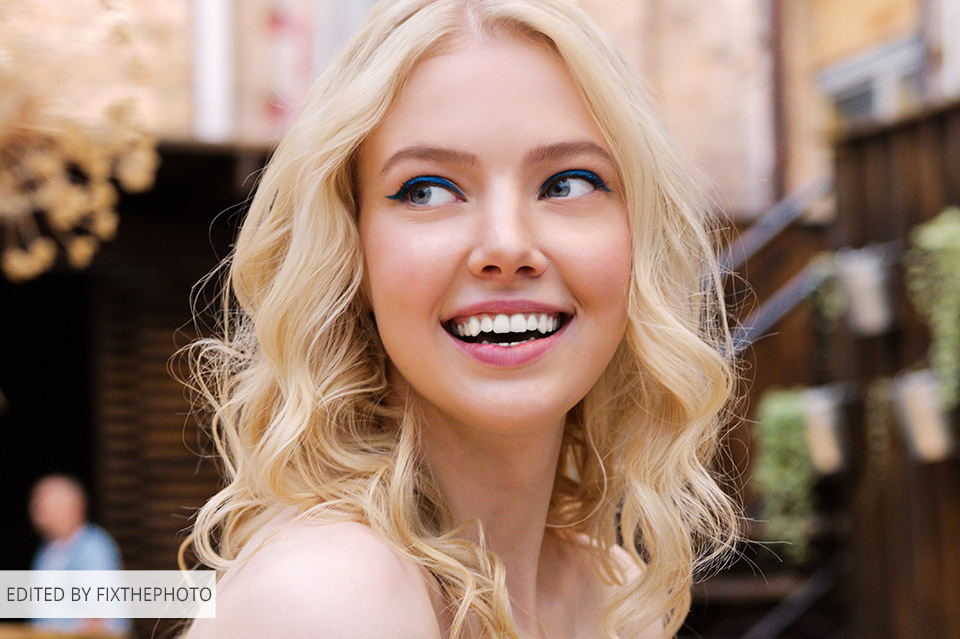
Step 4. Done! Evaluate the Result
There you go! Perfectly white teeth in 4 steps.
- Check out this tutorial on how to whiten teeth in Lightroom.
Method #2. Teeth Whitening Through Curves Adjustment Layer


This method has fewer fans, but those using it confirm its effectiveness. So, let’s examine it in detail.
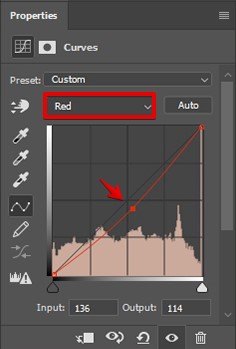
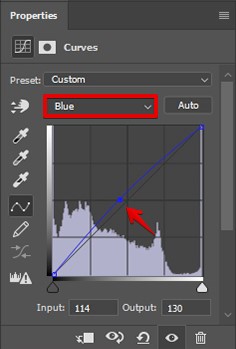
Step 1. Create a Curves Adjustment Layer
Primarily, we need to create a Curves Adjustment Layer.
Open Layers, select New Adjustment Layer > Curves. You will see 2 curves – red and white. Enter the values of RGB, Red and Blue curves like in the pictures below.

Step 2. Invert the Layer
You have definitely noticed that the layer you created comes with a layer mask attached.
Press the shortcut "Ctrl-I" to invert the layer. As a result, the effect of the curves Adjustment Layer will be invisible, as the layer mask is totally black.
In the layer mask, the black hides and the white makes the layer visible.
Press D to switch to the default colors (black for the foreground, and white for the background) and select the mask.
Step 3. Whiten the Teeth with the Brush
Now you need a regular soft brush with rounded edges to whiten teeth in Photoshop. Find it on the Toolbar.
The suitable size of the brush is 10px.
Now paint over the teeth with white. The effect of the curves layer is seen only on the teeth, as you performed this action in the layer mask, so the teeth look rather white.
- Find more details on how to mask in Photoshop.
Step 4. Done! Evaluate the Results
That’s all. Fast and effective way on how to whiten teeth in Photoshop.
Method #3. Teeth Whitening Through the Sponge Tool

Another easy-to-repeat method is to use the Sponge Tool and the Dodge Tool. The first one brings the desaturation effect, while the second instrument is used to lighten the teeth.
Be accurate with the degree of whitening. The natural smile is your top priority!
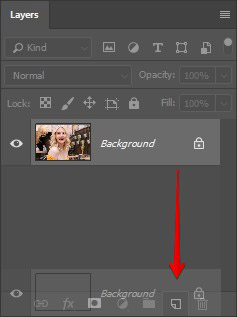
Step 1. Duplicate the Layer
Regardless of the photo you are editing, you’d better keep the original file intact, while making all the changes on a Duplicate layer. So, create one. Press Cmd + J (Mac) or Ctrl + J (Windows) to copy an image on a new layer.
Step 2. Select the Sponge Tool and Desaturate the Teeth
On the Toolbar, under the Dodge tool, you can find the Sponge Tool. Select it.
We need this tool to desaturate color in the teeth.
Open the Tool Options at the upper part of the window and set the Mode to Desaturate. The Flow should be set to 100% and the Vibrnace – turned off (see if the checkbox is empty).
You need a soft brush. Choose the size that will be convenient for you to paint over the teeth. Depending on the area of the teeth, you may need to increase or decrease the size of the brush. Not to waste time, browsing through the settings, just use the shortcuts – press “]” to make the brush bigger and “[” – to make it smaller.
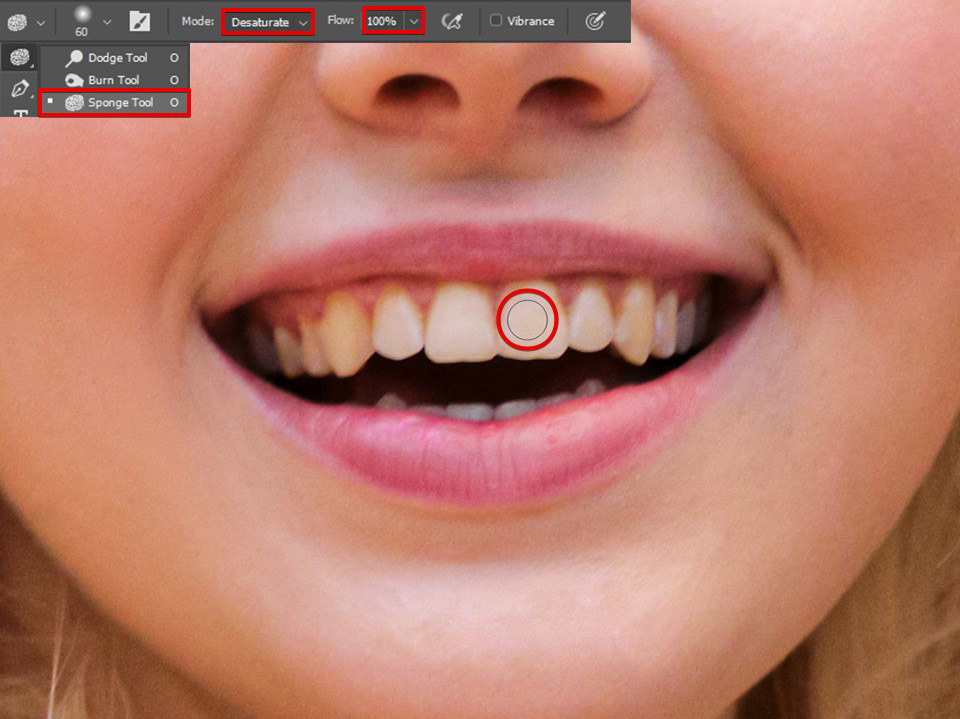
Before you can actually whiten teeth Photoshop, you need to desaturate them at first. Zoom in to have better control over the area. Be accurate, as you don’t need to affect neighboring parts of the photo.
Continue until you’ve desaturated all the teeth.
Step 3. Whiten the Teeth
When you have finished the previous step, you can start whitening teeth. For this, you need the Dodge Tool. Activate it, by pressing O.
On the Toolbar, select a brush. It should be small and with soft edges. Set the size that is a bit larger than the teeth.
First, set the Range to Highlight. The Exposure should be set to 48%. Regulate the brush size as in the case with the Sponge Tool. Start lighting the teeth.

Remember about the peculiar feature of the Dodge Tool. Every time you release the button and begin painting again, the amount of Dodge increases.
Then set the Range to Midtones and the Exposure to 10%. Paint over the teeth.
If you think that you’ve gone overboard, press Cmd + Z (Mac) or Ctrl + Z (Windows) to go 1 step back. If you don’t like the overall effect, reduce it by selecting Fade Dodge Tool in the Edit tab.
- Learn how to smooth skin in Photoshop to give your portrait photo a finished look.
Step 4. Done! Evaluate the Result
Well done. You’ve managed to whiten teeth in Photoshop in 4 simple steps.
What Can You Do Except Teeth Whitening in Photoshop?
It won’t take you much time to understand completely how to use this teeth whitening photo editor. Nevertheless, keep in mind that there can be other parts of the photos which may require some kind of post-production (stray hair, red eyes, skin blemishes, etc.).
Make Skin Look Fabulous
Adjust the skin tone of the model’s body and face. Don’t blur it too much, try to leave the texture as natural as you can. For a magazine look, use a Dodge & Burn effect.
- Learn how to retouch skin with frequency separation.
Work with Stray Hair
Taking care of the hair, its volume, color, and removing unwanted strays are other basic steps of successful photo post production. Removing the stray hair can be a real challenge. There are lots of useful tips and effective techniques to cope with this problem.
- Check out this tutorial on how to remove stray hairs in Photoshop.
Get Rid of Puckers and Crinkles in the Clothes
Looking at the photos, we certainly pay attention to the person that is depicted. However, the kind of clothes, which he/she is wearing, is no less important. It highlights the person’s beauty and is often connected with the theme of shooting. Therefore, the next step in obtaining an impeccable image is the work with flaws in the outfit. If you deal with headshot retouching, remove all folders and wrinkles in the clothes.
Improve Makeup
Naturally, before the shooting, the make-up artist cares about the model to look perfect and suit the style of the photo session. However, gradually the color of blushes, eyeshadows, and lipsticks begins to lose its brightness and attractiveness.
Of course, you can take a break and refresh makeup but there is another way out. You can perfectly improve all of the above details during photo retouching.
- Read more about how to remove a double chin Photoshop.
Remove Bags under the Eyes
Bags under the eyes are a fairly common problem. They can seriously spoil the portrait, regardless of whether it was taken in the morning, in the middle of the day or in the evening; inside or outside the studio.
We hope our tips on how to use easily whiten teeth in Photoshop and some other important portrait retouching video tutorials will be helpful for you. These effective techniques will help you in your image retouching become faster and more professional.
Freebies for Teeth Whitening
If you don’t have time to make teeth white in each photo, you may use Photoshop plug-ins to make this step faster and automatic.
Action #1

Download this Photoshop action for fast teeth whitening. With its help, you will be able to turn a picture editing into a fast process. Remove the yellow tint in 2 clicks.
- Learn how to use Photoshop actions.
Action #2
Get your teeth looking natural and white in a matter of seconds with this action.
Action #3
Remove the unattractive yellow tint and instantly upgrade your photo by using this action.


