Frequency Separation
When you purchase through affiliate links on our site, we may earn a commission. Here’s how it works.
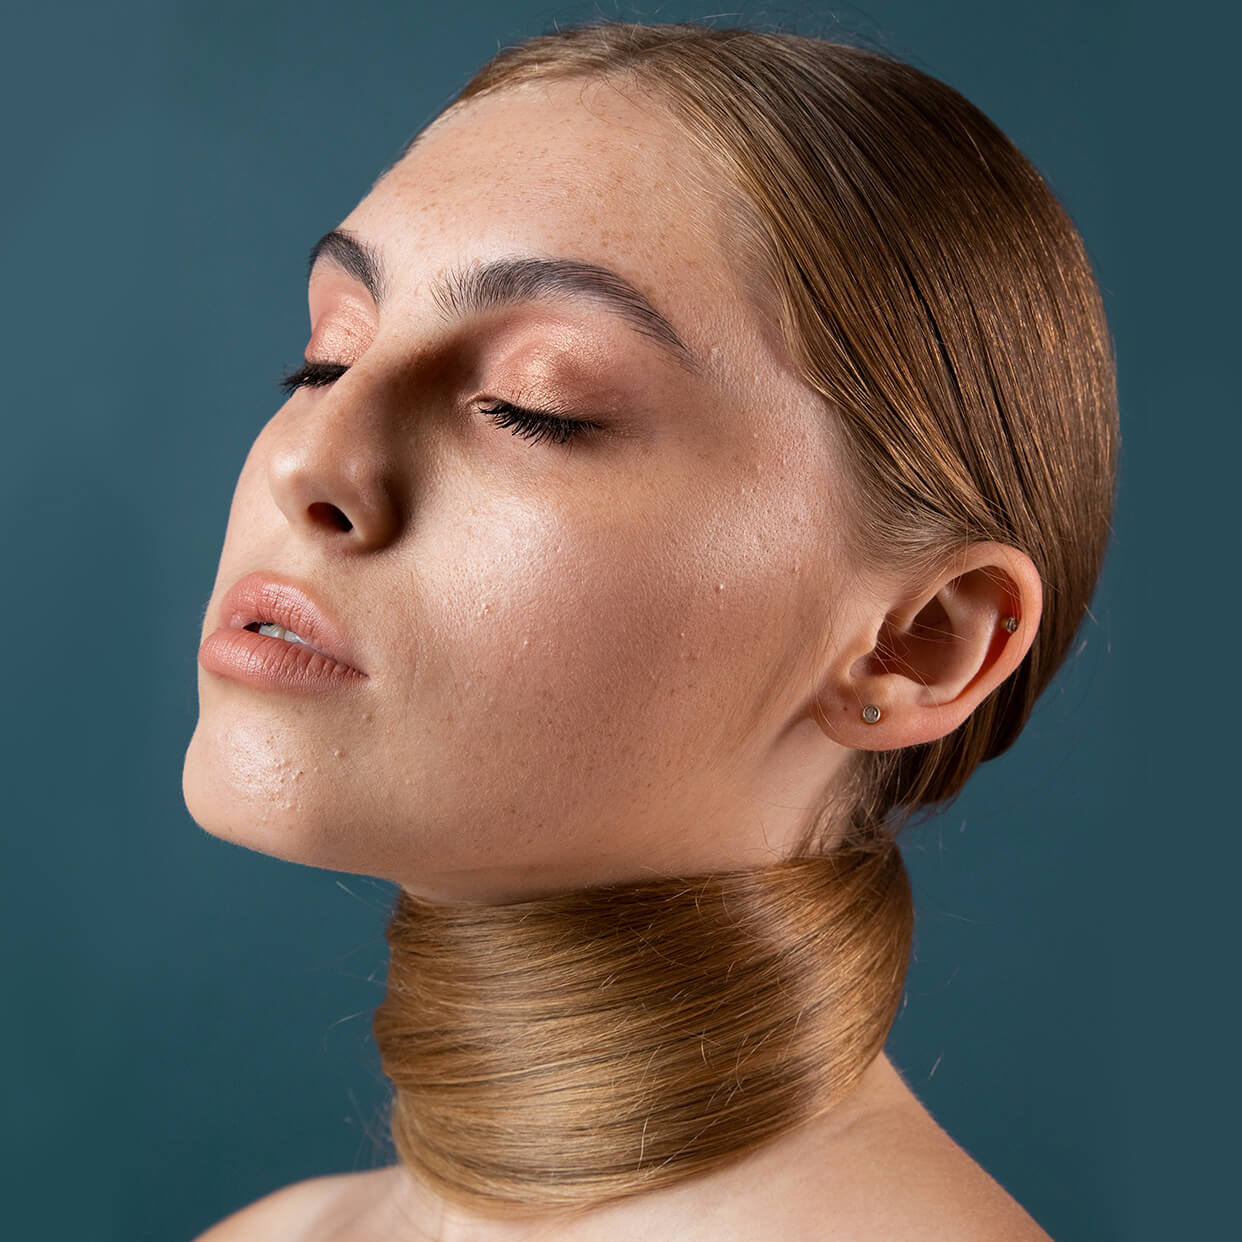
If you want to retouch portraits like professionals, you need to preserve skin texture, get rid of blemishes and greasiness. The most effective way is a Frequency Separation Photoshop Technique. It presupposes changing the skin details separately.
I will analyze 5 easy methods of portrait skin retouching through Frequency Separation. In this tutorial, I use Photoshop CC, but you can use earlier versions, such as Photoshop CS6 (in CS5 version and earlier editions, some features and tools may be different or even absent).
Method #1 Classic Frequency Separation


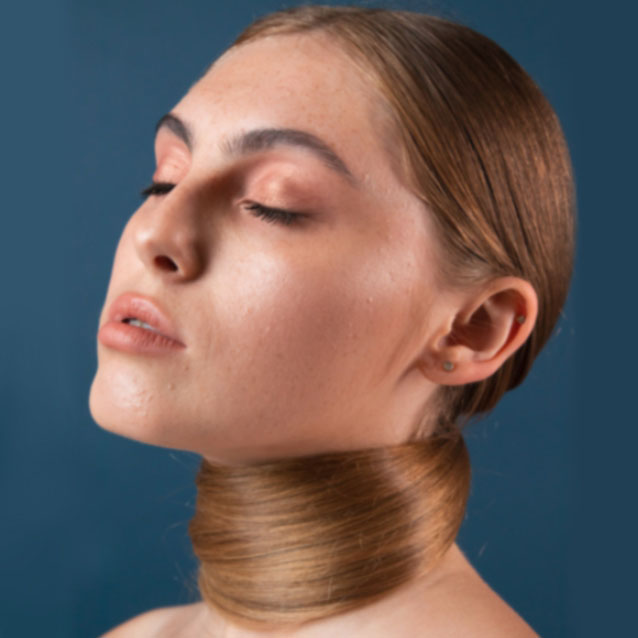
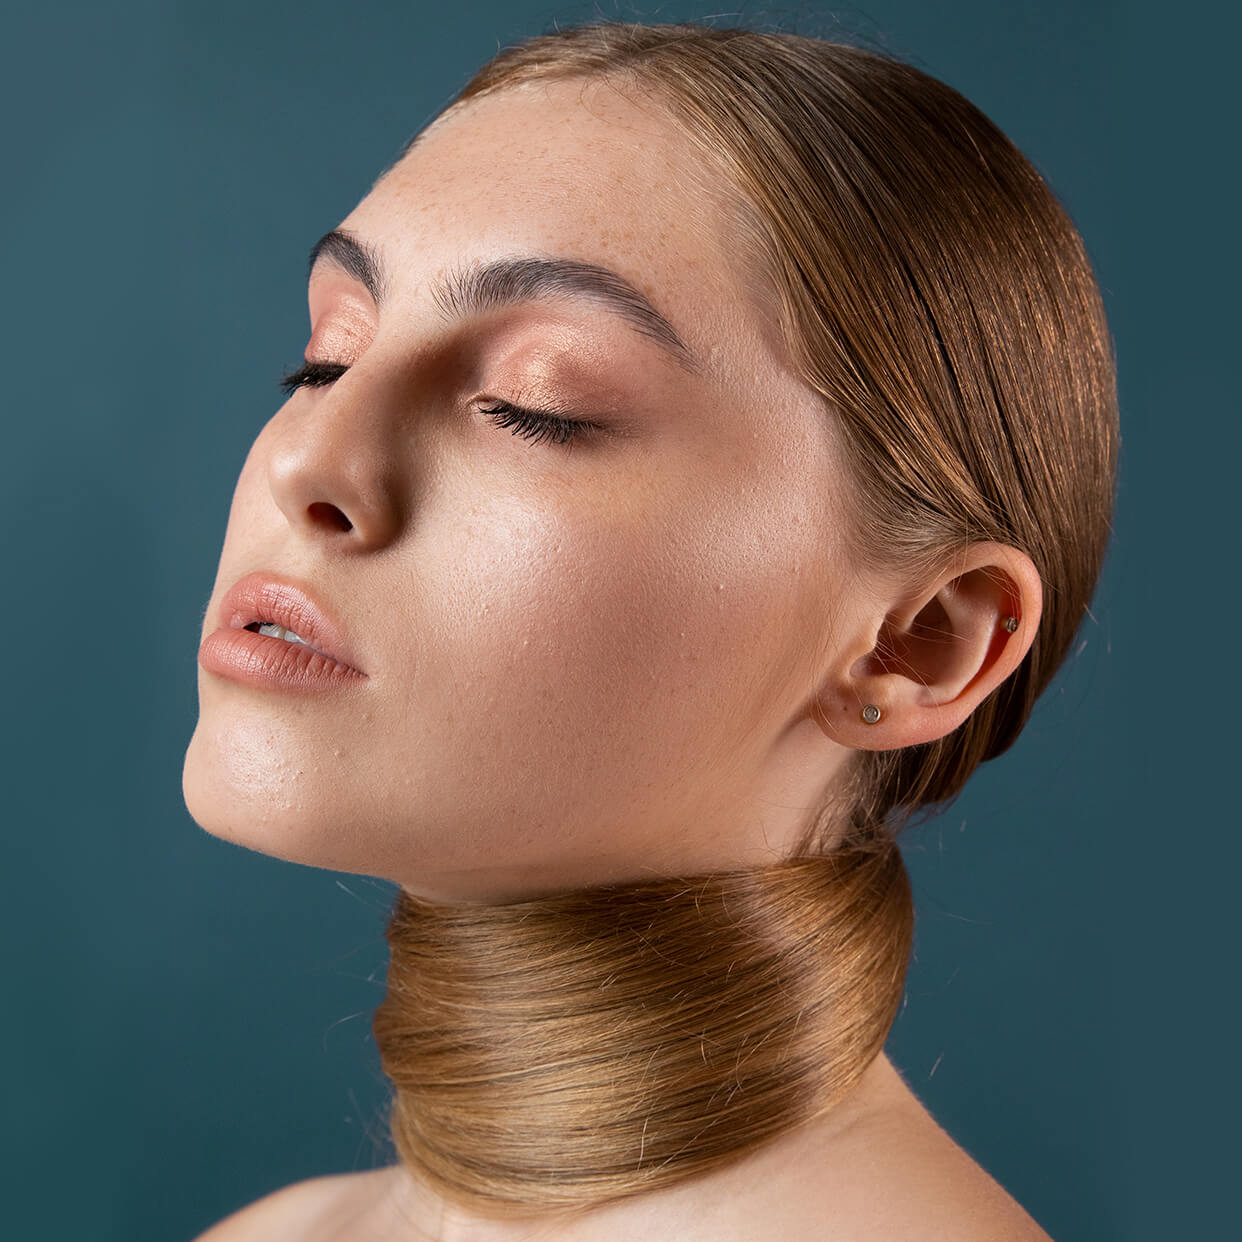
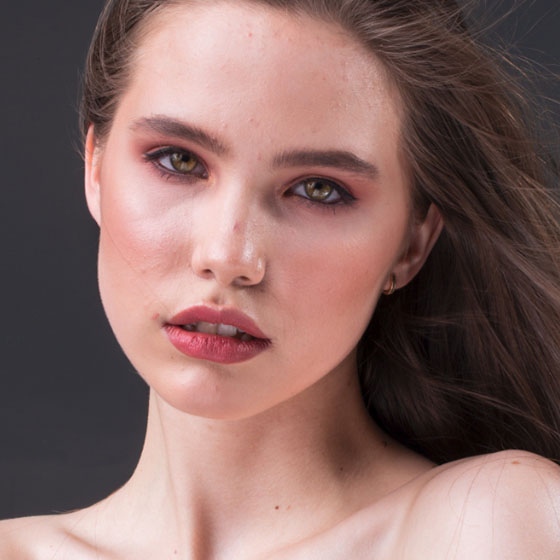
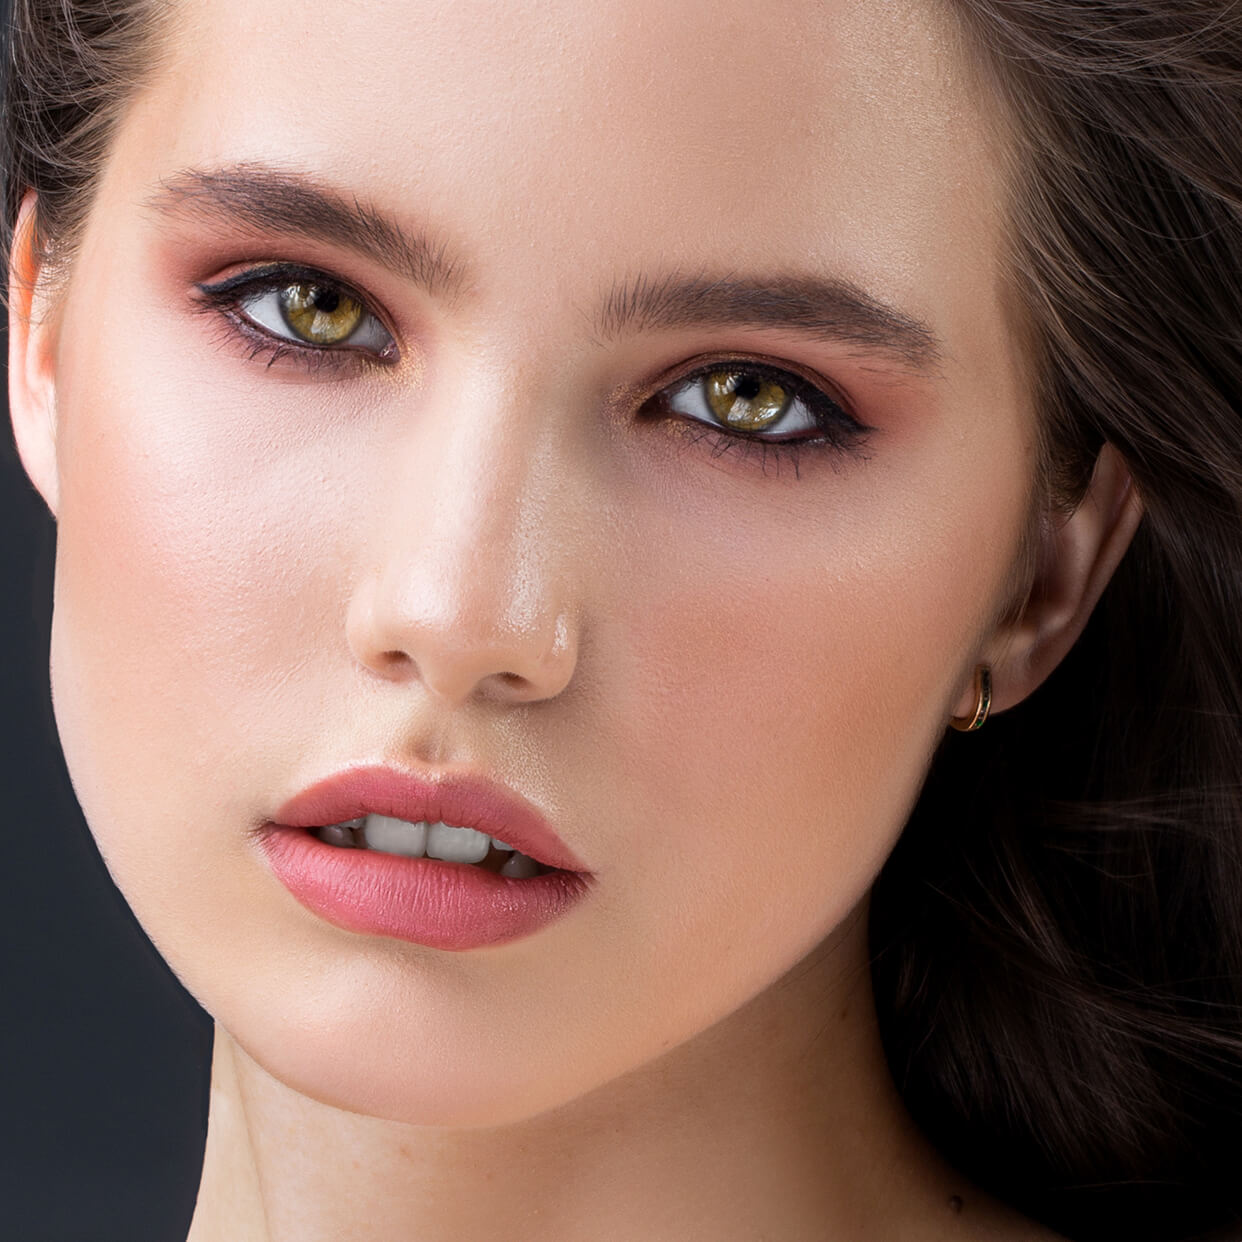
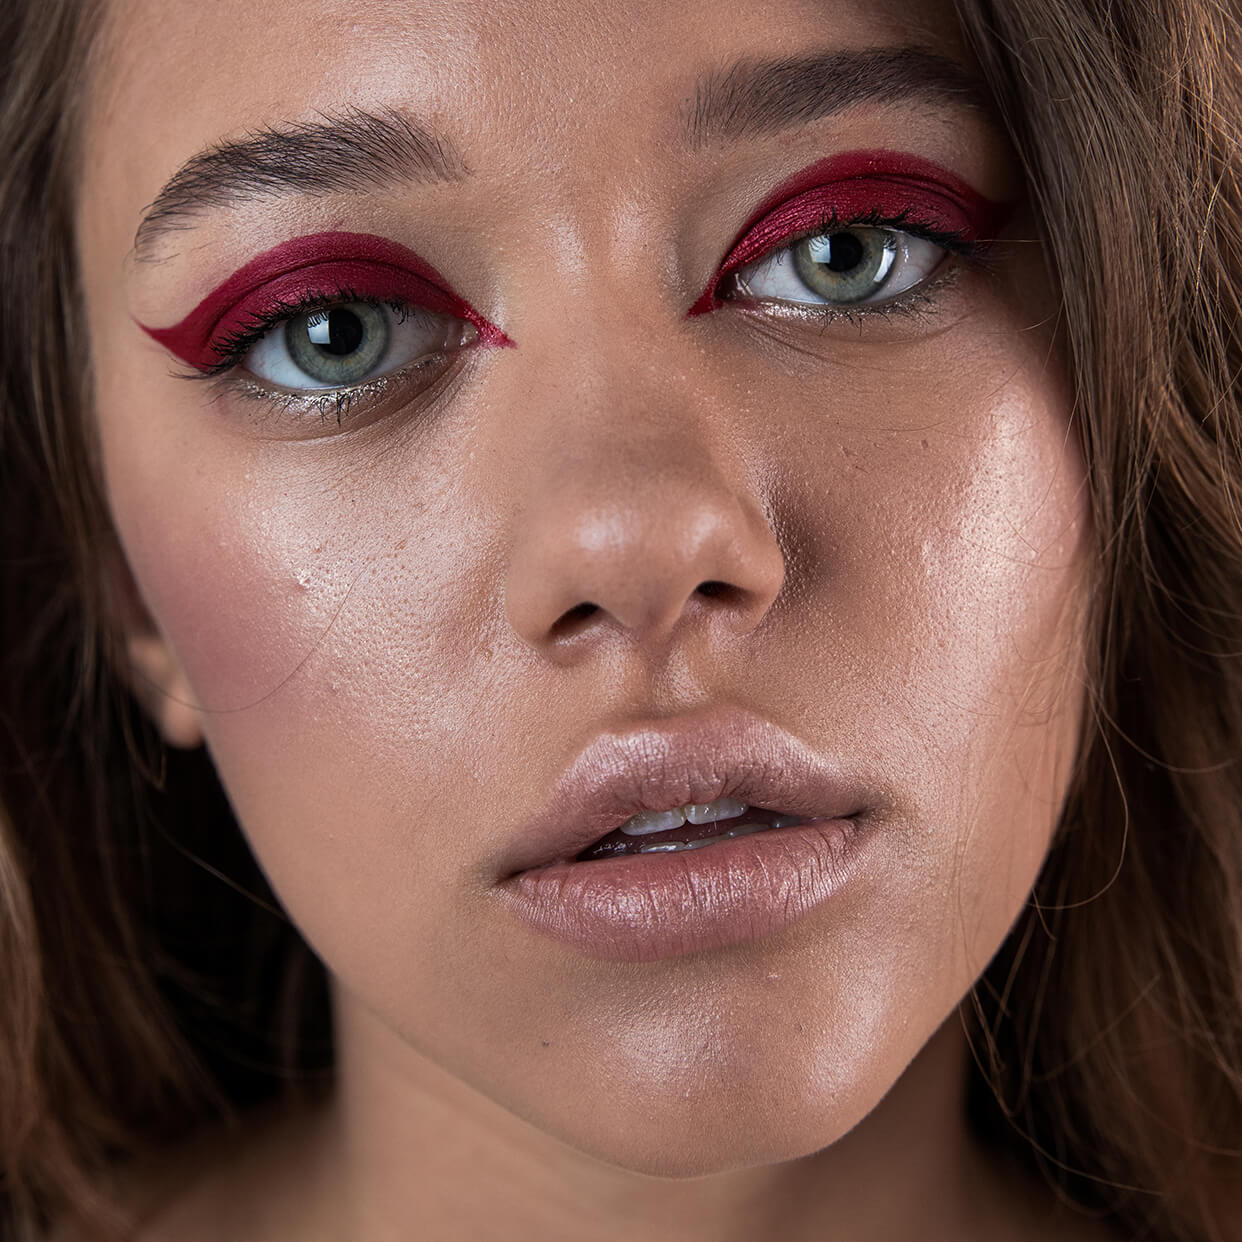
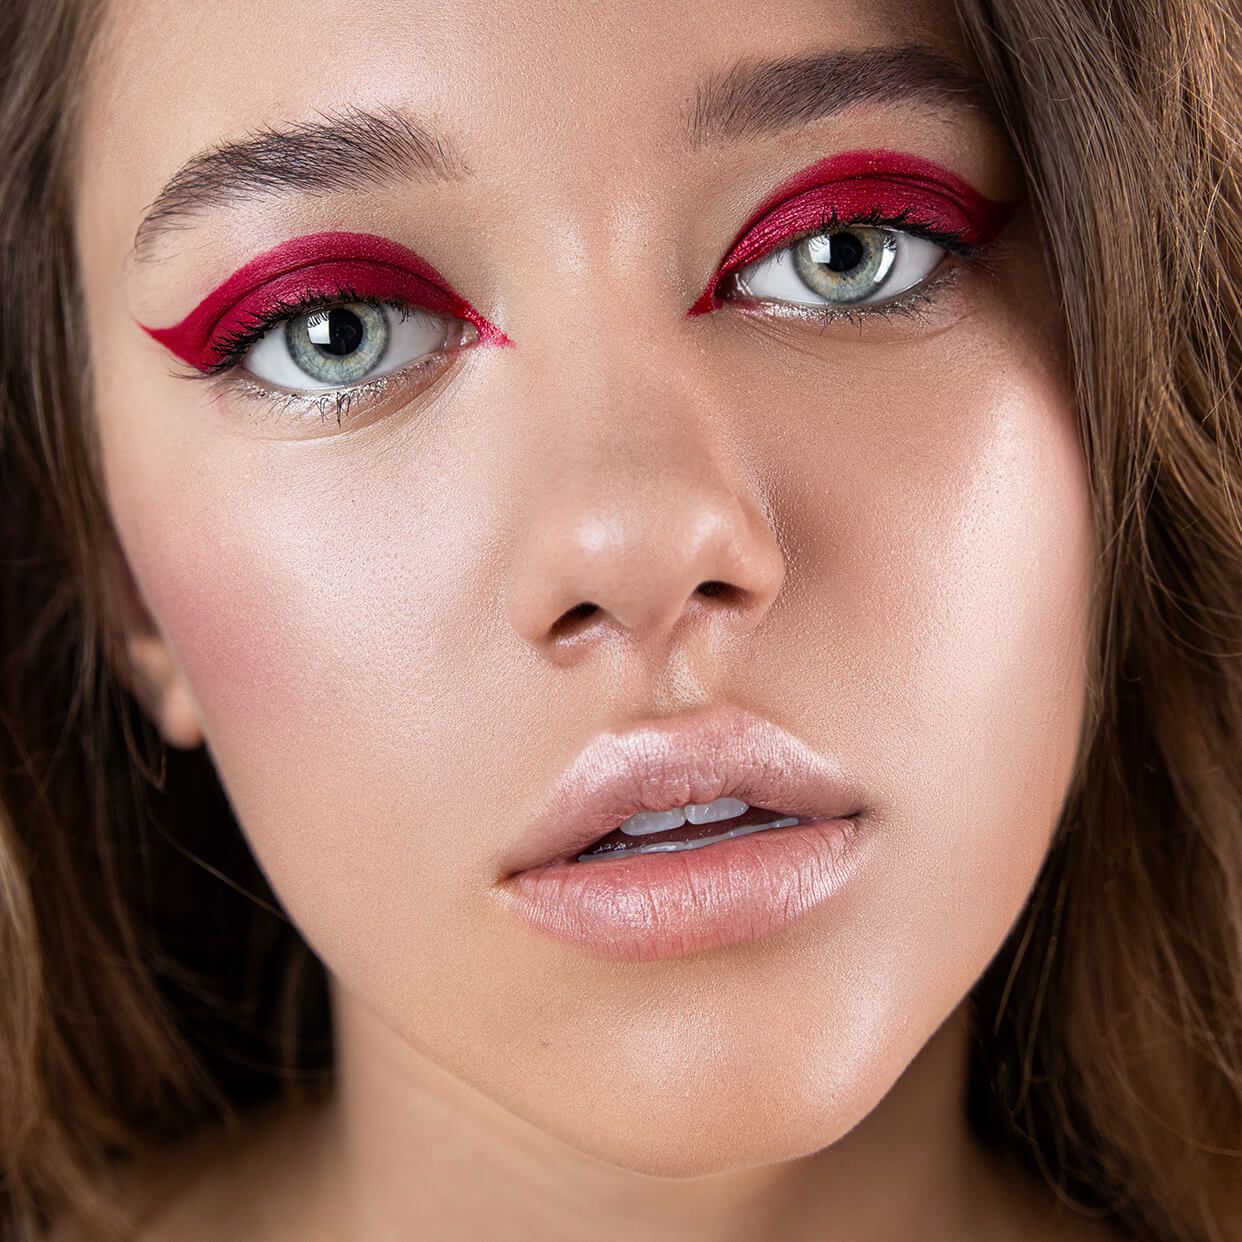
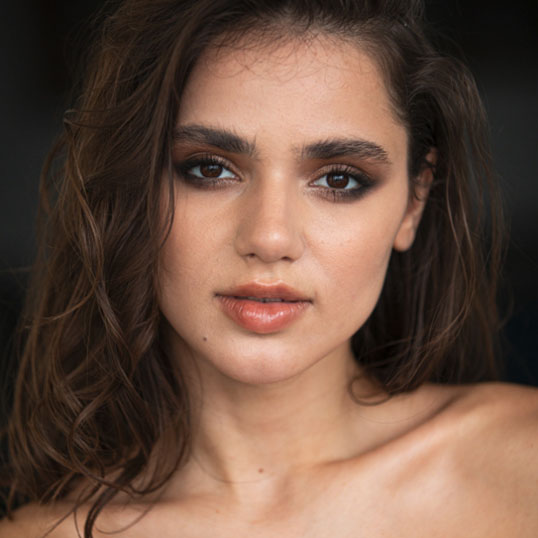
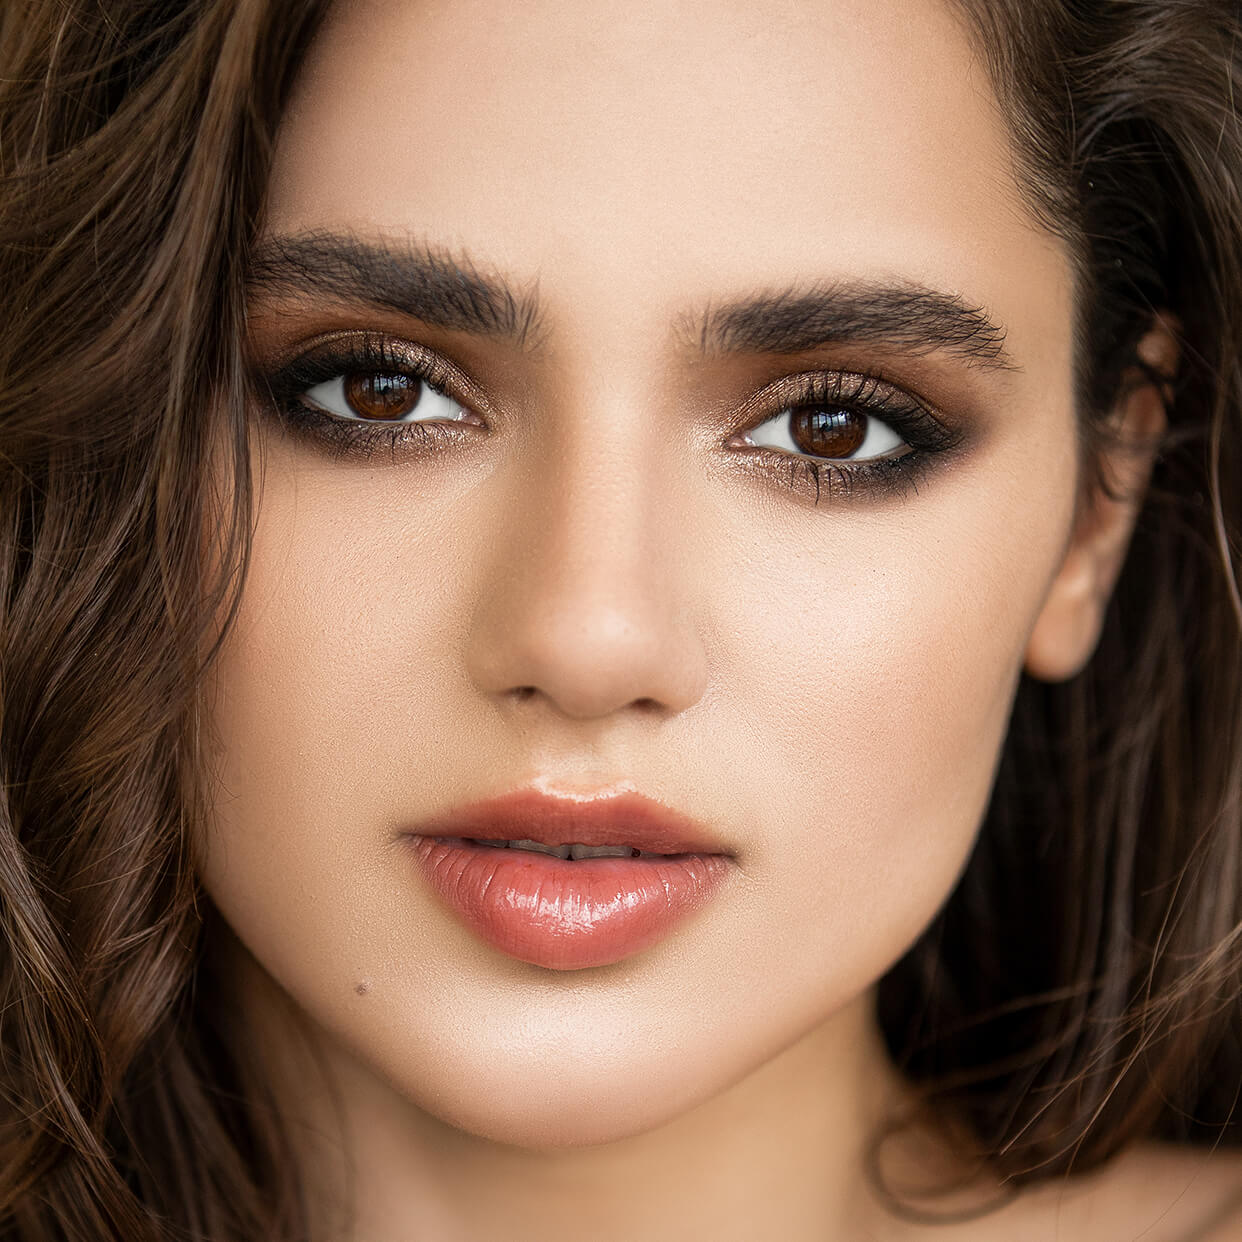
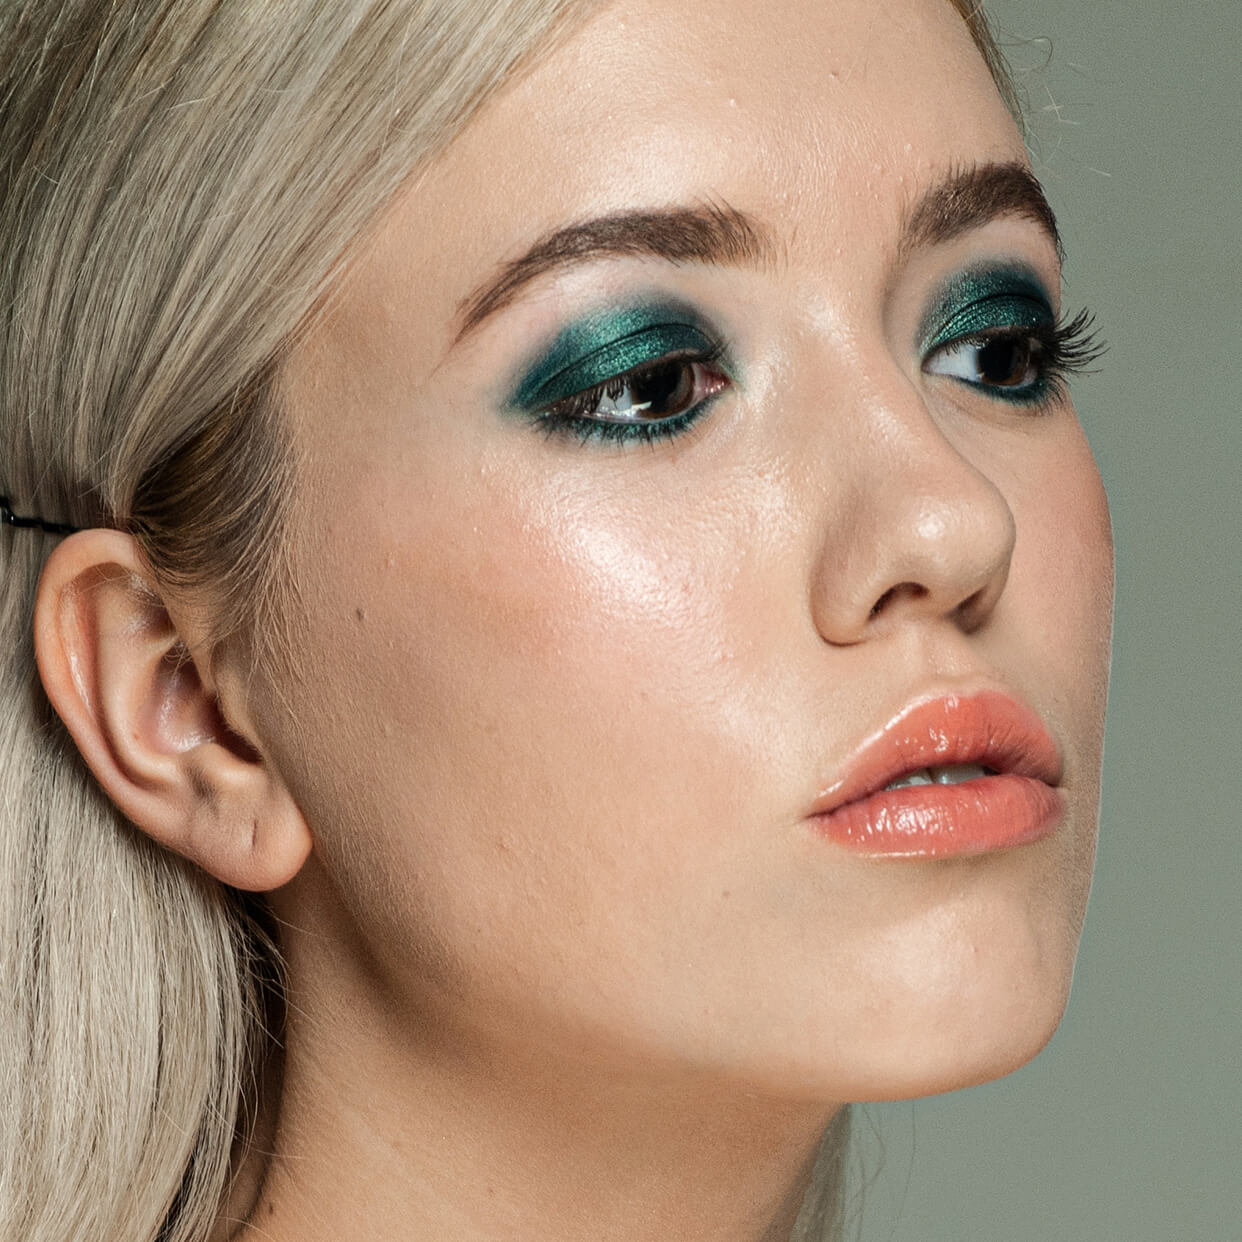
This is a great example of what you can get if you use the Photoshop Frequency Separation technique. In this portrait, I had to get rid of some skin imperfections using the Healing Brush Tool and Path Tool. The skin will look better, but will still require some processing.
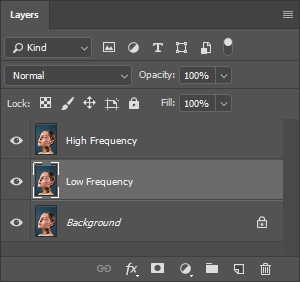
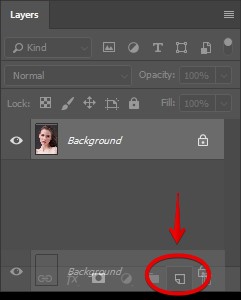
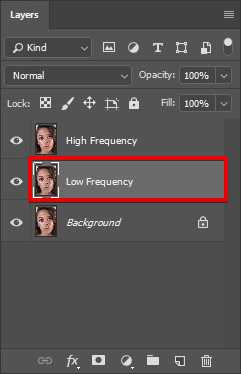
Step 1: Duplicate Layers
Create two copies of the layer by selecting the “Background” layer and pressing Ctrl + J (Cmd + J) twice. Rename each layer to Low Frequency and High Frequency by double-clicking on the name. It will make further work easier.
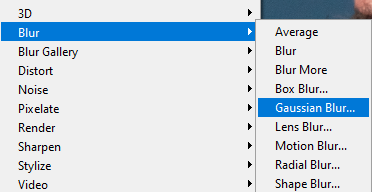
Step 2: Low Frequency Blur
Next, make the upper layer, called “High Frequency” invisible and switch to the “Low Frequency” layer. You need to keep blurring this layer until all minor skin defects disappear. To do this, open Filter – Blur – Gaussian Blur.

While using this Frequency Separation method, you need to set such radius so that skin defects will disappear. Choose the position of the slider when the texture is a bit blurry.
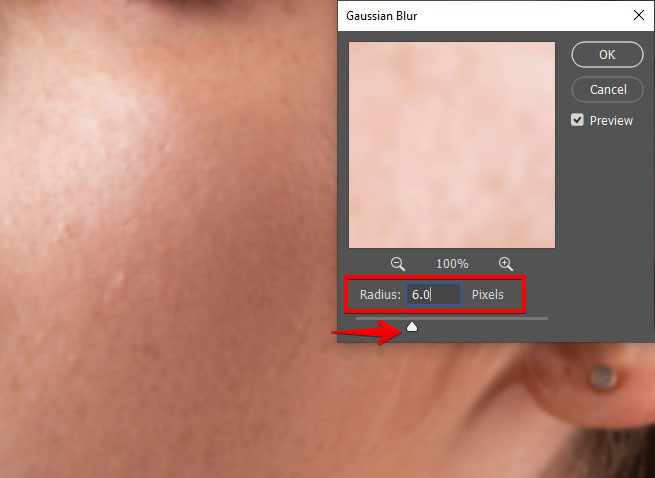
Tip: For close-up portraits – 6-8 pixels. For medium-size portraits – 3-5 pixels. For full-length portraits – 1-3 pixels.
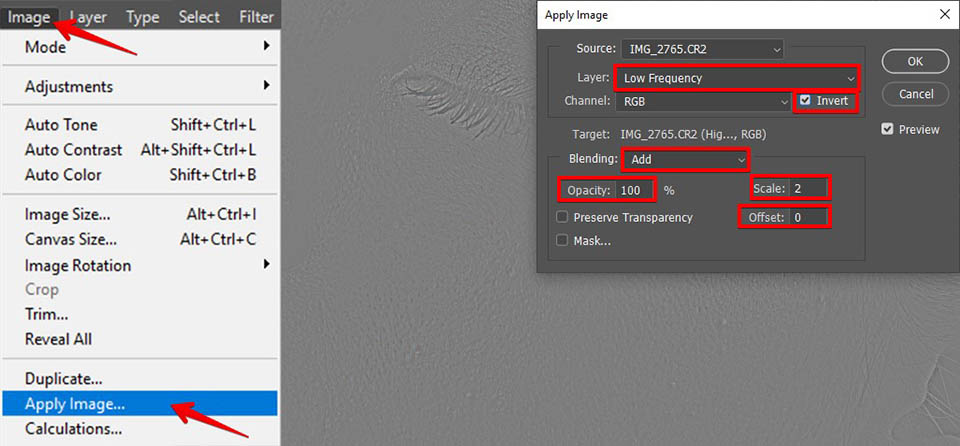
Step 3: Work with Texture
Switch to the “High Frequency” layer, make it visible and go to Image – Apply Image.
 Layer: Low Frequency • Invert: ✓ • Blending: Add Opacity: 100% • Scale: 2 • Offset: 0
The photo will turn gray and only the outlines will be visible. Click “OK”.
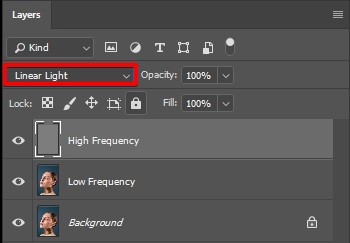
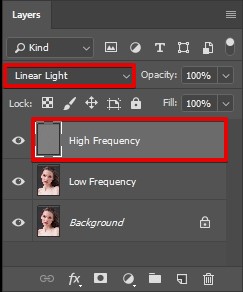
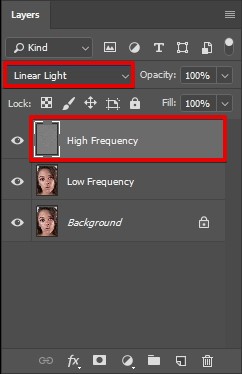
Step 4: Change the Blend Mode
Being on the “High Frequency” layer, change the blending mode from Normal to Linear Light. The photo will acquire a standard look, as the original image.
To skip Frequency Separation steps 1 - 4 and cope with the task, automatically switching to Step 5, you can download the following Photoshop action:
Step 5: Create Correction Layer
Switch to the Low Frequency layer and create a new layer by clicking Shift + Ctrl + N (Shift + Cmd + N), name it Correction Layer. This layer is necessary to remove things you don’t like using the Eraser tool and keep important parts intact.
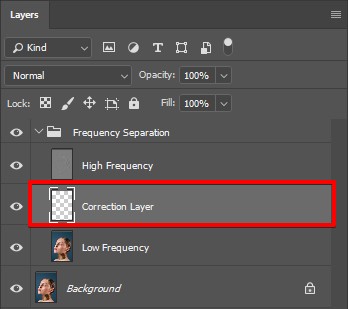
Select the three layers – “High Frequency”, “Correction Layer” and “Low Frequency” by clicking on each layer, holding Ctrl (Cmd) and then press Ctrl + G (Cmd + G) creating a group. It will be easier to compare the results.
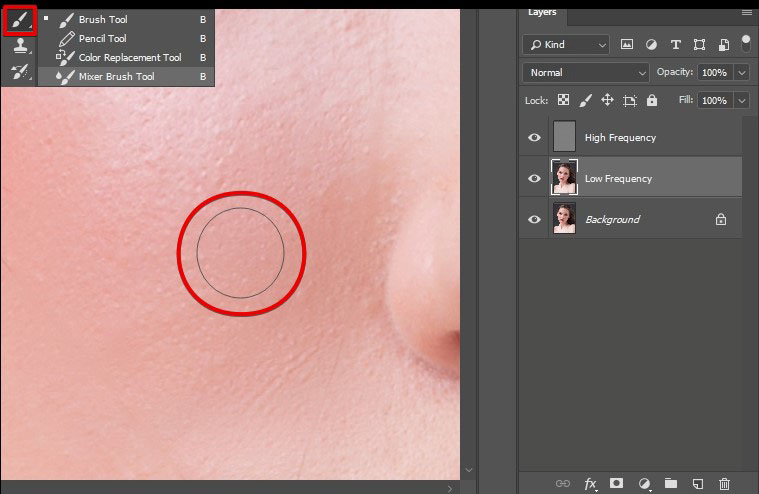
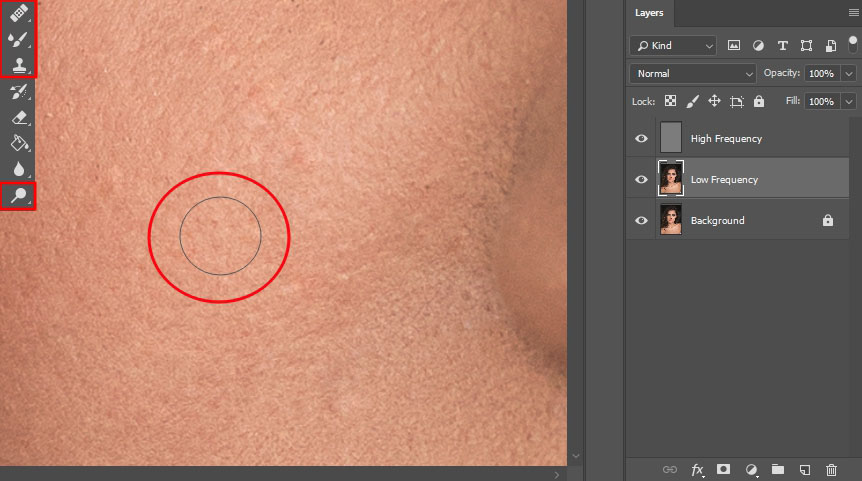
Step 6: Set Up the Mixer Brush Tool
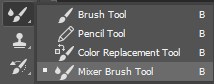
To enhance skin, I will use the Mixer Brush Tool. Using it, you can conveniently work with transitions from dark skin parts to lighter ones. You can find the Mixer Brush Tool on the toolbar by right-clicking on the brush.
For correct work, you need to set up the Mixer Brush Tool, using such values:
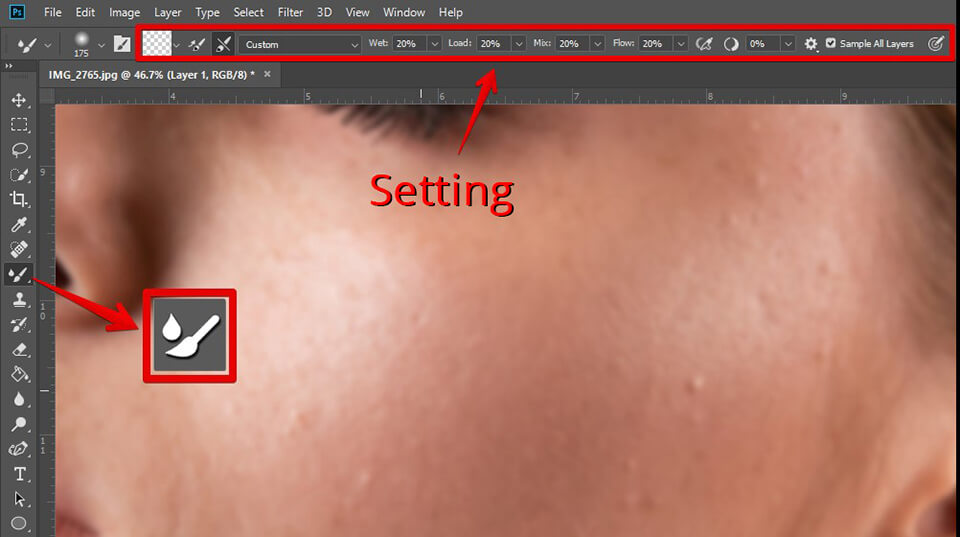
Clean the Brush after Each Stroke • Custom • Wet: 40% Load: 20% Mix: 20% Flow: 20% • Sample All Layers ✓
Tip: You can also set Wet to 20%, so the brush will be less intense. Click on the canvas with the second mouse button and set Hardness to 0%.
Step 7: Light and Shadow Pattern
Hide the High Frequency layer by clicking on the eye on the left. Use the Mixer Brush Tool to accurately draw light and shadow pattern on the skin on the Correction layer, smoothing the transitions from shadow to light and eliminate minor skin irregularities.
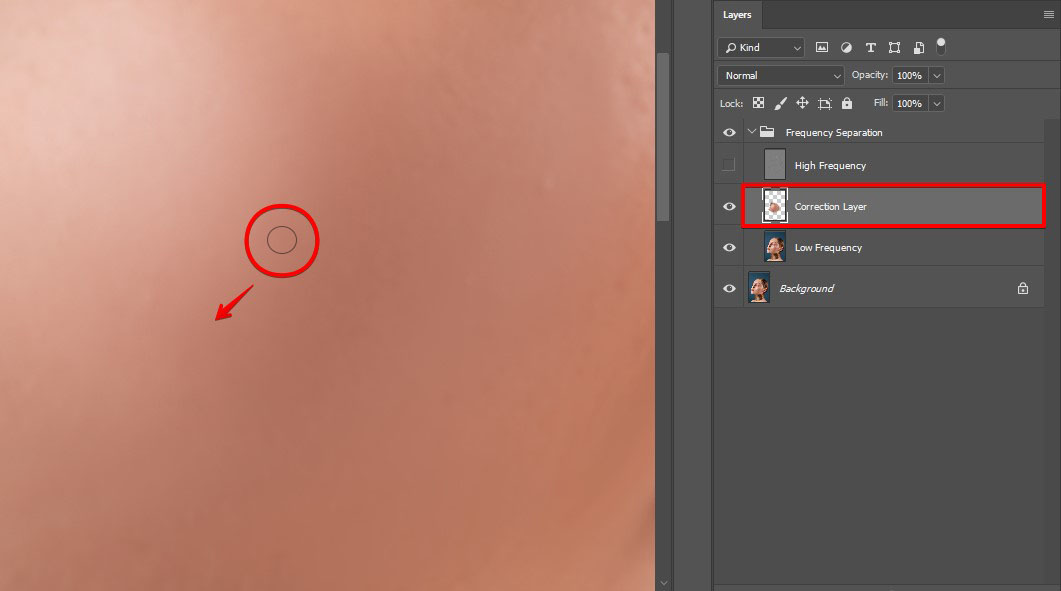
To perform such kind of image retouching in Photoshop, you need to move the brush from shadow areas to light ones. As a result, the skin will look smooth.
Step 8: Configure the Intensity of Settings
Once you’ve done smoothing the transitions, activate the High Frequency layer and look at the result. Add or remove the things you want with the help of the Eraser (E) tool.
By lowering the Opacity of the folder, you can reduce the effect. Do it only after you finished working with this folder, otherwise, it will operate incorrectly.
More detailed work with Low Frequency:
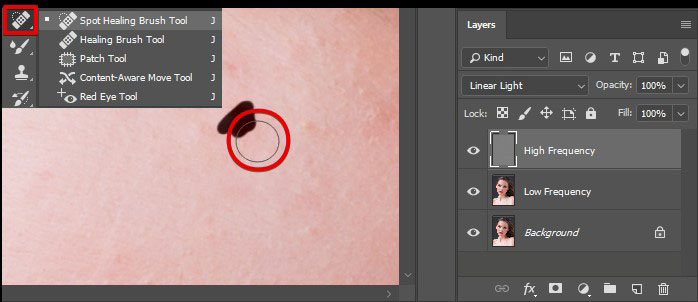
Step 9: Remove Minor Imperfections
Now, on the High Frequency layer, use the Clone Stamp tool (S) or the Spot Healing Brush tool (J) to remove acne, wrinkles, stray hair, and small defects.


To perform such High Frequency retouching, you just need to move the Spot Healing Brush tool (J) over the small details and hair, correcting them, and use the Clone Stamp tool (S) to improve large areas by copying the texture from good parts of a shot.
Check the detailed work with the Clone Stamp tool here:
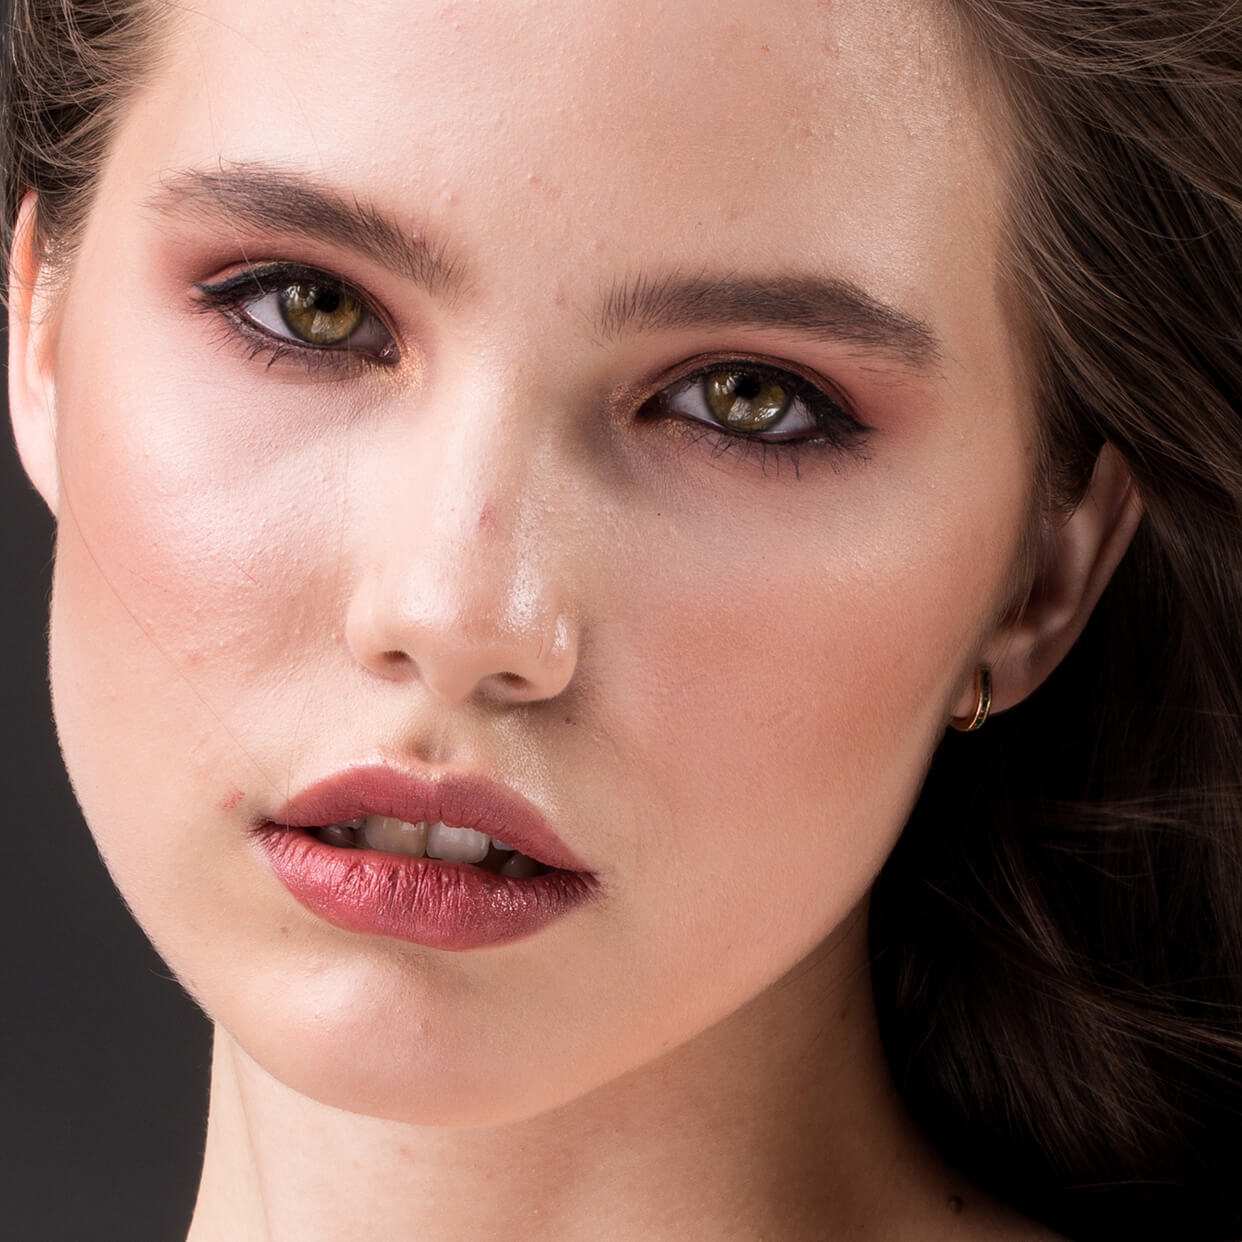
As a result, the skin in the picture should look even, smooth and with a beautiful texture.
Step 10: Done! Evaluate the result!
Just in ten steps, you can retouch your portrait using Frequency Separation method!
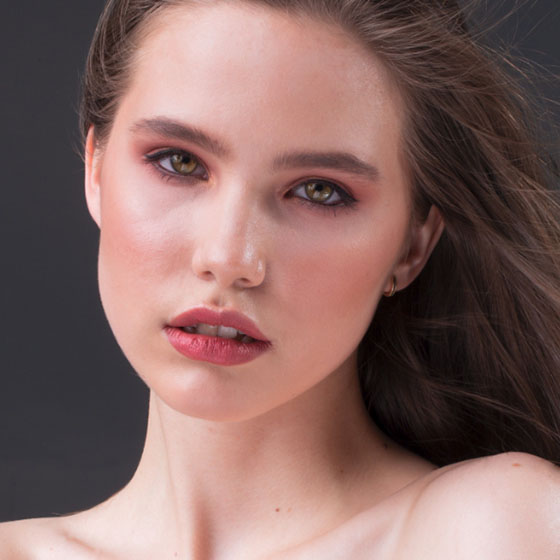
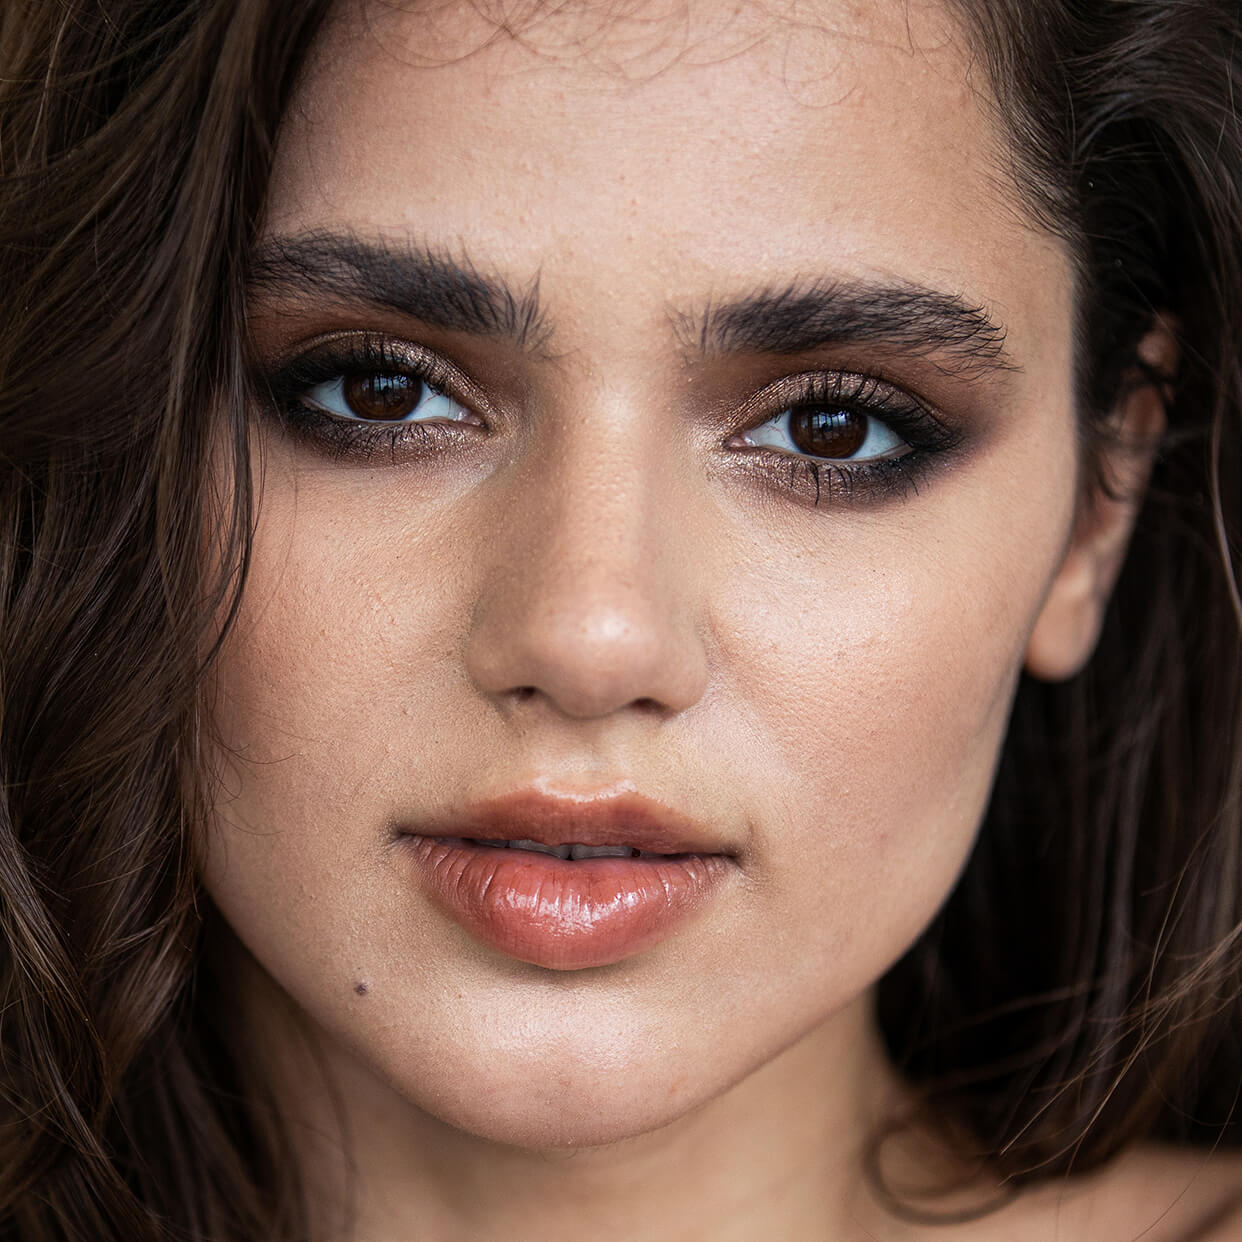
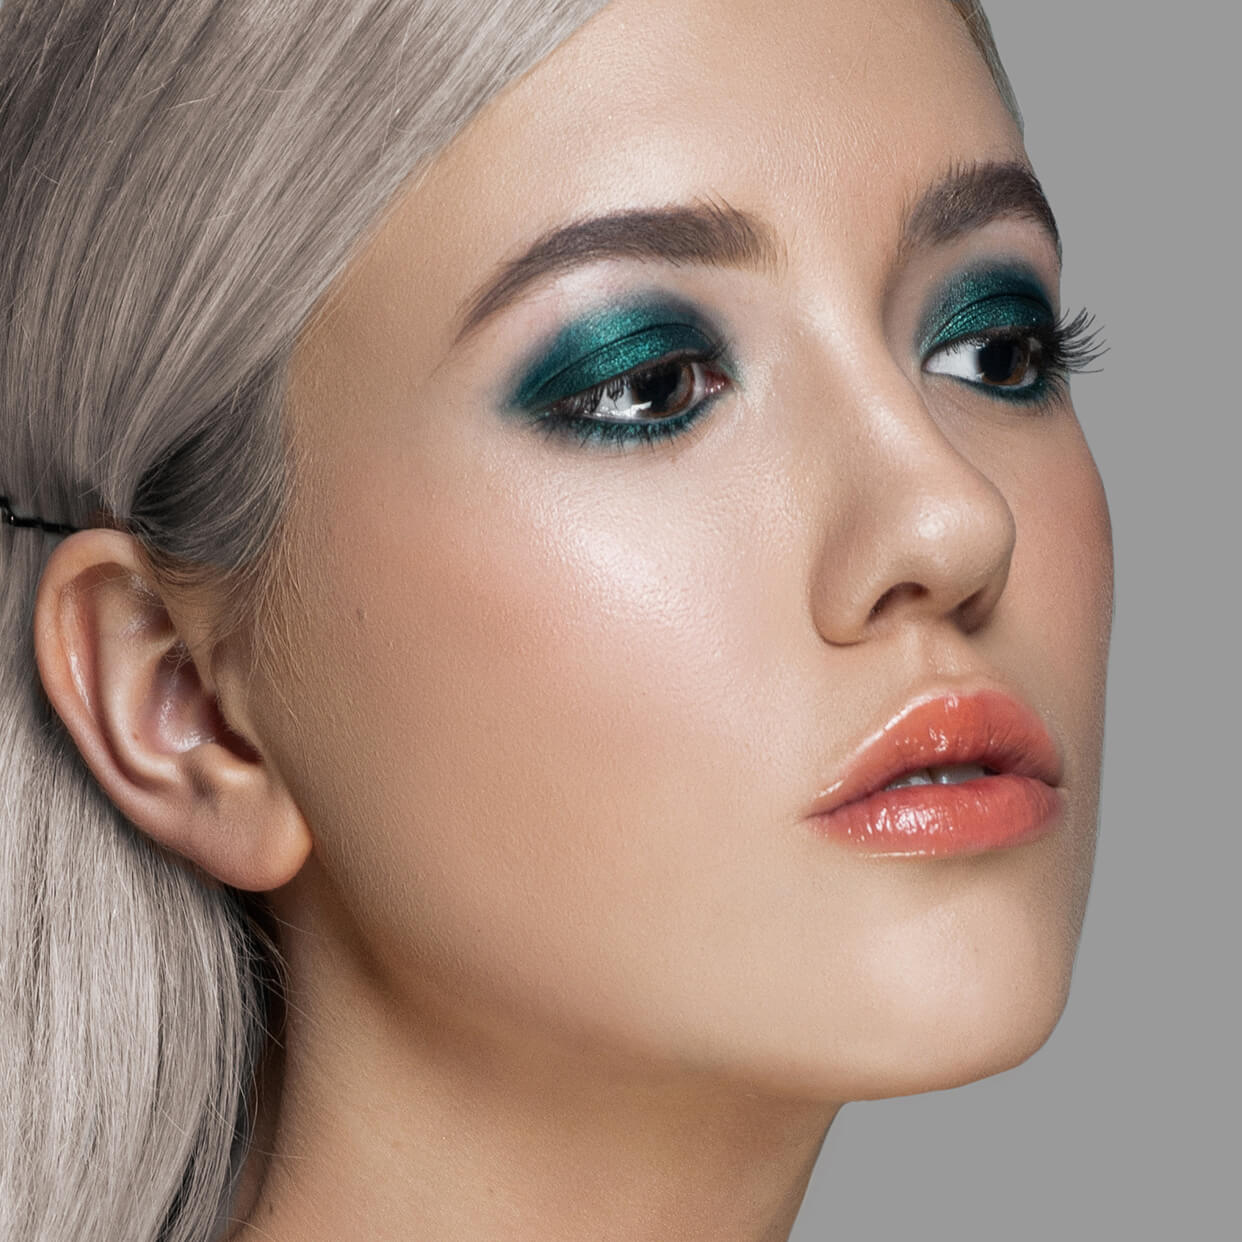
The skin looks smoother and healthy, without losing its texture. Truly professional and fast skin retouching!
Method #2 Frequency Separation through Gaussian Blur


This Frequency Separation Photoshop method presupposes more accurate work with skin imperfections, so you don’t need to eliminate them in advance to prepare a shot for retouching.
Step 1: You Need to Duplicate Layers
Duplicate your layer twice by clicking Ctrl + J (Cmd + J) or drag your layer to the New Layer sign as in the picture below & name them Low Frequency and High Frequency:
Step 2: Apply Gaussian Blur
You need to blur the “Low Frequency” layer. Click on your layer, then open Filter - Blur - Gaussian Blur and set the radius slider so that the skin texture is slightly blurred.
Tip: If you have a close-up portrait, you need to blur it more, but don’t go over 8 pixels.
For my portrait, I use 3 pixels while trying Frequency Separation technique.

Click “OK” and you will get a blurry image.
Step 3: Separate the Texture from the Color
Go to the “High Frequency” level. In Image - Apply Image menu, set the values as in the picture:
 Layer: Low Frequency • Invert: ✓ • Blending: Add Opacity: 100% • Scale: 2 • Offset: 0
Pay attention to the table below. There are all 6 settings that you need to change:
The photo will turn gray. Don’t worry, it is alright. Click “OK”.
Step 4: Fixing Defects on the High Frequency Layer
Select the “Linear Light” blending mode on the “High Frequency” layer. The photo will acquire its previous look.
You can skip these 4 Frequency Separation steps using a special action for Photoshop:
Using your convenient tools remove minor skin imperfections on the High Frequency layer. I recommend using the “Spot Healing Brush Tool”, “Patch Tool” and, optionally, “Stamp”.
As a result of these Photoshop portrait retouching steps, your model’s skin should be clean and without defects. Don’t pay attention to its color at this stage, I will fix it later, as the main thing now is the skin texture.
More detailed work with texture using the Spot Healing Brush Tool is shown here:
Step 5: Enhance Skin Color
Select the Mixer Brush Tool. I use it to smooth out color transitions on the skin. You can find the Mixer Brush Tool on the toolbar by right-clicking on the brush.

Tip: For comfortable work, I recommend using such settings: Next to the color square, there are two images of the brush, click on the crossed-out brush meaning “Clean the Brush after each stroke” to make it dark, then click on the brush with an arrow to make it light.
 Clean the Brush after Each Stroke • Custom • Wet: 40% Load: 20% Mix: 20% Flow: 20% • Sample All Layers ✓
On the Low Frequency layer, you need to carefully improve the color, making it uniform. But do not overdo by removing the volume and the light & shadow pattern. It is a frequent problem among amateurs, who begin learning and understanding Frequency Separation nuances.
As a result, the skin should look smooth and healthy.
Step 6: Done! Evaluate the result!
It took me 6 steps to achieve the perfect result.
You can do it at the same level, just follow the instructions of this Frequency Separation tutorial.
Method #3 Frequency Separation + Smooth Skin


This Frequency Separation method is great for portraits of models with normal skin, which do not require careful and detailed blemishes removal, so I often call this method “Fast”, but this does not mean that the result will be worse than in previous cases.
Step 1: Duplicate Layers
Create 2 duplicates of the Background layer. Double-click Ctrl + J (Cmd + J) and name layers Low Frequency and High Frequency respectively.
Step 2: Blur the Low Frequency Layer
In order to blur the Low Frequency layer, find it in the layer window. Open Filter – Blur – Gaussian Blur menu and set the slider in accordance with your picture making it a little blurry.

Tip: For close-up portraits – 6-8 pixels. For medium-size portraits – 3-5 pixels. For full-length portraits – 1-3 pixels.

After you’ve set the right radius, click “OK”.
Step 3: Adjust the High Frequency Layer
On the High Frequency layer go to Image – Apply Image and choose the values as in the table below:
 Layer: Low Frequency • Invert: ✓ • Blending: Add Opacity: 100% • Scale: 2 • Offset: 0
The photo will turn gray and you will see only the outlines.
Turn the High Frequency layer to the Linear Light blending mode. The photo will acquire its original look.
You can skip Frequency Separation steps № 1-3, using a special action for PS:
Step 4: Improve the Skin
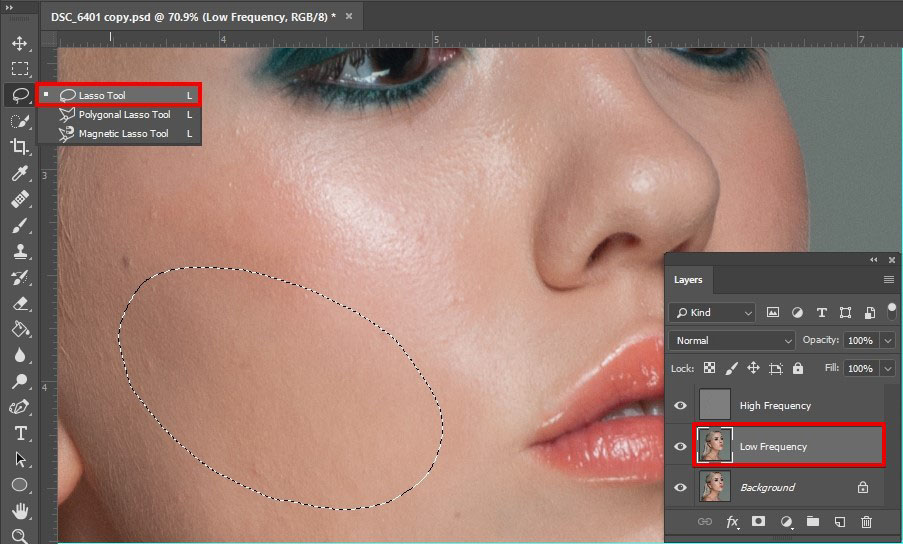
Use the Lasso Tool (L) on the Low Frequency layer to select the area on which you want to even the light and shadow pattern and the skin.
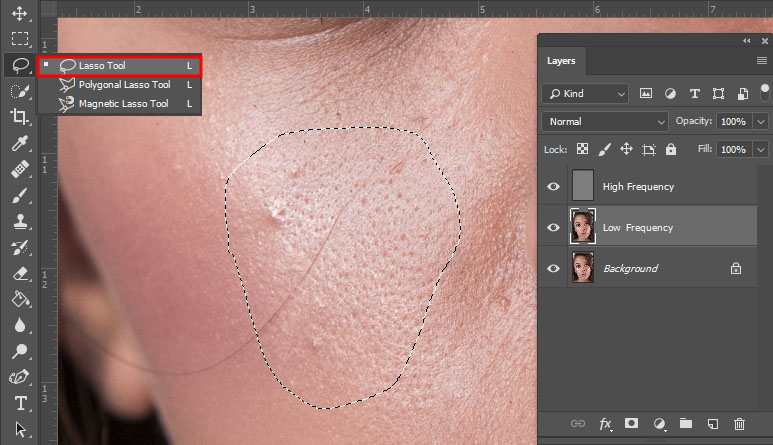
Select a small part of the skin, go to Filter - Blur - Gaussian Blur menu and increase the value of the slider to achieve the desired skin blur effect.
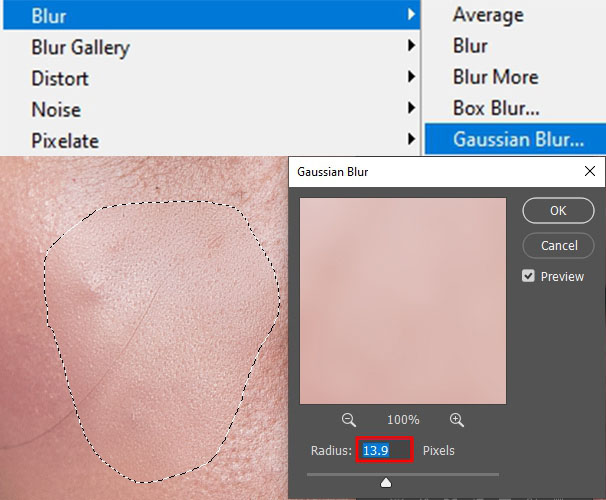
Tip: Avoid areas of the skin with bends - e.g. a nose. Use this tool on small areas without affecting sharp curves.
Check the GIF above to understand how to blur the skin properly with the help of the Lasso tool.
Step 5: Final Touches
After you have smoothed all blemishes of the light and shadow pattern, remove minor imperfections that remained - acne, wrinkles, stray hair. Use a convenient tool, for example, the Healing Brush Tool (J) while doing High Frequency retouching. Check out this GIF to see how to get rid of minor flaws on this stage:
As a result, you should get perfect skin without any visible defects:
Step 6: Done! Evaluate the result!
Compare the results, everything should be perfect!
Just follow these Frequency Separation technique instructions above and get that natural High-End skin.
Method #4 Frequency Separation Through Median


Such Photoshop Frequency Separation method isn’t suitable for all portraits. The result may seem too blurry, but for very problematic images that’s a perfect option.
Step 1: Duplicate Layers
Duplicate your layer twice by pressing Ctrl + J (Cmd + J) or drag your “Background” layer to the sign of the new layer & name them Low and High Frequency, as shown below:
Step 2: You Need to Use the “Median” Filter
First, turn off the High Frequency layer to apply Median.
You need to blur the Low Frequency layer. Open Filter – Noise – Median to do it.
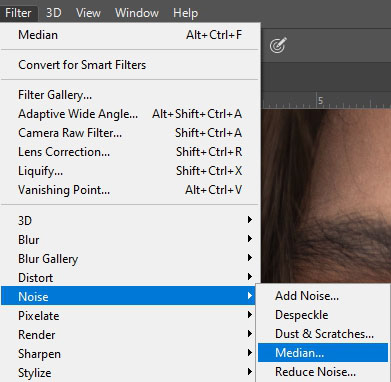
Set the radius slider so that only color transitions are visible. I recommend setting a value between 15 and 30 pixels.
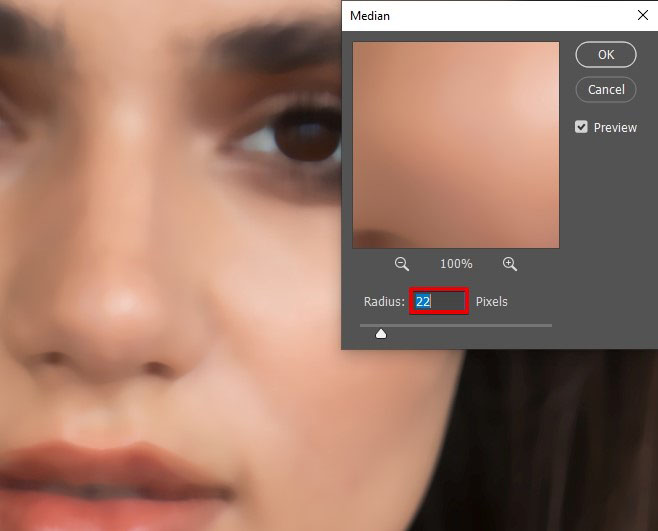
Click “OK” and look at the result, the image should have blurry lines, as if it has been painted.
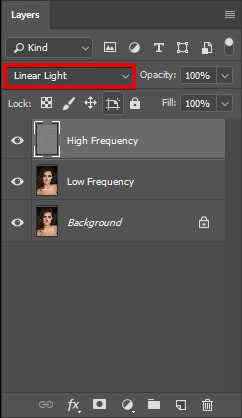
Step 3: Separate Texture from Color
Being on the “High Frequency” layer, open Image – Apply Image menu and use the settings as in the picture:
 Layer: Low Frequency • Invert: ✓ • Blending: Add Opacity: 100% • Scale: 2 • Offset: 0
The photo will turn gray and only the outlines will be visible. Click “OK”.
Step 4: Work with Minor Imperfections
Choose the “Linear Light” blending mode on the “High Frequency” separation layer. The picture will acquire its previous look.
Use a special action to skip all the mentioned steps:
Stay on the same layer and fix all minor imperfections, using the “Stamp Tool” (S), the “Spot Healing Brush Tool” (J), or the “Patch Tool” (J).
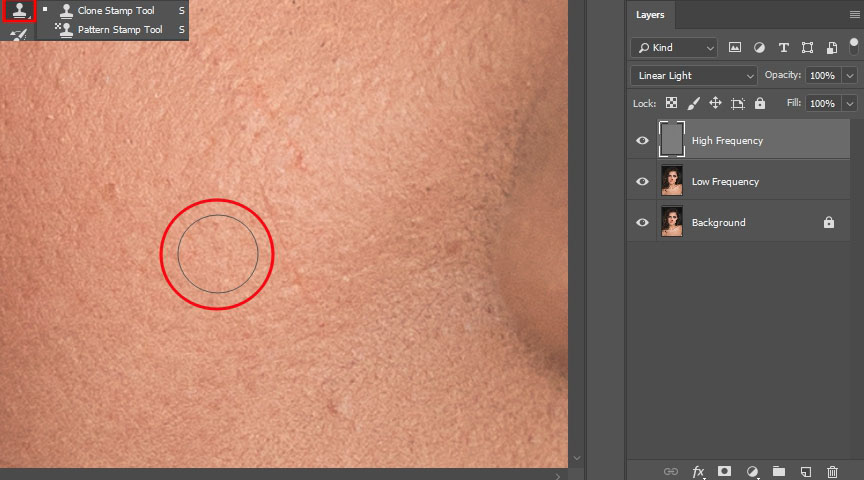
Look, how you can get rid of skin defects with the help of the Clone Stamp Tool:
As a result, the model’s skin texture should be smooth and without imperfections. Now, don’t pay attention to the color spots that appear in the process of skin retouching in Photoshop. We will get rid of them later. The key element at this stage is texture.
Step 5: Color Enhancement
Switch to the Low Frequency layer.
Tip: At this stage, you can use several tools: For small color spots use Stamp Tool (S); Spot Healing Brush Tool (J); Patch Tool (J). To make smooth color transitions use Mixer Brush Tool (B). To create/improve light and shadow pattern use Dodge (O); Burn (O).
I recommend starting with minor imperfections fixing and only then proceed to large color transitions on the forehead, cheeks and nose.
Then emphasize the upper eyelids, cheekbones, face lines with the Burn tool, set the exposure to 10-12. Also, use the Dodge tool to add shine to the areas where it is usually present, for instance, strip on the nose, cheekbones and forehead. Remember to add brightness to the lips and eyes.
Ready! Examine the result! It took me five Frequency Separation steps to achieve a perfect look of the skin in my portrait. Just follow the instruction to get an ideal outcome.
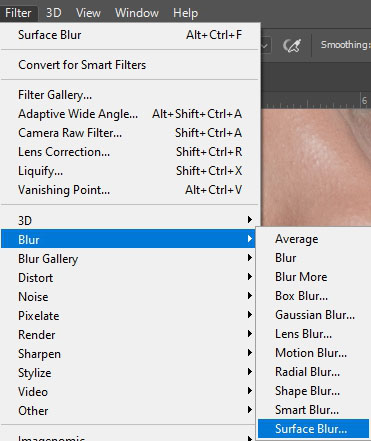
Method #5 Frequency Separation Through Surface Blur


I recommend using this Frequency Separation method only for close-up portraits or if models have really good skin. You can get rid of small flaws beforehand, so your photo is ready for retouching. Use “Stamp Tool” (S) or “Spot Healing Brush Tool” (J) for this.
Step 1: Duplicate Layers
Duplicate your layer twice by pressing Ctrl + J (Cmd + J) or drag your “Background” layer to the sign of the new layer. Rename them to “High Frequency” and “Low Frequency”, double clicking on the name.
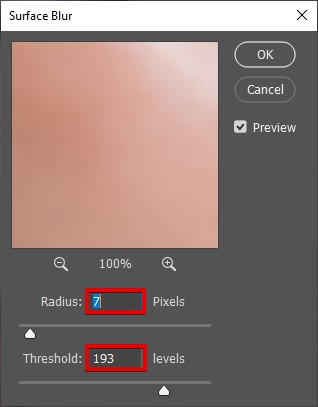
Step 2: Apply Surface Blur
Turn off the High Frequency layer and go to the Low Frequency. To blur the Low Frequency layer, you need to open Filter – Blur – Surface Blur:
Set the radius slider so that the skin texture is a bit blurry. I recommend the following setting:
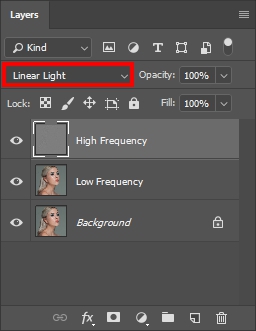
Step 3: Set Up the High Frequency Layer
Activate the High Frequency layer and go to it. Open Image – Apply Image menu:
 Layer: Low Frequency • Invert: ✓ • Blending: Add Opacity: 100% • Scale: 2 • Offset: 0
The photo will turn gray and only the outlines will be visible. Click “OK”.
Set the High Frequency layer to Linear Light blending mode. The photo will acquire a previous look.
Step 4: Eliminate Skin Color Irregularities
On the Low Frequency layer using the Lasso Tool (L), select the area on which you want to align the light and shadow pattern and skin color.
After selecting, open the Filter - Blur - Surface Blur menu and increase the value of the slider to achieve the desired skin blur effect.
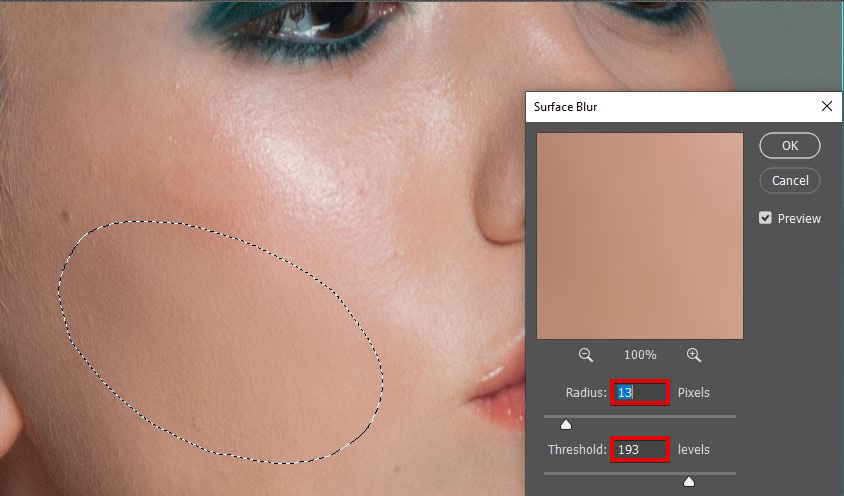
Check this GIF to understand how to work with the Lasso tool.
Tip: Avoid skin areas with bends – e.g. nose, eyes, lips and eyebrows. Use this tool on small areas without affecting sharp curves. Besides, you can’t use this Frequency Separation method to change very small parts.
Step 5: Get Rid Minor Defects
After you have aligned all the irregularities of the light and shadow pattern, remove the minor imperfections that are still visible - acne, wrinkles, stray hair. Go to the High Frequency layer and use “Stamp Tool” (S) or “Healing Brush Tool” (J). More details in this GIF:
After you’ve got rid of all skin imperfections, look at the result!
Free Actions for Portrait Retouching in Photoshop
While retouching any portrait, you can significantly reduce the time spent with the help of actions. Download these free actions right now!
Bright Eyes Portrait Photoshop Action
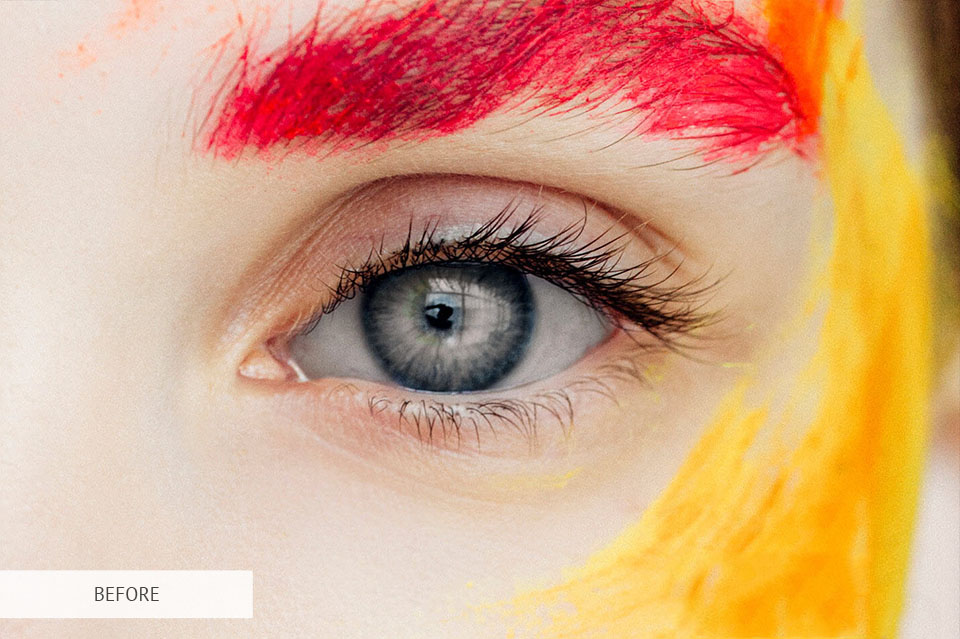
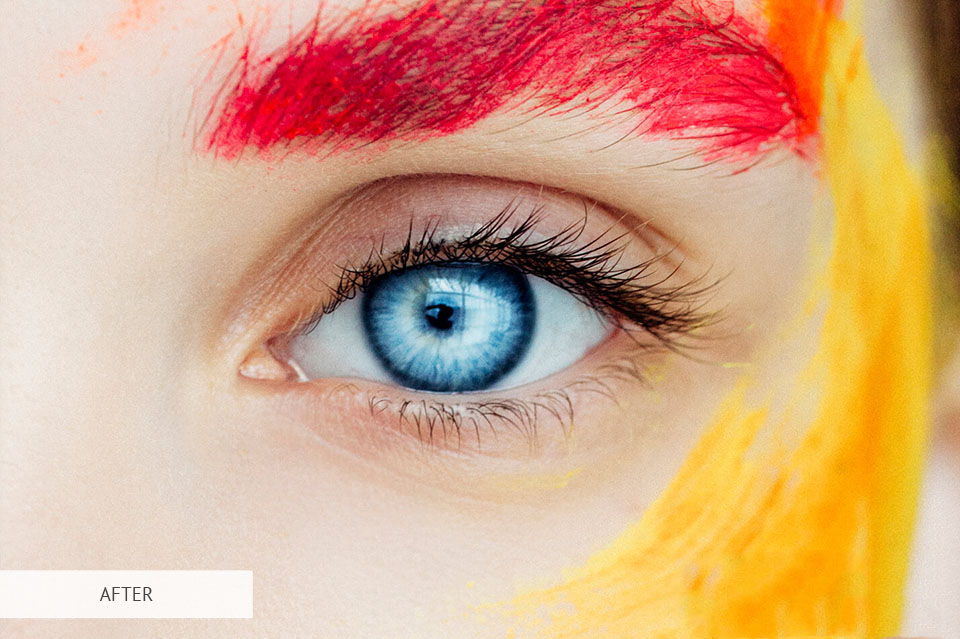
When looking at portraits, people primarily notice eyes, so they must be perfect. This action will add shine to the model’s eyes making them more expressive.
- Read more about how to smooth skin in Photoshop.
Smooth Skin Portrait Photoshop Action

It happens that after you use Frequency Separation method, the skin looks too sharp and you need to blurry it. This action will help cope with the task faster.
Whitening Teeth Portrait Photoshop Action
Even the whitest teeth in the photograph may look slightly yellowish or gray because of the lighting. With this action, you can easily and naturally whiten teeth in your photos.
- Read more about how to whiten teeth in Photoshop.


