In today’s article I’m going to talk about a really cool tool that I use for my Amazon and eBay pages – ghost mannequin photography. It will help you to take better apparel pictures, make more sales, and grow your business. I’m going to lift the curtain a bit and show all the stages of creating such images as well as give a lesson on ghost mannequin photography retouching.
Ghost mannequin photography is a simple and efficient way of showing off clothing. Mannequins help your products preserve their real shape so that the buyer can imagine the clothes on themselves without being affected by the model’s appearance in these clothes, as it’s done in lifestyle product photography. However, mannequins can be distracting, which is why there’s a simple solution – you can create a ghost mannequin effect for your product images.
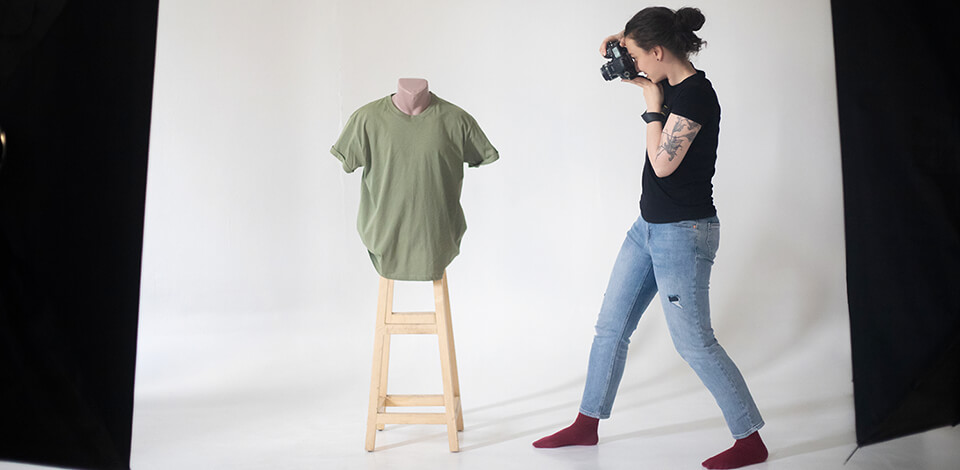
To achieve a good result, all you need is any kind of mannequin or model (you can be one yourself), clothing, a camera, and editing skills.

Ghost mannequin photography is a rather complex technique for beginners as it requires advanced shooting and retouching skills, but I described all the stages of creating this type of product images, starting from the studio setup and ending with the final product image. In reality, you can halve your worries if you send the taken photos to professional retouchers.
You’d think that the first thing you have to buy is a mannequin, but that’s not necessarily the case. Despite its name, this photography type doesn’t require a mannequin, you can use a person instead. Taking photos of a mannequin is easier, but a quality one costs money and it constantly needs to get changed, which gets quite annoying after the tenth time.

Look at the poses and hand placement in the shot. Comfortable and natural poses aren’t suitable for this type of image since you have to imagine how the clothing will look like after deleting the person. You need to place the model in a way that ensures the clothing looks as straight as possible and isn’t obstructed by anything.
If we’re talking about a mannequin – it’s advised to get one with arms or at least shoulders since otherwise, the sleeves will dangle shapelessly while the rest of the body keeps its shape. Of course, you can put something inside the sleeves, but imagine how annoying it will get to do it for each shot
Akin to all other photography types, preparation requires as much time as the shooting process itself. To achieve the ghost mannequin photography effect, you simply must know how to create professional photos in a studio. The effect itself won’t save the images if their quality is low. That’s why it’s crucial to know how to set up your gear professionally.
The first thing you need other than a camera and clothing is a white background. It’s a classic choice for e-commerce product images since a white background makes the subject clearly visible and can be easily made transparent, allowing you to place the object on a different background.

The standard set of gear that you need to create ghost mannequin photography isn’t different from any other studio photoshoot. Here’s what I used:
Place the camera on a tripod to ensure you photograph all products from the same angle, while also making the shooting process more convenient and freeing up your hands.
Do not put your mannequin outlet too close to the backdrop, this will create some harsh shadows. The light should be placed just above the mannequin.
Remember, that the light should be soft and evenly distributed. This should be enough to create a depth of field that will ensure that the product remains sharp. If you want to expose the scene and control the settings in a manual mode, we recommend you learn about the in-built light meter in your camera.
Here you need to use standard camera settings for product photography. You have to ensure the subject is well-lit and looks as clear as possible, but since you have a flash – that shouldn’t be a problem.

Even if you’re an experienced photographer, it’s still vital to choose the correct camera settings:
MANUAL MODE SETTINGS:
Always keep in mind that when you are taking picture for your ghost mannequin photography, you need to keep your ISO as low as possible. Pictures with high ISO are grainy and do not retain all details. Use a tripod to keep your ISO minimal (100-200). The final pictures will be clear and sharp.
Aperture is in charge of focus and how much light enters your camera. While small f-number is great for some photography styles, when it comes to ghost mannequin service, your f-number should be higher than 11. Small aperture will keep the entire object in focus, instead of only highlighting a certain aspect of it.

Take a couple of frontal shots, check the lighting, and make sure the chosen settings are suitable for your photos. I suggest connecting a laptop to your camera via WiFi to easily view the photos and check if everything is in focus.
Mind the placement of your camera. When you take a picture of any product, it’s important to remember to place the camera directly in front of the area you are photographing. That means, when you are taking a picture of a blouse, you should place your camera at a chest level and when you are photographing shorts, place it across the hip area.
If you disregard this rule and take the picture either too high or too low, the apparel will look inaccurate and distorted. Let me show it on the ghost mannequins below. One is taken properly and the other one violates the mentioned rule. Try to put yourself in the customers’ shoes and look at these images with their eyes.

Following the rules above, take a couple of photos of the person from the front and the back. Clothing looks best when the model straightens their arms, adjusts their posture, and tilts the shoulders slightly backward. Remember to iron the clothing before the photoshoot since dealing with uneven or wrinkled parts during image post production is a long and tedious process.

To create a 3D effect, you have to take a few photos of the clothing parts that aren’t visible on the first image. Turn the clothes inside out and affix them to a wall, board, or let your assistant hold them while you take a few photos of the inner collar part with the label. With this photo, you’ll be able to remove the head of the person/mannequin and replace it with the inner part of the collar.

I used two shots for creating ghost mannequin photos – a frontal shot of the shirt on a mannequin and a collar photo. As for software suitable for editing ghost mannequin photos, I’m going to use Adobe Photoshop CC, but you can employ any of the available free Photoshop alternatives that have layer support.
However, your work isn’t done after you’ve taken the necessary photos and sent them to the computer. In this case, you have two options do everything yourself or delegate that work to product photo editing services, which will do everything quickly and professionally.

After opening the image in an editor, start by duplicating the “Background” layer. This can be done using Ctrl (Cmd) + J or by simply dragging the layer to the empty layer icon, as seen in the picture above. I immediately added the collar image here and made it invisible.

Create an empty layer by pressing the + sign on the bottom of the layer window. Place it between the existing layers. Pick the Paint Bucket tool (K), choose the white color, and fill the empty layer with it.

Now you need to select the Pen Tool (P) and create a path around the object that you’ll have to cut out. This needs to be done point-by-point. The smaller the distance between them, the more detailed will be the selection. Once done, click the right mouse button inside the selected area and pick “Make Selection” from the list.

The Work Path transformed into a selection. Now pick “Add Mask” (a rectangle icon with a circle inside) on the layer panel.

Take the Stamp (S) tool and remove all flaws that you see in the photo. Simply copy the details from other parts of the image.

Make the collar layer visible and reduce it to the correct size. Place this layer below all the others.

Reduce the opacity of the collar layer by setting it at about 20-30%. Move around the layer and decrease its size it fits the rest of the shirt perfectly.

Using the aforementioned Pen Tool (P), cut out the collar with some extra space around it, as you can erase the unnecessary parts later. Click the right mouse button inside the chosen area and pick “Make Selection” from the pop-out menu.

This is where the hard part begins so pay attention. Select the shirt layer that you worked with during Step 4. Press the left mouse button on the mask and Alt (Option), then drag the mask onto the neckline layer – the mask will be applied to the layer automatically.

Choose the Brush tool (B), then white color, and go to the neckline layer. Erase the pathing and neckline details that you don’t need.

Choose any selection tool (M) from the tool panel, click the right mouse button and pick Warp. Use control points to distort the layer in a way that makes it fit the rest of the shirt naturally.

For this step, you need to create a new adjustment layer. You can do it by pressing the black-and-white circle at the bottom of the Layers menu. Choose the Curves layer and press the white square with an arrow. This will ensure all adjustments are applied to the collar layer and not the entire photo. Bend the layer the way it’s shown in the image above.

Akin to the previous step, create a Hue/Saturation layer and decrease the saturation a bit (to about -15) so that the collar color matches the shirt.

Create a Curves layer as you did in step 12, and make the curve look as shown in the example. Add a black mask by pressing a rectangle with a circle, and develop only the shadow area, as shown in the example.

Just like in Step 13, we’re going to work with Hue/Saturation. Reduce the saturation a bit, so that the collar matches the shirt’s tone by employing the same outline you used for drawing the shadows.

Press Shift + Ctrl + Alt + E (Shift + Cmd + Option + E) to merge all layers.
If you want, you can add sharpness to your photo. To do so, select Filter – Camera Raw Filter. Alternatively, you can do it in Lightroom by using Lightroom Presets. Now, save the image! This is a rather complex lesson for beginners, so if you didn’t manage to do something correctly, don’t worry and let professionals take care of all the difficulties.
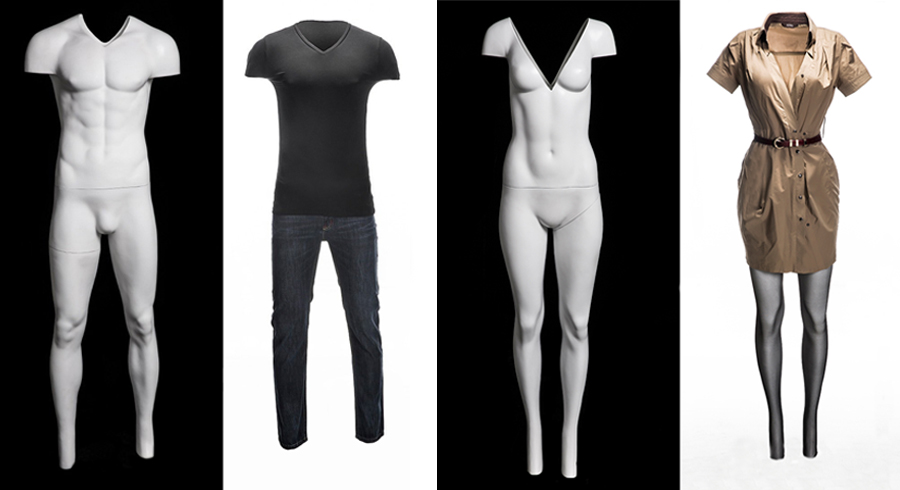
If you don’t want to retouch your photos and make a ghost mannequin photography, you may invest money in buying invisible mannequin. Such photography mannequins for sale consist of many parts and each part has a special use, which can better display your clothes. Usually, they have 8 parts that can be easily separated. Mostly you will use removable chest and arms, as such parts are always “seen” in terms of regular mannequin photography.
So, keeping these parts invisible, you will help customers more easily imagine themselves wearing the garments. In terms of types of clothing, invisible mannequin photography is quite useful for things like blazers, jeans, jackets and shirts. Their biggest advantage is that they can bring the inside of your clothes to life without the need for Photoshop.

The final stage of retouching any photo, including ghost mannequin photography, entails the need of performing quality color correction to ensure the product is adequately presented. The simplest way to do it is with our actions for Photoshop that will make the colors in your photo perfect in a single click.


