F-Stop Guide For Beginners
When you purchase through affiliate links on our site, we may earn a commission. Here’s how it works.
F-stop (also known as f number/full stop photography) is determined as a ratio of the focal length of the lens to the maximum aperture diameter. F-stop is also defined as a particular number you can see on the camera when you set the size of the aperture.
Would you like to know more? In this post, I will consider the reasons why the f-stop concept is so important in photography and how to use it in your work.
What Is F-Stop?
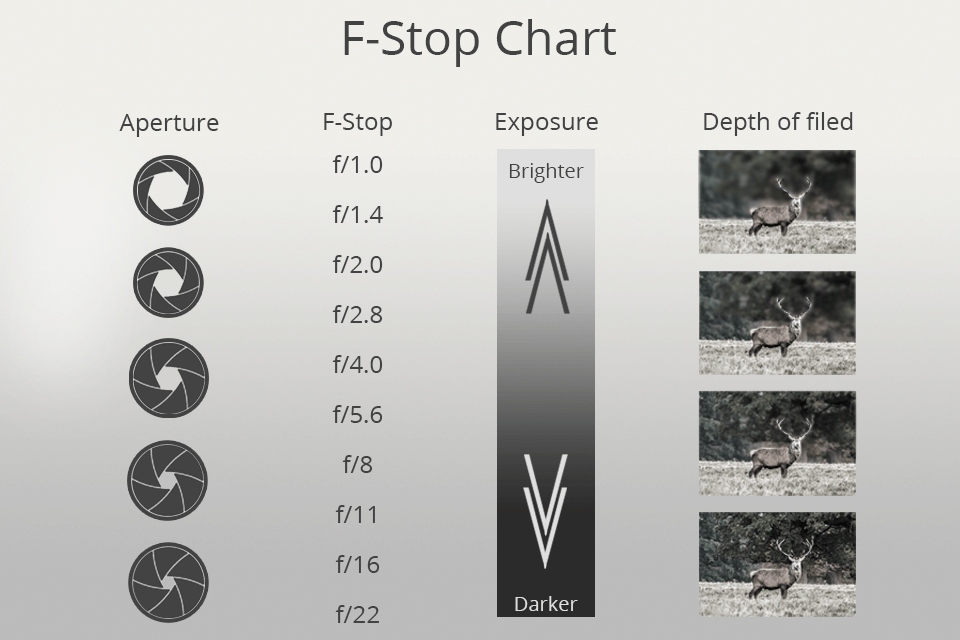
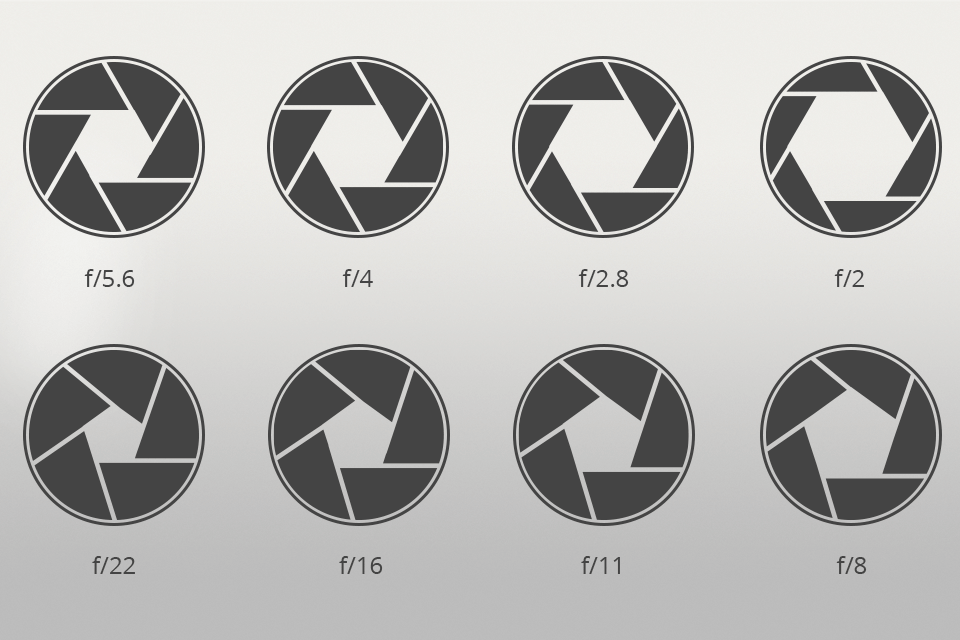
You have probably seen the f number on your camera screen or viewfinder. There are common fstop settings like f/2, f/2.8, f/4, f/5.6, f/8, f/11, f/16, f/22. Some camera or lens brands show the f-stop without a slash, for example, f11. Also, the f number can be shown with the capital letter F, for example, F11. You may choose between different f-stops. There are smaller values such as f/1.2 or larger ones such as f/32.
Why Full Stop Is Important?
As I have mentioned above, an aperture is an opening in your camera lens through which light travels. This is not a difficult topic, but it is important for you to better understand the concept of aperture blades (also known as the diaphragm).
These blades form a small circular opening which is known as the aperture. They can contract or expand, changing the diameter of the opening.
You might have heard other shooters talking about large and small apertures. It is possible to “stop down” (close) or “open up” (widen) the aperture blades depending on the result you want to achieve.
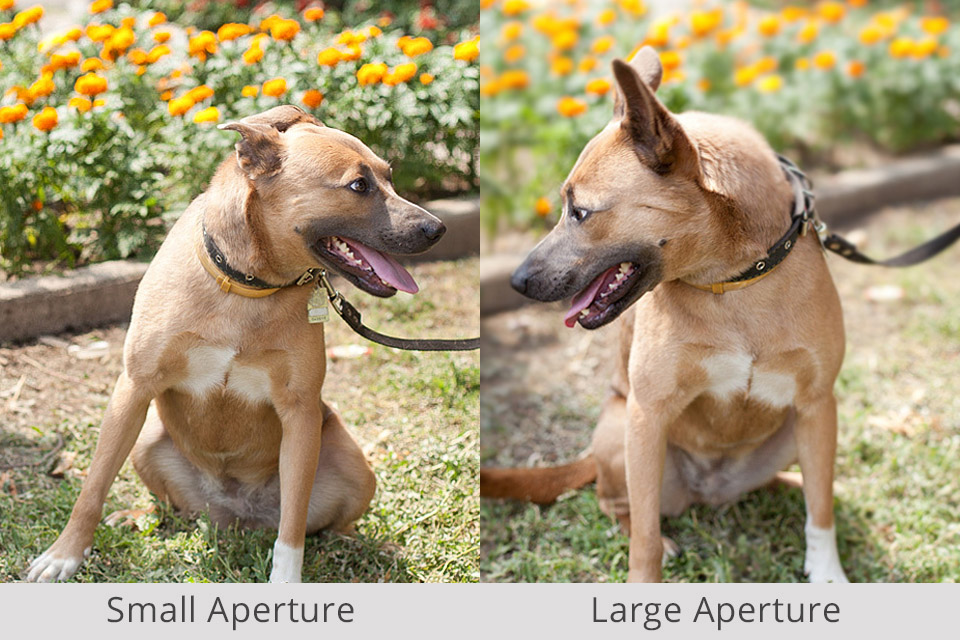
Shooting at large vs small apertures can give you absolutely different results in the same lighting conditions. The diameter of the opening directly affects the brightness of the shot. For example, with the larger opening of the lens, you will let more light to the sensor and achieve a much brighter photo. However, the brightness of the picture is not the only thing the size of the aperture has an impact on.
The aperture affects depth of field as well. The depth of field is the particular distance between the nearest and the furthest objects that both appear sharp in a shot.
To take successful shots, it is necessary to adjust the aperture properly. To do it, you can choose between the aperture priority mode or manual mode.
Regardless of which mode you opt for, you will be able to adjust the aperture according to your needs. As for me, I usually use only these two modes while shooting.
Before you take a deep dive into the question of f-stop vs aperture, it is necessary to learn no less important things in photography.
- Read more about camera modes.
Why Is Aperture Written as an F-Number?

What does F mean in aperture? It is the most essential thing you should know about this topic. The aperture is expressed as a fraction, with the f number as the denominator.
Think of f/11 as one eleventh and of f/16 as one sixteenth and so forth. Just like in math, 1/2 is bigger than 1/16. You will probably be happier if you get 1/4 of a pizza rather than 1/16, right? This is the way the fractions work. f/2 means a bigger aperture than f/8.
So, if you need a large aperture, it is better to set f-stop like f/1.4, f/2, or f/2.8. If your photography requires a small aperture, consider choosing f-stop range from f/8 and above.
- Check out camera settings for product photography.
What Does the “f” Stand for?
Sometimes the beginning photographers don’t understand what the “f” stands for in f-stop and the name of aperture (for example, f/22).
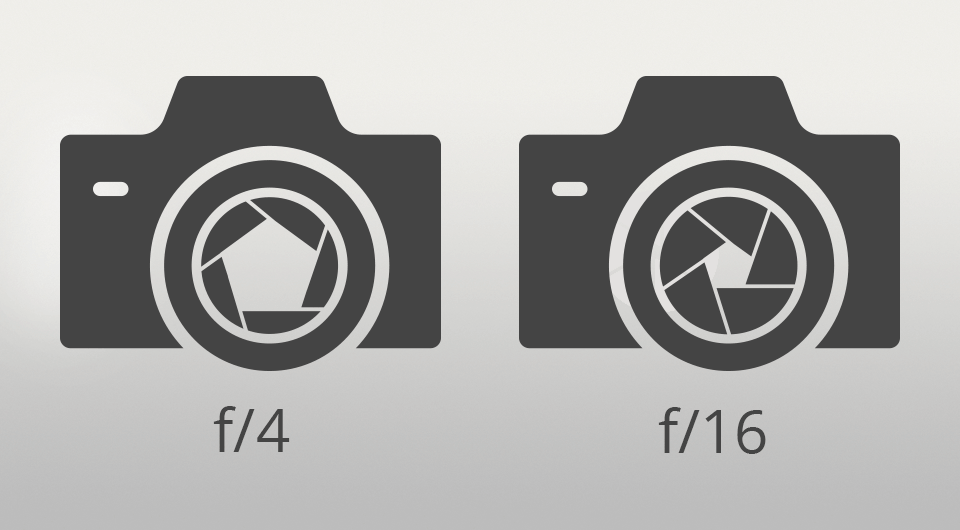
So, I am trying to give you a simple explanation. The “f” in “f/22” stands for “focal length”. If you replace this f value in the fraction with the focal length value, you will get the diameter of the aperture.
Let’s imagine you are using an 80 200mm f/2.8 lens completely zoomed out to 80mm. If you choose f/4, you will get the fraction 80/4. 80 divided by 4 is 20. So, the diameter of your aperture blades is 20mm across. If you choose f/16, the diameter of the opening will be 5mm (80mm/16).
This is a great concept. By understanding it, it will be easy to figure out why the aperture opening f/4 is larger than f/16.
- Check out real estate photography camera settings.
F-Stop Value
Each fstop represents an aperture setting concerning the maximum aperture of the lens. So, it is impossible to set the f value you want. Every lens has a limit on how narrow or how wide the aperture opening can be.
The limit to how large a lens can be opened is called the maximum aperture. Usually, it is expressed in f numbers like f/1.4, f/1.8, f/2, f/2.8, f/3.5, f/4, or f/5.6.
Experienced photographers often choose lenses with a large aperture. Some of them are ready to spend extra money just to purchase a lens with the max aperture of f/3.5 rather than f/4.
Why do professional photographers prefer the lens with a large aperture? The answer is simple. The larger aperture of the lens, the more light will travel through the camera sensor. For example, the lenses with the max aperture of f/4 allow you to get one half of the light as the lenses with the max aperture of f/2.8. The size of the lens opening especially matters if you are shooting in poor lighting situations.
Since the maximum aperture is so important for the photographers, the camera manufacturers specify the fstop in the name of the lens. For instance, in Nikon 40mm f/2.8G, the largest maximum aperture is f/2.8.
If you are using a 50mm f/1.4 lens, the largest aperture you can set is f/1.4. The constant aperture lenses, such as 24 70mm f/2.8, will have the maximum aperture of f/2.8 at each focal length. More affordable lenses, such as 18 55mm f/3.5 5.6, will feature flexible maximum apertures that change depending on the focal length the lens is set to.
For instance, at 18mm, you will get the maximum aperture of f/3.5. While at 55mm, the maximum aperture can be f/5.6. The aperture shifts gradually within this range.
Usually, the minimum aperture is not so important for photographers. That is why camera equipment manufactures don’t specify it in the name of the lens. Nevertheless, if you do care about the smallest size of the aperture, you can visit the manufacturer’s website to clarify this information. The smallest aperture of the lens is represented in such f numbers as f/16, f/22, or f/32.
- Check out camera settings for portraits.
F-stop and Depth of Field
Other than the volume of light supported by the lens’s aperture, it also significantly affects the depth of field of your photographs.
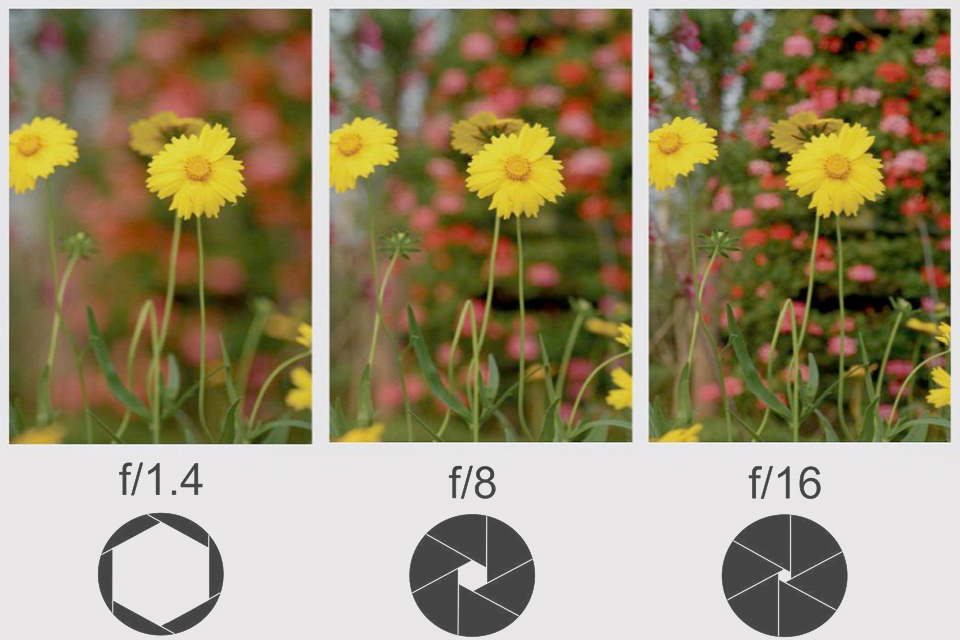
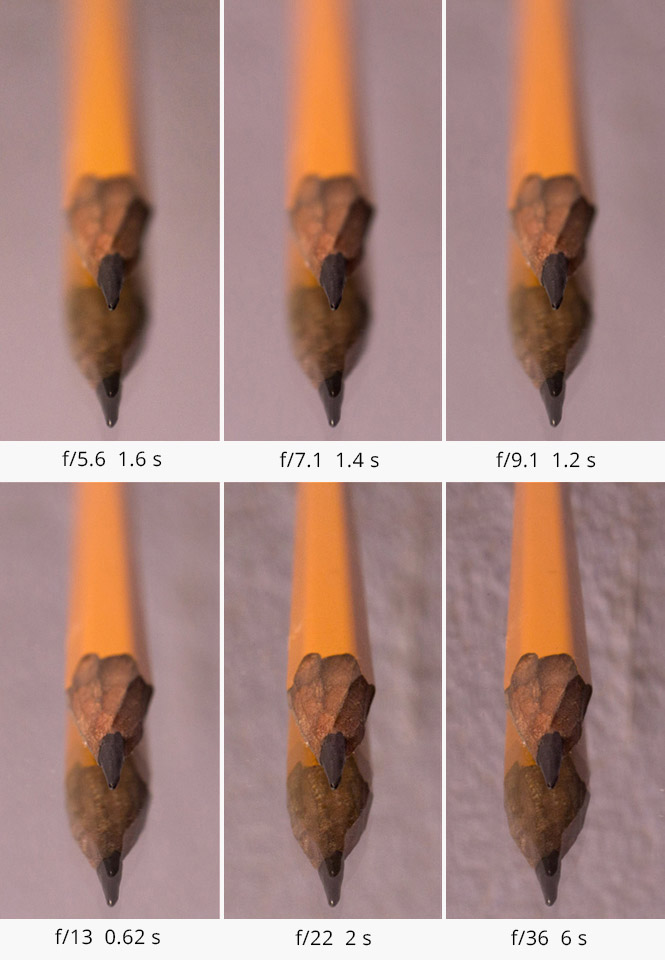
When thinking of depth of field and f-stop photography, I usually bring up examples like the ones below. As you can see, I’ve set a quite high aperture of f/4 when taking the picture on the left and decreased it to f/32 when taking the shot on the right.
The difference is very fascinating! As clearly visible in the left example, only a small part of the lizard’s head has high sharpness, while the background appears to be very blurred. That is exactly what depth of field is.
Another way to understand this term is to think of it as a glass sheet, which converges with the subject. All image areas that cross the glass sheet will have increased sharpness. The depth of said sheet is determined by your aperture setting. When shooting at f/4, the sheet is quite thin. Meanwhile, at f/32, the sheet is far thicker. However, keep in mind that the glass comparison is an oversimplification since the depth of field changes gradually, not instantly.
With the correlation between the depth of field and f-stop explained, now you understand why most portrait photographers prefer to work at f/1.4, f/2 and f/2.8. These settings offer an appealing “shallow focus” look that makes only a small slice of the subject sharp (eyes or lips, for instance). On the other hand, it also becomes obvious why landscape artists usually resort to f/8, f/11 and f/16. If your goal is to make the entire scene sharp, those are the settings for you.
- Learn additional information about aperture and depth of field – focusing basics.
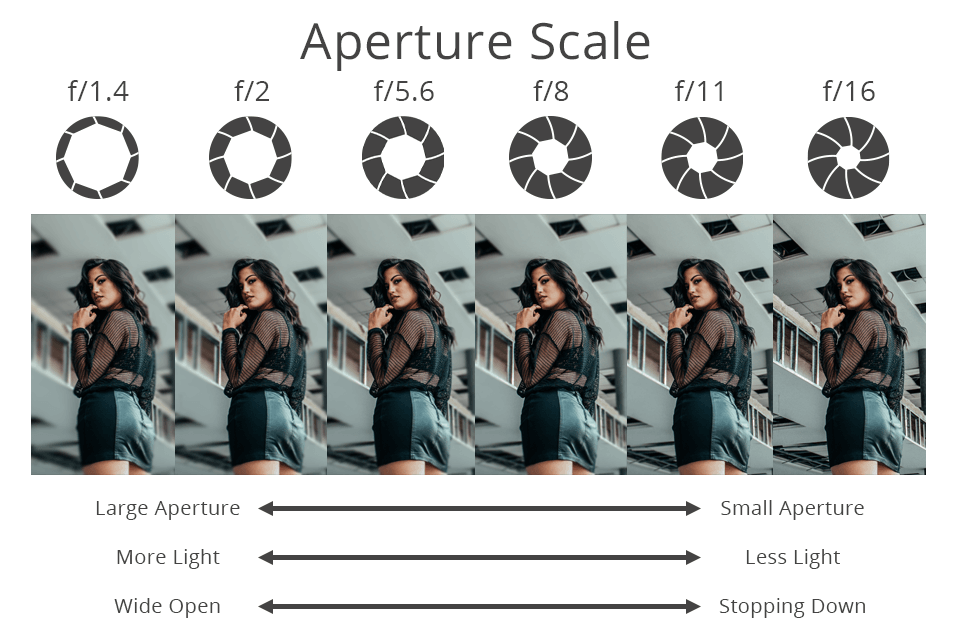
Aperture Scale
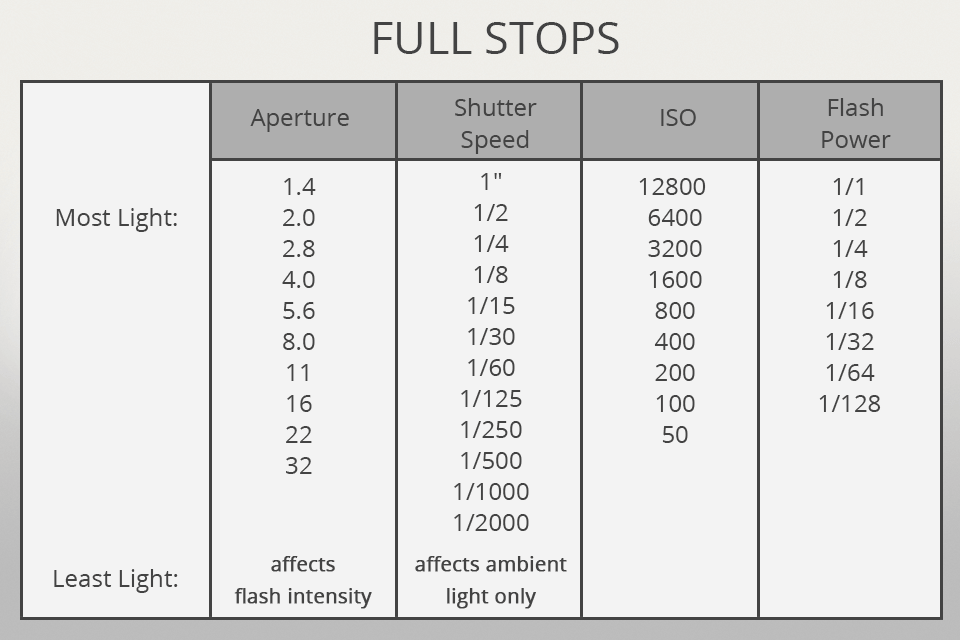
Check out the possible aperture f-stop range. Each next step decreases the amount of light that passes through by 2:
- f/1.4 (the largest used opening of the aperture mechanism that lets through plenty of light)
- f/2.0 (twice less the amount of light compared to f/1.4)
- f/2.8 (twice less the amount compared to f/2.0)
- f/4.0 (etc.)
- f/5.6
- f/8.0
- f/11.0
- f/16.0
- f/22.0
- f/32.0 (smallest used setting, lets through minimal light)
Those are the primary “stops”. However, the majority of modern camera models allow you to use other aperture f-stop settings like f/1.8 and f/3.5.
Ordinarily, the fstop with the highest sharpness can be found in the middle of f/4, f/5.6 and f/8. That being said, don’t value sharpness more than the depth of field and feel free to experiment with other settings when needed. The lens manufacturer included a variety of f-stops for a reason.
ISO Stops
Let me begin with an aspect that is simple to comprehend: ISO. The first stop after ISO100 is 200 and the next one is 400.
The distance between them differs, but it’s easy to keep track of the values since they are doubled each time, so let’s move on.
Shutter Speed Stops
Usually, when using a DSLR, you’re taking photos at a tiny fraction of a second. When taking photos with a shutter speed of 1 sec. or longer, you need to adhere to the principle from above.
All you have to do is multiply the duration from 1 sec. to 2, from 2 to 4, etc. It couldn’t be easier.
When setting the speed to a fraction value, like 1/100, to multiply this number, halve the denominator (the bottom value of the fraction, in this situation – 100).
If you’re still at the beginning of your career, don’t be afraid of this aspect if you don’t understand the f-stop meaning completely. Soon enough, it will all feel natural.
1/50 is double the duration of 1/100, meaning it’s a single fstop and it multiplies the exposure by 2. 1/25 is double the duration of 1/50, etc.
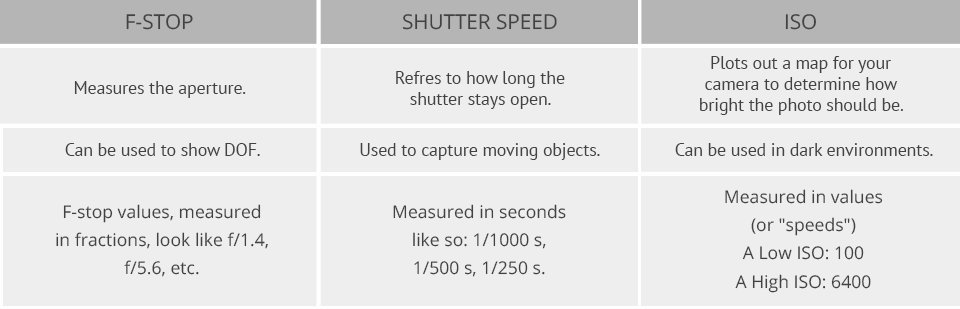
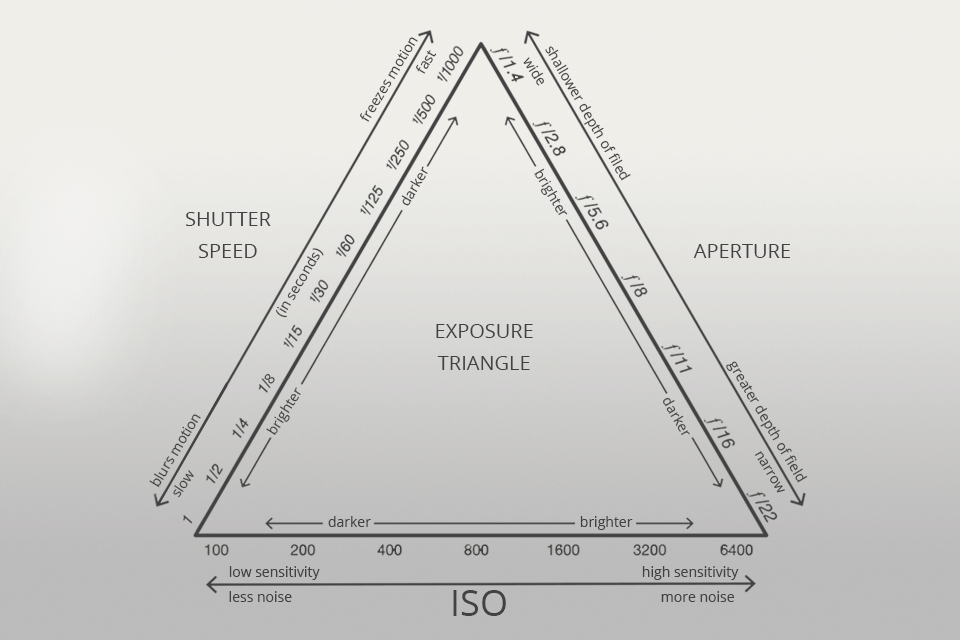
Exposure Triangle
Now that I’ve covered what is f-stop and how aperture works (letting light move through the lens and reach the camera’s sensor), let’s talk about ISO and the shutter speed.
The ISO setting refers to the sensitivity level of a camera’s sensor. Shooting at a higher ISO setting requires a smaller amount of light to get the exposure you need.
Meanwhile, the shutter speed relates to the time during which the shutter remains open, letting light reach the digital sensor. This characteristic is usually represented in either seconds or fractions of a second. The higher the f-stop camera speed (meaning the shutter has less time to pass through light), the less light you’ll receive. A lower setting (meaning the shutter stays open for longer) lets the sensor receive more light.
Now I will return to the broad comparison made earlier so that you can better understand the purpose of each end of the triangle. If you imagine an eye as a camera, then the pupil works like an aperture. It increases and decreases to get the correct amount of light required for a specific situation. This means that an eyelid works as a camera’s shutter.
As long as it’s open, your brain receives the light necessary to visualize the space around you. As soon as it closes, it stops. The ISO represents the amount of light an eye can endure without blinking. Are you familiar with how certain individuals can endure strong light while the rest immediately squints? ISO works similarly.
The primary correlation between adjusting the fstop to change the aperture and adjusting the ISO or shutter speed boils down to the fact that all three settings directly affect the exposure of your photos. Whenever you adjust one of them for a specific look, you often have to change one of the other two settings as well to maintain the proper amount of light.
When I say “specific look,” I’m referring to the fact that f-stop adjustments that shift the lighting also have a direct effect on the depth of field. However, if the needed depth of field has been already achieved, you’ll have to adjust another setting to fix the exposure. That being said, ISO and shutter speed adjustments can also cause some minor annoyances:
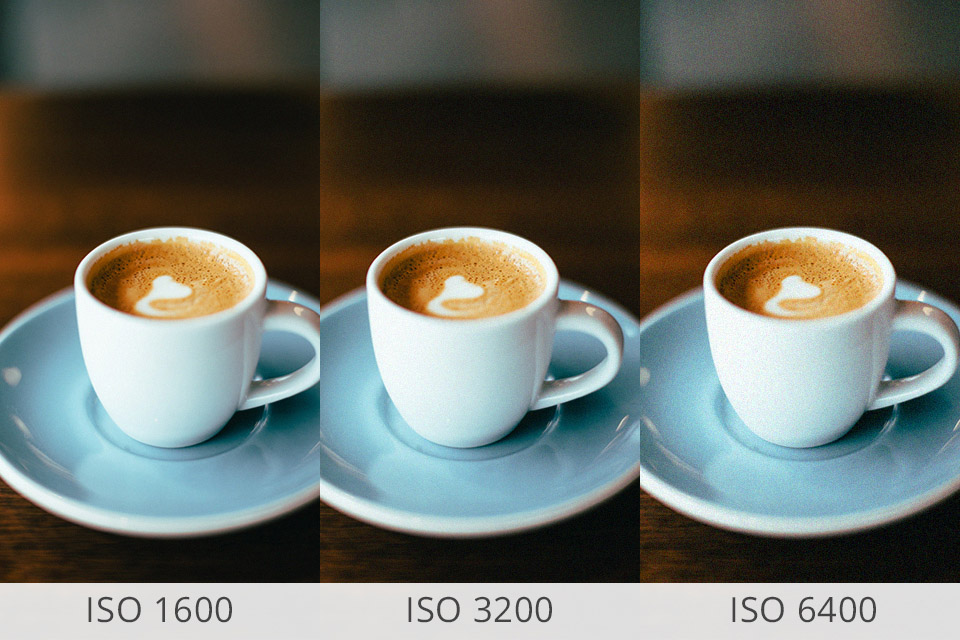
Adjusting ISO often alters the amount of noise in the photo. The larger the setting, the bigger the amount of noise you’ll notice as a result. This is why professionals know that changing ISO isn’t a magical pill that can fix all exposure issues.
The shutter speed setting determines how much movement gets captured. The longer the duration, the larger the amount of blur and movement will be visible in the photo. Logically, sports photographers usually rely on superfast speeds that can freeze a single moment without any blur.
Given the tight connection between the three settings, it’s easy to see that setting correct exposure is a separate skill altogether. Mastering the triangle can take a lot of determination and patience. Lucky for you, there’s a way to avoid that hassle (as explained in the next section) that you can rely on while working on the triangle skill.
Aperture Priority Mode
Aperture priority is a partially manual mode included in most cameras. To access it, set the program dial of the camera to “Av” (sometimes marked “A”). This way you remain in control of the aperture, while the mechanism determines what shutter speed should be used to get the correct exposure.
If the camera picks a lower speed, place it on a tripod. It will help prevent camera shake and guarantee high quality long exposure shots. I also recommend using a remote shutter release since your fingers can also cause vibrations.
If you don’t own a tripod but the camera still sets very low shutter speed, you’ll have to bump up the aperture. This will make the camera switch to a higher speed to accommodate the new aperture setting.
Freebies for F-Stop Photography
If you don’t know how to control the settings of your camera yet, you can create a blurred background with these Photoshop tools.
Gaussian Blur

This freebie is the best way to blur the background in Photoshop as naturally as it can be.
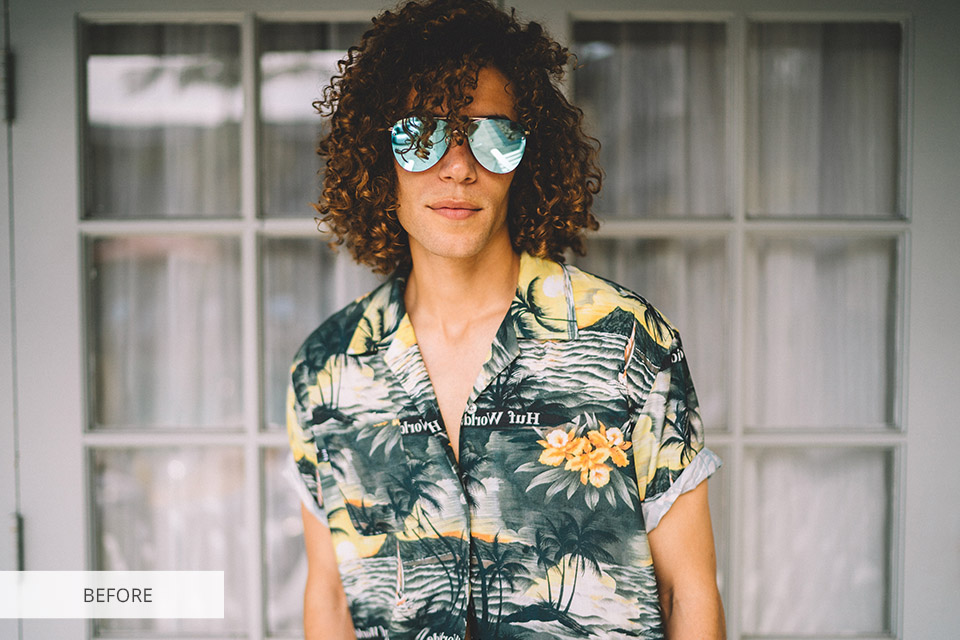
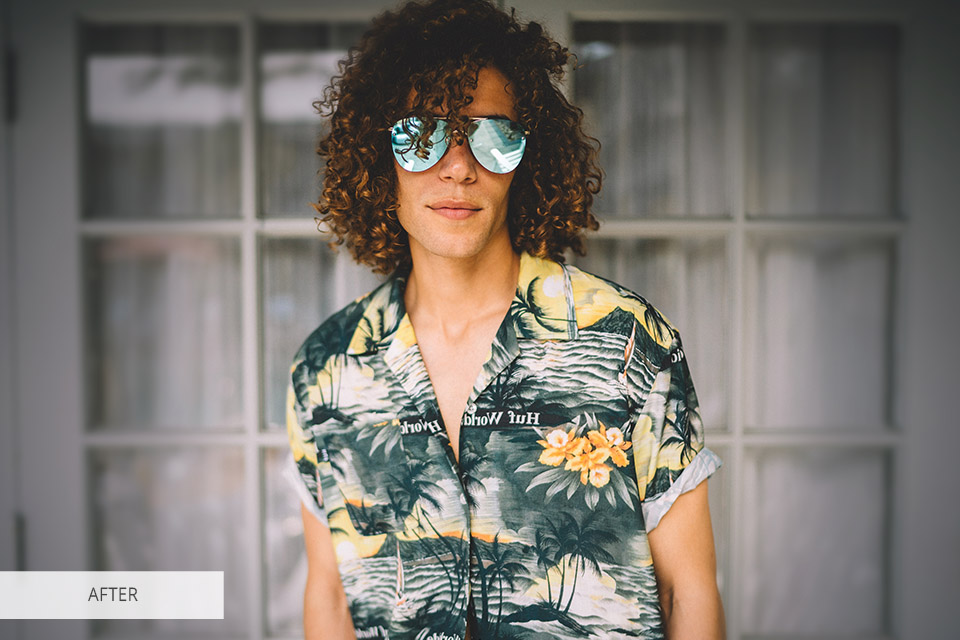
Lens Blur


Use this action to blur the background if you took a portrait photo. It is good for photos where you have stray hair.
Motion Blur
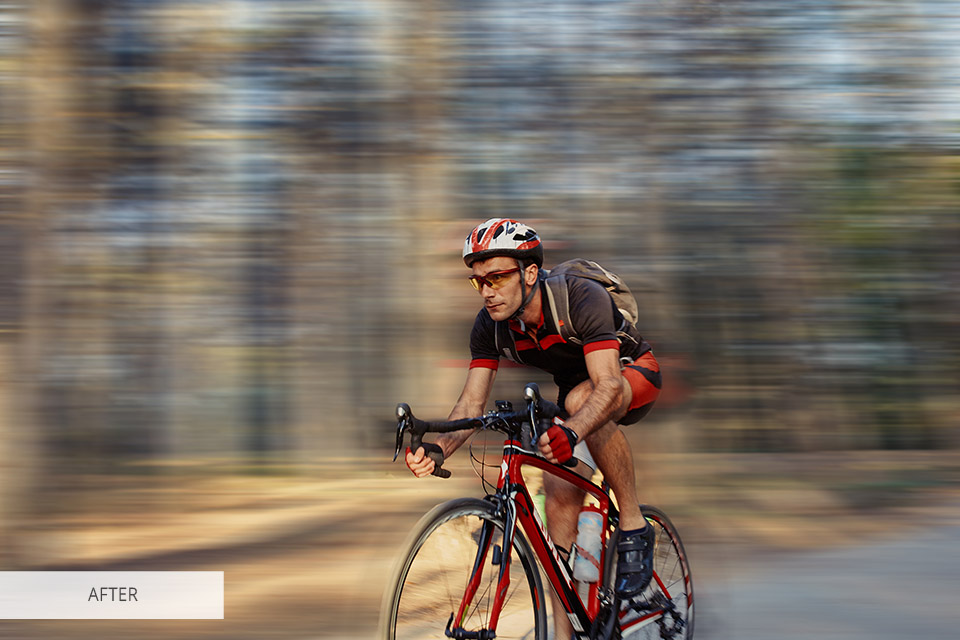
Add motion and action to your photos with the help of this freebie for Ps. Looks especially great on sport photographs.
Tilt Shift Effect
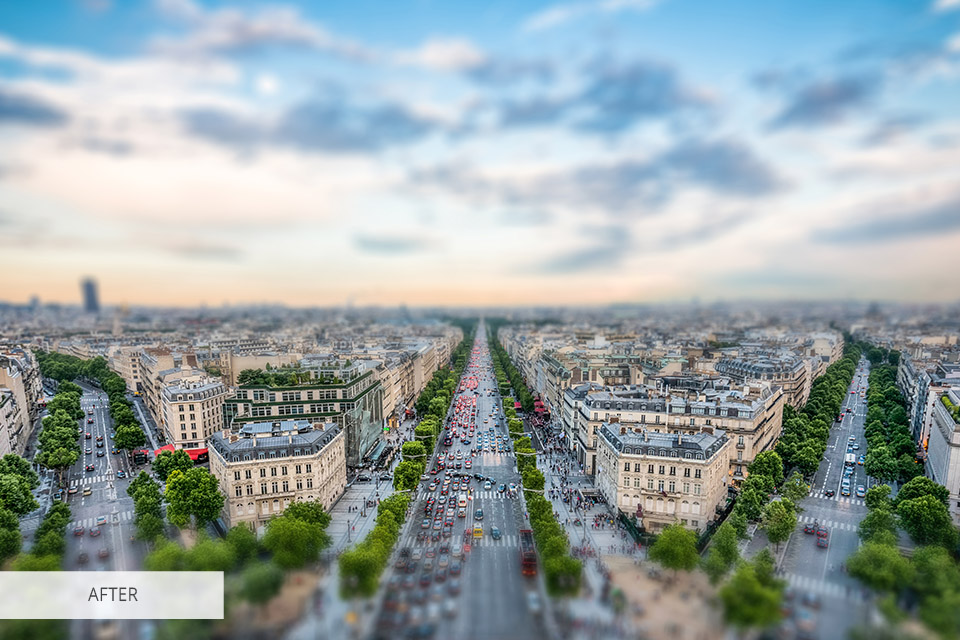
This action is the easiest way to transform your standard architecture photos into fun tilt-shift style very easily.
Vignette
Reduce your photo’s brightness or saturation to add a dramatic tone or heap, make your photos vintage.


