.jpg)


(1).png)


Best Portrait Photographers
Basic Photo Editing Tips
Basic photo editing remains vitally necessary as choosing a good lens for beginning photographers and professionals as well. A hundred years ago, photographers used ink to draw fuzzy lines in portraits, now we use special basic photo editing programs in order to improve the image quality. In this article, I want to share with you the basic photo editing tips and tricks that I actively use in my photography workflow.
Basic Photo Editing Tips
- Use any online/desktop photo editor or software: GIMP, Picasa, Snapseed, iPhoto, PhotoPlus, Pixlr or PicMonkey, Lightroom or Photoshop.
- Choose a photo format before starting image editing: RAW or JPEG.
- Making cropping, adjust levels, and correct a horizon.
- Add a light Vignetting to focus attention on the photo’s object.
- Adjust shadows and highlights.
- Make a photo vivid and clear: adjust contrast.
- Make stylized photo color correction: matte, pastel, black and white, vintage, sepia, light and airy, film.
- Remove skin, background blemishes and spots.
- Add your text, photography logo or watermark.
- Save an edited photograph in the proper size and resolution.
Basic Photo Editing in Simple Steps
1. Choose the Best Basic Photo Editing Software
If you edit photos for your Instagram or for fun, you can use the best free photo editor online. Many people use these online/desktop/mobile apps for basic photo editing. Here are the image editors I recommend you to try.
iPhoto

This basic photo editing app is worth mentioning just because it is one of the most popular among iOS users. It is quite simple to use and you can easily increase the contrast of the image or impose any filter. However, it’s very limited and can’t be compared to Photoshop, Capture One vs Lightroom. You can use it as an editor for photos for posting in social networks. Easily "Sync" photos across devices, you can access your photos from anywhere, and its Optimized Storage is awesome.
Recommended functions to use: adjust the exposure, remove red-eye, eliminate photo flaws and adjust the color balance.
GIMP Photo Editing (PC or Mac)

GNU Image Manipulation Program or GIMP is a freeware raster photo editor for PC, a program for creating and editing graphics and partial support for working with vector graphics. Thanks to a wide range of functions, you can make your photos juicier, more accurately convey the mood, remove distracting elements, and create collages and posters. Read a detailed GIMP review before using this photo editor.
Recommended functions to use: free Photoshop alternative.
Picasa (PC or Mac)

The use of this photo editor for PC has several important advantages, which I really want to share with you. First, the developers distribute it for free. Secondly, it has the same functionality as professional photo editing programs. Thirdly, this is an excellent option for those who are tired of the products of Adobe and want to try something new without losing image quality. It doesn’t offer the same social activity as Flickr or Facebook, you need to pay for extra storage, and it doesn’t serve as good back-up storage.
Recommended functions to use: it makes basic fixes with one click, adds one of 12 filters for enhancement, improves photo quality for sharing on social media
Snapseed (iOS or Android)

Now I will share with you the only basic photo editing app I use on my iPhone. It's Snapseed. It is free and has the tremendous functionality. But it’s not easy to master for the first time.
Recommended functions to use: Transform, Lens Bur and Brushes.
PhotoPlus (iOS)

Almost every basic photo editing app now boasts convenient functionality, which almost completely compares it with computer softwares.
Recommended functions to use: brushes, cloning brushes, the ability to change the blend modes of the layers.
Photo Editor Pixlr (Online)

One of the most popular online photo editor like Photoshop that you can use right in the browser field. It has several varieties, each of which is assigned for a certain photo editing type. For example, Pixlr Editor most resembles Photoshop and can cope with a number of tasks that this photo editing software performs. The second option is called Pixlr Express. It easily copes with color settings, correction of shadows and other things, but does not have any additional tools. The third version of this free basic photo editing software is Pixlr-o-matis, which is ideal for those who retouch photos only for social networks since it works with ready filters and frames. Read a detailed Pixlr review before using this photo editor.
Recommended functions to use: color correction, effects, making collages.
PicMonkey (Online)

According to many photographers’ forums, this is the best photo editing software for beginners. It is very similar to the previous one.
Recommended functions to use: ready-made filters, fonts, and creative collages/frames.
If you do photography as a business or just starting this project, you need do download Lightroom and Phtooshop. They are the best programs for photo editing because there are many Photoshop and free Lightroom tutorials, plug-ins for beginners.
2. Choose a Photo Format

Before I start talking about the basic photo editing techniques that I use in Lightroom and Photoshop, I would like to talk to you about image formats, as well as about the shooting itself. No one will ever say that the quality of the source material does not matter. The better the image is taken, the more comfortable it will be to retouch it.
Each camera has its own settings, color sensitivity and it transforms the image according to these settings and saves the picture on the memory card with some changes. If you select the RAW format, the camera does not make any changes, simply transferring the image to the memory card.
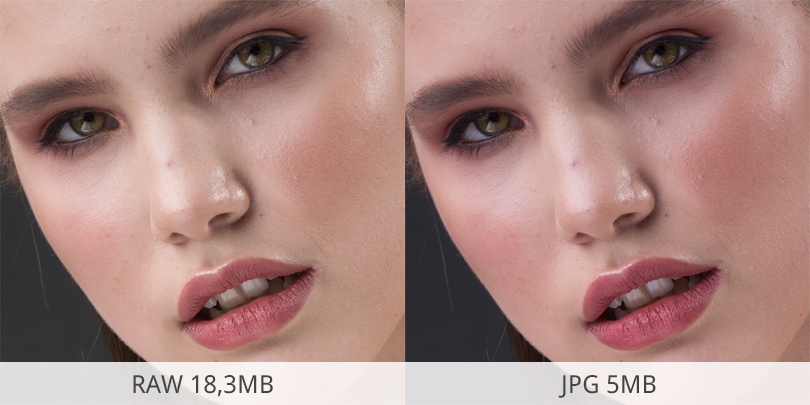
On the other hand, if you shoot in JPEG mode, be ready for the camera to slightly improve the image according to its settings. Of course, you can change the parameters, add light, adjust the color palette or saturation of the image after that in basic photo editing app of your preference, but you will carry out all these image manipulations not on a "clean" image, so the photo quality will be lower than on RAW.
That is why one of the most important basic photo editing tips that I always share with all novice photographers is shooting in RAW format. Yes, this implies more work in the future, but you will completely control the process of editing the picture and do not let your camera decide for you what the finished image should look like. Read more about the difference between GPEG and PNG.
Beginners Guide RAW vs JPG:
3. Make Sure that You Have the Original Photo
Remember one of the main basic photo editing tips - always make a copy of the photo before image editing. The fact is that you may be dissatisfied with the result or you will want to try to make some other changes, but, unfortunately, the original file will be lost. It often happens that I go back to the same original photo to try different styles of photo editing or focus on other colors. It would have been impossible without copies.
4. Stay Natural
CORRECT


WRONG


Never be too addicted during the basic photo editing! Do not make too many changes, it can spoil the entire image and make it unnatural and even plastic. For example, while photoshopping portraits you simply emphasize the features of the human face, remove minor flaws, revealing the natural beauty. Don’t overdo. The same applies to images of nature or landscapes.
Remove visible face blemishes, add volume to hair or remove stray hair, and enhance background for about $5 per photo with FixThePhoto. All professional photo retouching services for photographers and models.
Nobody denies the need for editing the sky in order to make its color more vivid, but you can lose the atmosphere and untouched beauty of nature with dramatic changes. Experiment, but remember that basic photo editing software has an "Undo" button.
5. Crop the Photo to Get Rid of Empty Space
CORRECT


WRONG

One of the easiest ways to improve a photo for a beginner photographer is a successful cropping. No special knowledge for this is required, just your sense of beauty and understanding how you want to see the final image. Such a function you can find in any basic photo editing app or software.

Personally, I always use several ways of crop. The first is a square crop, it’s very simple and can be used almost for any picture. The second method is cropping in a ratio of 6 to 5. Regarding the size of the image in pixels - never admit with a crop so that the picture is less than 600px wide.
Recommended Basic Photo Editing Software: GIMP, Picasa, Snapseed, iPhoto, PhotoPlus, Pixlr, PicMonkey, Photoshop, Lightroom.
6. Use Levels for Best Rotation
CORRECT


WRONG

Sometimes, when you are doing a frame-by-frame and trying to catch the atmosphere of the shooting, it's very difficult to make sure that the horizon is shot properly. Beginning photographers make a mistake during the process of photo editing and do not edit such minor flaws, which makes the image unfinished and not very high quality. I always recommend paying attention not only to colors when you are doing basic photo editing, but also to format Rotation with the help of Levels.
Always pay attention to such trifles, when you shoot with the exact line of the horizon, for example, make a photo session outdoors. Especially the unevenness of the horizon can be seen when you do not use a tripod. This can easily be corrected using basic photo editing in Photoshop or Lightroom.

In Lightroom, the tool that will help you with this type of photo editing is in the same part of the tool panel as crop. Lightroom is an excellent photo editor software where using a special grid makes the Rotation process easy and fast.

Photoshop can also cope with the task of leveling a complex horizon in just 10 seconds. Find the Rotate Canvas tool on the Image tab and be ready to fix the horizon line, focusing on the square grid.
Recommended Basic Photo Editing Software: GIMP, Photoshop, Lightroom.
7. Vignetting to Make Photo Pop
CORRECT


WRONG


Many photographers use it in order to highlight an object in the photo. The fact is that the vignette is a way of basic photo editing in which some parts of the image are darker, which automatically makes the other parts of the image lighter. Most often, the vignette is applied at the edges to emphasize the central part of the image. I use a vignette for portrait images to highlight the face of the model. The only advice I give to novice photographers on vignetting is to carry out this treatment so that no one will notice it, without too noticeable black spots on the corners.
Recommended Basic Photo Editing Software: GIMP, Snapseed, iPhoto, Pixlr, PicMonkey, Photoshop, Lightroom.
Creating a Vignette in Adobe Lightroom Classic:
8. Shadows and Highlights to Increase the Beauty
CORRECT


WRONG


CORRECT
WRONG

Photographers mention those parts of the photo that are darkened as shadows and those that look lighter as highlights. Unfortunately, the camera is not perfect and it often turns out that it captures light and shadows a little differently than we would like to see them. This is very easy to fix if you turn to the tool, which almost every basic photo editing software has. This tool is called "Shadow" or "Highlight". Follow one of my previous basic photo editing tips and shoot in RAW, then you will find out how powerful and useful this tool can be, capable of transforming the image beyond recognition.
It helps to slightly reduce the brightness of the overexposed parts of the image or increase the shadows, which will add depth. However, I recommend being very careful with these tools and applying them wisely, because if the brightness is excessive, shadows can acquire unnecessary roughness and noise, which will lower the image quality.
Recommended Basic Photo Editing Software: Photoshop, Lightroom.
Shadows and Highlights in Adobe Lightroom:
9. Adjust the Contrast
CORRECT


WRONG


CORRECT

WRONG

The task of Contrast Tool is to make the light areas lighter, while the darker ones are darker, thereby making a clearer line between them. Working with Contrast helps you make the image more clear and sharp, and also significantly improve the color characteristics of the image. Using this method of basic photo editing, you move away from soft, calm tones to brighter ones. Recommended Basic Photo Editing Software: GIMP, Picasa, Snapseed, iPhoto, PhotoPlus, Pixlr, PicMonkey, Photoshop, Lightroom. Adjusting Contrast in Lightroom CC
10. Colors Adjustment to Give the Depth to the Image
CORRECT


WRONG


Therefore, we got to one of the most important concepts in basic of photo editing. This is the ability to change the color scheme of a picture. You can do this in general for the whole image, for example, tone the pictures in warmer shades or make all the shadows look bluer. At the same time, using certain tools, you can customize only particular color. Now I will tell you about my favorite tools that can help you to make color correction.
Order professional photo color correction by FixThePhoto from $0,5 to $0,20 per photo. Adjust white balance, colors, tints, shadows, saturation, clarity, blacks and whites, and temperature to make photos pop and bright.
For starters, I recommend using the simplest tool, which is “Saturation’. Its main feature is that it affects the entire image, increasing or decreasing its saturation. With this tool, you can make the image completely black and white, leading the slider in your basic photo editing software to the left side until it stops.

You can drag the slider and get a completely different effect with bright tones too.

The most important thing is not to overdo it in any direction, so as not to make the image either too bright or too dim. I use this method of basic photo editing to create black and white images, especially if I'm dealing with interesting, emotional portraits. In other cases, I apply small adjustments to make the image a little brighter, but natural.
Recommended Basic Photo Editing Software: GIMP, Picasa, Snapseed, iPhoto, PhotoPlus, Pixlr, PicMonkey, Photoshop, Lightroom.
11. Make a Basic Face Retouching
CORRECT


WRONG


CORRECT

WRONG
.jpg)
Find out how to change eye color in Photoshop or how to whiten teeth in Lightroom to make a beautiful headshot or a dreamy portrait. Correct eyes, nose, hair, teeth, and eyebrows to make your portrait pop.
Recommended Basic Photo Editing Software: GIMP, Snapseed, Photoshop, Lightroom.
How to Whiten Teeth in Lightroom:
12. Correct Skin Blemishes
CORRECT


WRONG

.jpg)
CORRECT
WRONG

One of the most difficult photo editing steps for the amateur is removing imperfections, especially on the face, for example, pimples or fine wrinkles. This process is also called “image healing”. Speaking about Healing Tool in basic photo editing programs, it's worth mentioning that this tool, although it is adapted to get rid of any superfluous items on your image, still best copes with minor imperfections. After all, it replaces the area that you want to remove in the nearby areas. In addition, it is known to work better, where the color and texture of the image is approximately the same. That's why the world's retouchers just love this tool, as it makes it possible to get rid of imperfections on the face of the model without problems. In addition, if you really need you can fix the background with this tool, but one of my basic photo editing tips in this regard is the advice to avoid clearing lines and heterogeneous textures.
Recommended Basic Photo Editing Software: Photoshop.
How to Smooth Skin in Photoshop by FixThePhoto:
13. Add a Curves Adjustment Layer with a Difference
CORRECT


WRONG


Many novice photographers are very afraid of the tool in Photoshop, which is called Curves. Why? Because they can not find the right balance of adjustment in order for the picture to look natural. First, let's figure out what the Curves can help us with. The fact is that this basic photo editing software tool is made specifically to change the positions of the curve and controlling it with points you can adjust the brightness of the image, shadow and light.

I suggest you create a new layer, make all necessary updates, reduce its opacity to half and change Blend Mode (I most often use Soft Light for these purposes). For comparison, I give you an example of how basic photo editing in Photoshop look when I apply my method and how the update looks like with 100% fill.
Recommended Basic Photo Editing Software: Photoshop, Lightroom.
14. Patch Tool
CORRECT


WRONG


Thanks to software updates, even any beginning photographer can now use this magic tool. You can even use it on a completely transparent new layer, which makes basic photo editing process much easier. I believe that this tool in Photoshop is not inferior to Healing Tool in Lightroom.
Recommended Basic Photo Editing Software: Pixlr, Photoshop, and Lightroom.
15. Compare Before and After Photo Editing Examples
CORRECT


WRONG


Always make several photo fixing samples to compare and choose the best. If you are a beginner, start with small changes that will help you make images better, because you can not avoid basic photo editing at all. Try to start by increasing the brightness. In normal photography, colors are often very prosaic and dim, by using various tools to increase the brightness of the image in your photo editor software you can achieve the desired effect. Next, make sure that the image has enough contrast. Make dark objects a bit darker. Make sure that the shadows on the picture look natural. In addition, I always recommend using a tool that will help you with sharpening, but be careful. Excessive use of this tool may result in a loss of image quality. The edges of the objects should be clear, but soft at the same time.
16. Add Text Smart
CORRECT


WRONG


Firstly, if you think you need to add text to the images, think about it while taking the picture and cropping it. Try to leave a little empty space to add the text. You can also add contrasting text on top of a fairly busy image. If you don’t have this free space, place it on the slightly transparent overlay. I recommend Pixlr Express and PicMonkey to do this. Keep a font easy to read.
Recommended Basic Photo Editing Software: GIMP, Picasa, Snapseed, iPhoto, PhotoPlus, Pixlr, PicMonkey, Photoshop, Lightroom.
17. Place Your Photography Logo
CORRECT
WRONG
To avoid photography copyright violation, place your photography logo or watermark. You can make it your own or download free photography logo templates. Make it memorable and recognizable.
Recommended Basic Photo Editing Software: GIMP, Photoshop, Lightroom.
18. Use Lightroom Presets and Photoshop Actions
Lightroom Preset


Photoshop Action


To speed up basic photo editing, download Lightroom presets and free Photoshop actions to make photo look good in several clicks on your laptop. Any effect you can imagine: black and white, pastel, sepia, film, high contrast, matte, chocolate, vintage, moody or light & airy are easy to archive now.
Recommended Basic Photo Editing Software: Lightroom and Photoshop
19. Make Collages
CORRECT


WRONG


If you have numerous photos that show something in several steps and you want to add many detail photos, create a collage. You should crop your images into squares, depending on the collage. Download free photography collage templates to simplify it in Photoshop.
Recommended Basic Photo Editing Software: Pixlr, Picasa, PicMonkey, Phtooshop.
20. Choose Proper Sizes and Photo Resolution for Printing
| PRINT SIZE | PHOTO RESOLUTION | ||
|---|---|---|---|
| 4" x 6" | 640 x 480 pixels minimum | ||
| 5" x 7" | 1024 x 768 pixels minimum | ||
| 8" x 10" | 1536 x 1024 pixels minimum | ||
| 16" x 20" | 1600 x 1200 pixels minimum | ||
| 20" x 30" | 1600 x 1200 pixels minimum | ||
| Wallet-size | 320 x 240 pixels minimum |
If you need to print your photos you may meet the term ppi or pixels per inch. Most printing services, and your own printer as well, will need a certain density of pixels in the image (ppi) to be able to render an print that looks fine, with smooth color transitions so there won’t be too visible individual pixels. Average printing ppi values range from 150 to 300 ppi, but some high-end magazines/advertising campaigns may ask you about the photographs which are 1200 ppi.
Megapixels: Do You Need More?
No matter what software you use for basic photo editing, always remember that it is necessary because the camera cannot always convey your vision of the image.
YOU MAY ALSO LIKE:
ABOUT US

RECENT POSTS
-
-
Best Photo Editing Software
-
Photoshop Free
-
Adobe Lightroom for Free
-
Cameras for Amateur Photographers
-
Wedding Photography Tips
-
Real Estate Photography Tips
-
Fine Art Nude Photography
-
Photoshop Online
-
Illustrator Online
-
Download Lightroom Online
-
Watermark Remover Online
-
Free Adobe Software of 2025
-
Best Free Graphic Design Software
-
Best Free Drawing Software
-
Best Motion Graphics Software
CATEGORIES
- Retouch Tips
- Guides
- Photo Editing Tips
- Professional photography
- Software Reviews
- Cameras & Lenses
- Software reviews
- Ann Young
- Photo Tips
- Comparisons
- Discounts
- Create with Adobe
- Wedding Photography
- Lightroom Tips
- Lighting & Studio
- Julia Newman
- Tech tips
- Photography Tips
- Amateur Photography
- Photoshop Tips
- Hardware
- Kate Gross
- Business Tips
- Photography Gear
- Editorial Photography
- Camera File Formats
- Graphic Tablets
- Eva Williams
- Photo Contests
- Inspiration
- Portrait Photography
- Capture One Tips
- Tripods
- Video Editing Tips
- Tata Rossi
- Photo Events
- Product Photography
- On1 Tips
- Bags
- Tani Adams
- Most popular
- Newborn Photography
- Photo Accessories
- Services Review
- Robin Owens
- Apps and Software
- Vadym Antypenko
- Drone Photography
- Drones
- File Formats
- Tati Taylor
- Jacqueline Dornbusch
- Deutsch Blog
- Tetiana Kostylieva
- Nataly Omelchenko
- Real Estate Photography
- Monitors
- Elisabetta Ferritto
- Italiano Blog
- Kate Debela
- Lifestyle Photography
- Computer Mouse
- Marcos Mancebo
- Food photography
- Spanish Blog
- Binoculars
- Luna Rebelo
- Photography storage
- Portuguese Blog
- Keyboards
- Nicolas Ardouin
- French Blog
- Kamata Miyuki
- Headphones
- Scanners
- Japanese Blog
- Phatchara Kanjanapas
- Projectors
- Chinese Blog
- Cui Jin Pau
- Speakers
- Arabic Blog
- Hamdi al-Kazmi
- Extenders
- Korean Blog
- Akshey Jadhav Chopra
- SD and Graphics Cards
- Turkish Blog
- Kerem Kurt Altınay
- Printers
- Thai Blog
- RAMs
- Polish Blog
- Roksana Kasza
- Modems
- Russian Blog
- Routers
- Hindi Blog
- Nagy Éva Rakoczy
- Thunderbolt
- Vietnamese Blog
- Madalina Iordanescu
- Microphones
- Czech Blog
- Adriana Vlasáková
- TVs
- Hungarian Blog
- Irene Angelopoulos
- Security Cameras
- Romanian Blog
- Pin Tae-Ran Kwon
- Additional Gear
- Indonesian Blog
- Greek Blog
- Vladimir Fokin
- UK Blog
- Tri Farida Sudjarwadi
- Dutch Blog
- Lourens Wilmerink
- Danish Blog
- Elena Nissen
- Australian Blog
- Mirjeta Sapunxiu
- Albanian Blog
- Gayane Melkonyan
- Armenian Blog
- Ali Hassan
- Azerbaijani Blog
- Nedim Sabanovic
- Bosnian Blog
- Salza Stoeva
- Bulgarian Blog
- Kong Samnang
- Khmer Blog
- Blaženka Slavić
- Croatian Blog
- Aleksander Mitt
- Estonian Blog
- Abeba Goytom Gabra
- Antivirus Reviews
- Amharic Blog
- Elma Niemi
- Finnish Blog
- Otar Kobalia
- Georgian Blog
- Serena Halldórsdóttir
- Icelandic Blog
- Gedeon Kagan
- Hebrew Blog
- Umoja Abebe
- Kazakh Blog
- Swahili Blog
- Moke Douangmala
- Kyrgyz Blog
- Lao Blog
- Sedriks Rozītis
- Latvian Blog
- Violeta Leketaite
- Lithuanian Blog
- Aleksandra Mitreska
- Macedonian Blog
- Mathis Ravatomanga
- Malagasy Blog
- Rose Pulmano
- Chichewa Blog
- Sophia Oletta
- Maltese Blog
- Bugurul Ganbat
- Mongolian Blog
- Naveen Pokhrel
- Nepali Blog
- Annette Dammen
- Norwegian Blog
- Emilijan Pešić
- Serbian Blog
- Elisa Bešiæ
- Slovenian Blog
- Peter Egnell
- Swedish Blog
- Nazar Antonyuk
- Tajik Blog
- Samat Kapanov
- Turkmen Blog
- Aiza Aydarova
- Ukrainian Blog
- Rustam Karahanov
- Uzbek Blog
- Idris Aksoy Alimov
- List of Authors at FixThePhoto
- Oumri Manzurova
- Tống Xuân Cung
- Mario Petrone
- Photographer
- Shannon Harris
- Allen Gray
- Nicky Sullivan
- Tina Baker
- Tina Parker
- VPN Deals & Reviews
Get New & Fresh Content From FixThePhoto

