25 Horse Photography Tips: Take Great Equine Photography
When you purchase through affiliate links on our site, we may earn a commission. Here’s how it works.

If you want to get great horse photos and stay safe, read this article with useful tips on how to photograph horses and impress your clients.
The horses are among the most beloved ones by the public. They are magnificent, graceful and majestic creatures. No matter what your aim is ‒ to take high-end equine portraits or action photos, you should understand all the peculiarities of horse photography to avoid troubles while shooting.
25 Horse Photography Tips
There are no people who are indifferent to horses. These magnificent animals made thousands of people love them. Horses have always been admired and respected throughout human history.
Therefore, they are perfect photography subjects. At first sight, equine photography seems similar to pet photography but in reality, it is not so. Photographing horses requires a special approach and techniques.
1. Low Angle + Golden Hour

Show flexibility and don’t stick to one location. Change your position together with the horse, in such a way adjusting it to the animal. Photography at the Golden Hours for getting warm light and gentle shadows.
As a rule, shooters try to take a low angle shot since it is the most beneficial position. In other words, get down on the knees and get to work.
Use the longest possible focal length. If I want to separate the object from the background (outdoor shots), I usually use an aperture of f/2.8 (or f/2.0). If I am in the studio, I prefer an aperture of f/11 since it provides more depth of field.
2. Always Edit the Photos


Personally, I prefer Lr and Ps to improve contrast, saturation, colors and exposure. If I want to remove halters or ropes, I usually use Photoshop.
- Read more about 4 legal ways of download Adobe Photoshop FREE.
However, it’s better not to remove horse tack since the picture will look unnatural. The same with reins or a saddle ‒ if you remove these objects from the photo with a rider, it will look strange and unrealistic.
3. Pay Special Attention to the Shooting Location

Mind that horses are not dogs. It is impossible to make it stay somewhere on the green grass and later make it gracefully run through the valley. Unfortunately, it will not come if you call its name. That is why I don’t recommend choosing an endless field or locations like this since you will have to run all the time and may miss the greatest photo moments.
- Check out the Best Places to Photograph Horses in the US.
So, what is the way out? You may just divide a big paddock with a fence and capture the horse there.
However, when it comes to photography with horses, mind that the photo zone should be big enough to use a focal length of 200mm. On the other hand, it should not be too big because it will complicate the process.
Avoid distracting objects (houses, power poles, etc.) and mind the space between the horse and the background. In such a way, you will separate the model from the setting. In case you put a new fence in the middle of the paddock, give a horse some time to get used to it. Only then you may let it gallop freely.
- Read more about landscape photography.
4. Mind the Horse’s Look

Horse photography involves much effort and arrangements. To begin with, you should have some knowledge about the breed you are going to photograph and know the basic riding styles.
Surf the net and get all the info you can. If necessary, look through the horse breed encyclopedia. You may also communicate with the owner and learn the basic peculiarities of the particular breed.
The next step is to prepare the horse for the photo session. The model should be clean and well-groomed.
If you plan to use the bridle, don’t forget to wash it too. Finally, if your shooting involves the rider, ask him/her to wear a color suitable outfit.
5. Don’t Forget about the Composition

The way we arrange the objects within the frame is called composition. When we speak about horse riding photography, we should always mind it.
For example, if I am 200 feet from the horse ‒ I lower my position. If I am 20 feet from it ‒ I try to stand taller. In such a way, the shot looks natural, featuring more depth of field.
Like in any other genre, the rule of thirds is frequently used in horse photography. The frame is divided into two horizontal and two vertical lines. Play with the composition, arranging the objects on the intersection of these lines.
If you want to take dynamic horse photos, do it from the front and at a slight angle in order to capture the rider’s face and the horse’s chest.
6. Time Your Shot to Catch the Best Moments

If you don’t have any practical experience, it’s quite difficult to capture the horse in the air jumping over the obstacle. However, after several horse riding photography sessions, you will know how to do it.
Personally, I know my camera, the gear and the lag time, so it’s not a problem at all. If you are a complete newbie, choose a Sports Mode in your camera and activate continuous shooting.
Also, it’s better to buy a memory card that will quickly record and process your pics. I use the Scandisk Extreme PLUS memory cards.
7. Remember about the Burst Mode and Continuous Focus

Equine photography requires specific camera settings to get satisfactory results. So, it’s not enough to have the best equipment, you should also use it correctly.
When photographing horses, switch to the Burst Mode and continuous focus. The Burst Mode works perfectly when the animal is running or playing.
Continuous focus is used to follow the moving objects. It may be also called AI Servo or AF-C (it depends on the camera brand).
You never know what to expect from animals ‒ they turn their heads, move and blink when you are trying to capture a great moment. That is why it’s better to activate the Burst Mode. You will press the shutter once and the camera will take multiple shots.
When you are done with camera adjustments, it’s time to apply your professional skills. Since your task is to capture the horse in the most aesthetic position, you should take photographs from the horse’s eye level. In such a way, its body will look natural and proportionate.
8. Pick Up Appropriate Equipment and Accessories
 Lightweight Tripod 55-Inch + Canon EOS-1D X 18.1MP + Canon 135mm f/2.0
To begin with, I’d like to say that the best lenses for horse riding photography are telephoto ones starting at 135mm. They create the pincushion distortion that perfectly works with equine photographs. The horses appear elegant and compact in the frame.
Equipment that I use in horse photography:
- Canon 135mm f/2.0: I frequently use this lens in horse portrait photography when I need to capture the horse and the rider. It provides a nice bokeh.
- Canon 70-200mm f/2.8: This is my universal lens. I often use it to capture the moving horses since it offers more flexibility in comparison with the prime lens.
- Canon 1DX: Both professional shooters and amateurish ones know that the lens is just as important as the camera is.
If you are engaged in horse riding photography, you absolutely need a quick, responsive camera, a sufficient noise performance (in bad weather conditions, it is particularly useful), and a qualitative sensor to get great shots.
If you have a choice to make ‒ to buy a quick crop camera or a not-so-quick full format one, I would opt for the better sensor. With practice, you will learn to press the button but you are not able to improve the sensor.
- Check out what are the best cameras for photography.
9. Make All the Necessary Preparations
If you decide to arrange a horse shooting indoors, it’s better to take all the equipment, for example, to the barn rather than bringing a horse to the small studio. As a matter of fact, you may use a hay store, riding hall or places like that.
When it comes to indoor equine photography, you can’t do without a portable background system and a huge black blanket (3 or 4 meters). Mind that it would be problematic to use the background paper since riding halls are usually damp.
This time you are not limited to some particular light sources and may use anything you like. Just take the biggest softbox you have since horses are bigger than other animals and people and arrange the lighting in the most appropriate way. The horse should have the space at least equal to its horsebox.
10. Arrange the Lighting Appropriately

It’s not a secret that the best horse photos are taken early in the morning when the sun has just risen or during the golden hour when it is setting. However, if you have to photograph in the middle of the day, locate yourself in such a way that the sun is behind you and its rays are directed at the horse. In case the sun is exactly over your head, mind the angle of shadows.
Take several test pics in order to check the lighting conditions.
You may not know that but horses of various colors look different in the frame. For example, dark horses are not the best models since cameras have trouble focusing on them. As a result, the horses are featureless and the background is over-exposed.
If you are lucky to have a camera that supports RAW or CR2 file formats, you will easily remove such drawbacks.
If your shooting location is an indoor arena, your camera should have a high aperture. Position yourself somewhere in the corner and capture the horse with a rider when they are illuminated by natural lighting. In such a way, the pics will turn out great.
11. Remove the Cables

Doing horse photography, I always take care of the horse’s safety and never leave the cables in such a place, so that the animal can get tangled or stumbled upon them.
Besides, it won’t hurt to have an assistant, who can replace the gear if the horse tries to run away.
Once you are on the spot, don’t grab your camera immediately and start taking photos. The horse needs some time to get used to the unknown situation, so mind this.
Actually, it won’t take more than 20 minutes for everybody, the hours included, to adapt to the scene.
12. Take Photos During Horse Races
If you have the possibility to take horse photos during races, use it. For such conditions, you need to evaluate the amount and quality of lighting and set the highest shutter speed possible. There are cases when it is allowed to stay quite close to the finish line and take images from that position.
Ask the officials whether you can do it and if they give their permission, find a safe spot for you to capture horses approaching the finish line as well as take distinct shots of them running in a circle. State that you won’t use a flash and that you know how jittery horses can be.
Photographing horses at the races, you can hone your panoramic shooting skills. Thus you can show the speed and dynamics by tracking your subject and adding a motion blur effect to the background.
- Have a look at other pet photography ideas.
13. Shoot Horse Portraits

People working with horses, not only spend many hours a day with their wards, but also feel a special affection to the animals. Having a closer look, you will notice a delicate link between a human and a creature and your task is to capture this relation.
The best time to take such candid shots is at the beginning or end of the shooting, when a rider sets the horse to the right mood, petting or simply talking to it. Have your camera on standby and you are bound to take genuine horse photos.
14. Pay Attention to the Details

Horse owners can tell you about their favorite parts of their horses, which serves as a wonderful basis for close-up equine photography. This can be a cute spot on the forehead or a heart-shaped sign on the leg – actually anything that makes the horse special and unique.
You can use a zoom lens to capture an interesting detail or, if you are lucky enough and the horse trusts you, get closer and take a close-up shot.
15. Master Action Horse Photography

Action photography of horses is a rewarding thing to do, though there is some work to take care of long before you arrive at the spot. I mean, you need to clarify what type of event you are going to shoot at and whether there are any peculiarities you need to keep in mind.
For instance, shooting a dressage competition requires a different approach than a barrel race. Try to collect as much info about the event as you can and ask your client what images he/she wants to receive.
Shape your shooting position, angle and timing according to the answers you get. For example, if you are going to document a barrel race, you need to take pictures of a horse coming around the first barrels, as this is the most winning perspective.
Remember that your shot shouldn’t feature the horse only, as you need to show the motion, so having some empty space in the frame is a reasonable idea. Moving too close may result in photos with cut off tails and hooves, which is one of the most serious mistakes of horse rising photography.
A horse photography specialist knows enough about the event and its most important stages. Don’t be afraid to ask questions, as this will help you make the plan of how and where from to take photos.
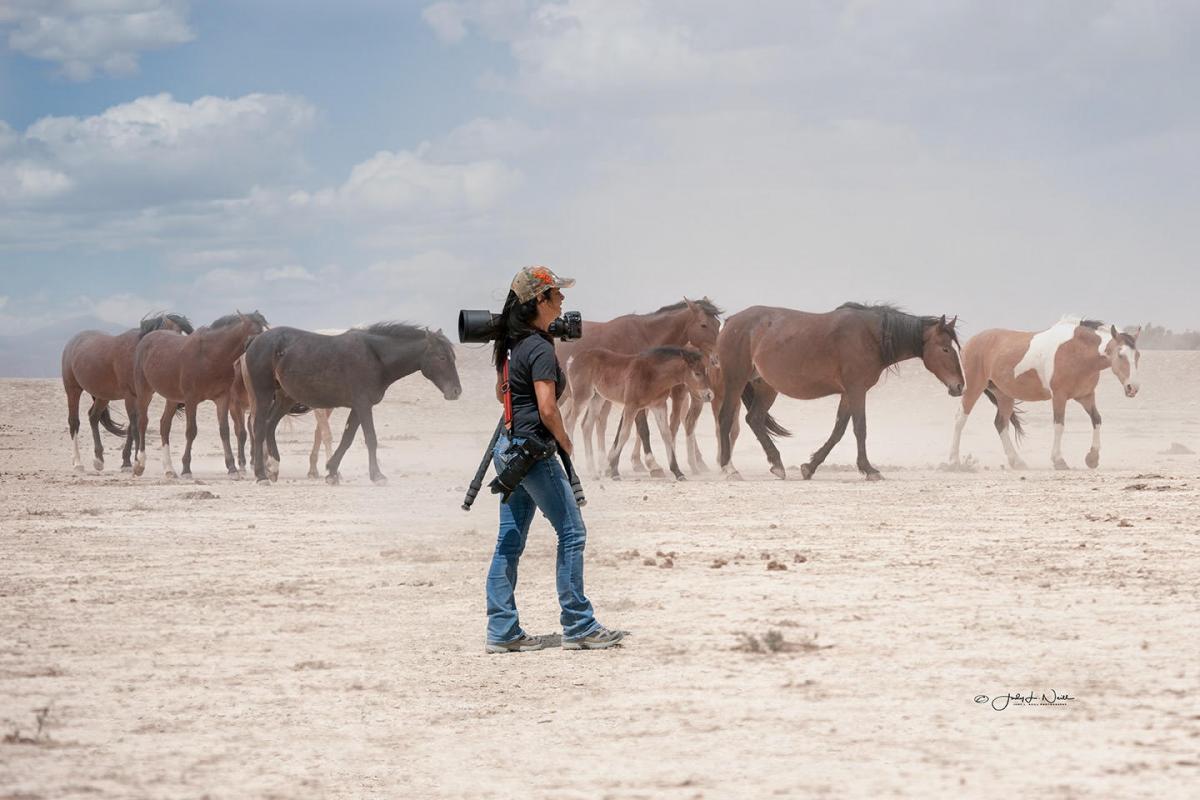
16. Try Your Hand at Photographing Wild Horses
If you are interested in wild horses photography, you need to google the places, where you can find them. As far as I know, pockets of free-roaming horses inhabit western US states like Wyoming, as well as Colorado and Arizona.
You can also go to Maryland and Virginia to take your chances of shooting jaw-dropping photos of powerful and graceful mustangs.
Once you’ve decided on the location with public access, use the map to mark water bodies, as horses come there for a rest and quench the thirst. Since you won’t be able to come close to the herd, you need to use a telephoto lens.
Revise the horse photography tips concerning shutter speed and aperture given above. Watch the horses for some time and take images when there is a bit of space between herd members, so they won’t blend into one spot. Images of mares and foals or two stallions interacting look truly mesmerizing.
- Learn some nature photography tips.
17. Shoot Ears Up

Try to capture a moment when an animal has its ears up, as such images look lively and not-posed. Besides, this indicates that a horse is happy and watchful. Most horse owners won’t like a photo in which an animal is depicted with its ears down.
When the ears are directed forward, the composition looks more engaging and a horse seems to be confident and comfortable with things happening around.
To “pose” the horse’s ears as you need, you can try specific sounds from a mobile photo, clicks or snacks. Actually, such tricks make photography with horses an enjoyable activity.
18. Experiment with Outfit

Encourage the rider to be creative with his/her outfit. You can start by taking several shots in the full show attire and then change it with more casual clothes.
Brighter colors mean livelier horse portrait photography results with the main accent on the person and the horse near him/her. Anyway, the animal may feel confused on ever frightened because of a riot of colors, so a horse owner should wear the clothes several days before the shooting, so that horse can get accustomed to it.
19. Capture the Quiet Moments

Talk to the horse owner about some private moments he/she has with the horse and is willing to demonstrate in pictures. This can be their everyday rituals like grooming, feeding, petting, etc. Such moments are very meaningful, though, don’t often require a word.
20. Forget about a Flash

Even if there isn’t enough light and turning on a flash can make a huge difference to the equine photography, don’t risk using it. Horses don’t like bright flash light and may get spooked, which will not only spoil the shooting and may lead to more serious consequences.
21. Mind Your Surrounding

Examine the place you are going to shoot at. There may be some interesting possibilities to take action shots, like getting on the arena rail and photographing from there, while a horse trotting around, but you need to treat safety issues, both yours and a horse’s, as a key priority.
Don’t frighten an animal. Try to show that you won’t hurt it and once a horse feels safe, it will give you many chances to take a fascinating photo.
22. Be Accurate and Calm

Horse photographers know that they must be almost invisible while taking images, so neither the horse, not a rider gets distracted. They interact and you capture these moments. Keep at a distance from the rail and move a little back when the horse galloping by.
Use the silent mode not to frighten the horse. I won’t repeat rules concerning a flash, as you have definitely understood that it has nothing to do with horse photoshoot.
23. Remember about Timing

Being hired to photograph a horse competition, you need to have a detailed plan of the most important moments. Thus, you will have your camera ready in advance and won’t miss really meaningful frames.
You should ask a rider or a trainer for advice, as they surely know what to pay attention to in order to show the beauty and power of a horse.
24. Respect Your Competitors

If there is a professional photographer, who has been hired to document the event, you shouldn’t compete with him/her. In this case, you can follow your rider and take images of the definite horse only.
This is a serious issue and it is specified in the horse show photography protocol. Besides, you can observe how your colleague works and even learn some interesting secrets on how to photograph horses from him/her.
Never step on the toes of the invited photographer and you’ll get extra points to your professional karma.
25. Learn the Intricacies of the Genre

You can find some horse photography books as well as video tutorials to learn how to define and capture a certain phase of a gallop or a trot. This may be challenging, so train your eye and reaction before you start offering your services.


